Object Rotation Scaling and Movement

Last updated on September 19th, 2018 at 10:23 am


When you select a figure, you can rescale it and change its dimensions. You can always change its height, length and width either through a property window, or in the small blue circles that surround the figure.

Rotate and scale

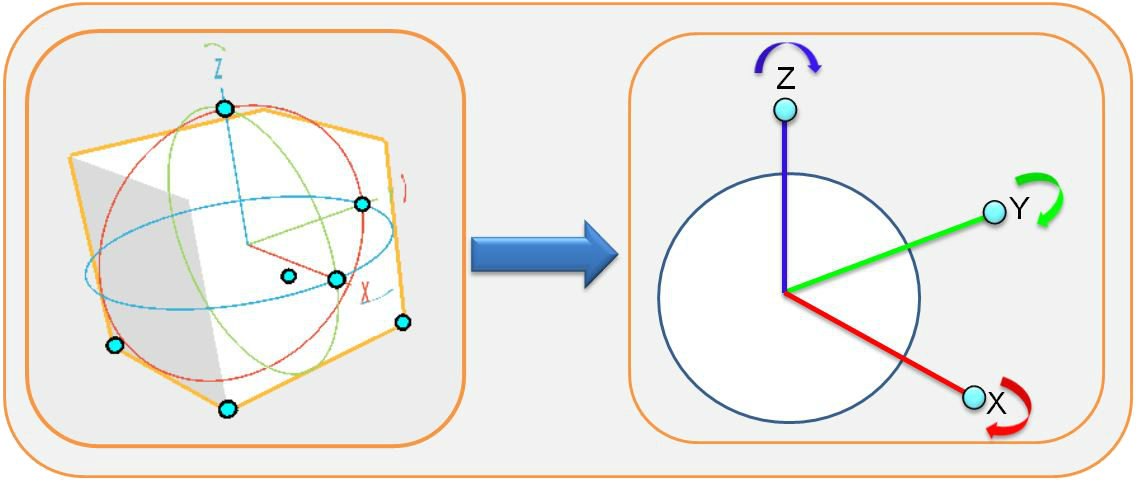
You can also move the object/s through the bounding box that is located in the center of the object. If you can see in the pictures above there are colored lines (Red Line indicates that Move Only in X-Axis, Green Line indicates that Move Only in Y-axis and Blue Line indicates that Move Only in Z-Axis) that was added to let the users move the object more easily. Rotation can be done through clicking the arrow that surrounds in the object.

View Tool

Last updated on September 19th, 2018 at 10:22 am


The View Tool in the bottom yellow box icon is use to spin the model left or right or to tilt the model up or down. You can also use the plus and minus icons to zoom in and out the work space. This function is added to have a better viewing in the object.

View tool

If you have a scroll wheel mouse, you can rely on your mouse buttons, which is even more convenient. Press and hold the right mouse button and drag the mouse around – this is for spinning and tilting the model. Scrolling the mouse wheel up and down lets you zoom. Try out these moves with your mouse -once you get used to using these buttons, you’ll never need to click those navigation buttons again!

You can also change the visibility status of the grid by turning On/Off Grid. Just click the square under the Home Icon and the work plane will be disabled, clicking it once again and the work plane will be visible again.

Properties Mockup

Last updated on September 19th, 2018 at 10:21 am


Properties Mockup displays when you have selected object in the workplane. It summarizes the dimension, position and color of the selected object.
Properties
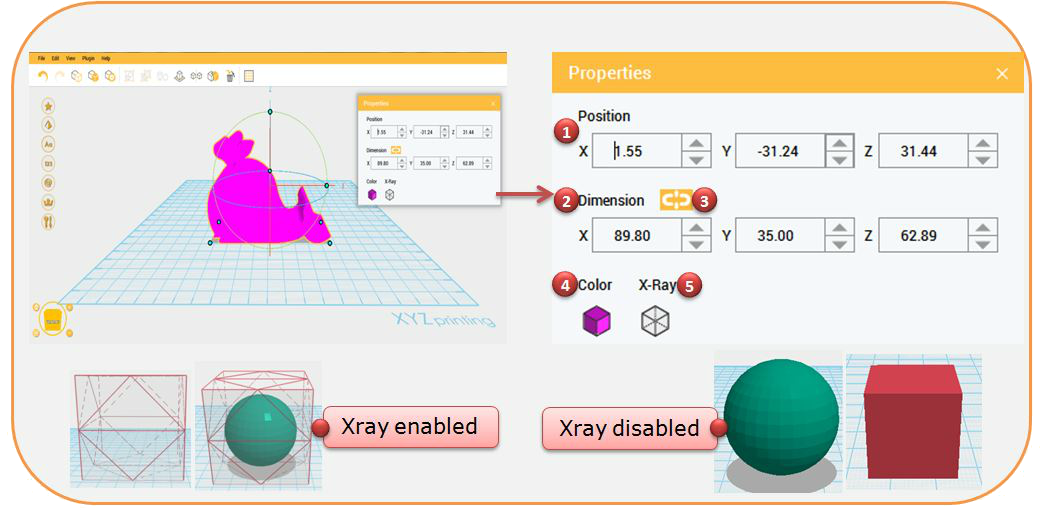
1. Position –this will help you to adjust the location of the selected object. You can move it on X, Y or even the Z position.

2. Dimension – this function can be use you to adjust the size of X, Y and Z axis of the selected object.

3.  Lock   the function when you want to resize the X, Y and Z uniformly.

4. Color – if you want to change the color of your object, simply click on color and choose your desired color.

5. X-Ray –  this function can use this to have a better glance on your object inside. This function is design in order to view the object in transparent mode wherein it is visible and easy to design objects inside another object.

Model Bar

Last updated on September 19th, 2018 at 10:19 am


The Model Bar is located at the left corner of the window will surely help you how to start creating a project by putting an object on the plane as it is. You can choose in the model bar which object will be needed in your project, it can be Geometric Figures, Letters, Numbers, Symbols, Special and Tools.

Modelbar

Geometric Figures

This are sets of different shapes that will help you to create your design easily. It consists of Cube, Sphere, Roof, Pyramid, Half – pie, Cylinder, Cone, Half – sphere, Hexagonal prism, Paraboloid, Capsule, Dodecahedron, Icosahedron, Octahedron and Tetrahedron.

Geomteric Figure

Letters

This consists of uppercase and lowercase set of alphabet. It will be easier for you to customize your design!

letters 2 copy

Numbers

This are set of numerical figures that will help you to  customize your design as well.

num

Symbols

This are set of punctuation symbol.

Sym

Special

Different customized design can be found on Special symbols such as XYZprinting logo and different gear size for designing a car.

Special copy

Tools

Text Generator is the main tool to use in this function. You can choose different font style size depends on what you want.
TEXT

Quick Start

Last updated on September 19th, 2018 at 10:17 am


When XYZmaker launch, Log-in window will display. User can login easily their XYZprinting account by just following the procedure below.

Login 1

  • Keyin your registered email address and password on XYZprinting website. After inputting your account, click Login.

Login 2

  • After Login, Main Window will display and you can see you Personal Archive on the upper right corner of the window.

Login Successful