XYZmaker tutorial – Robot Hand part 1

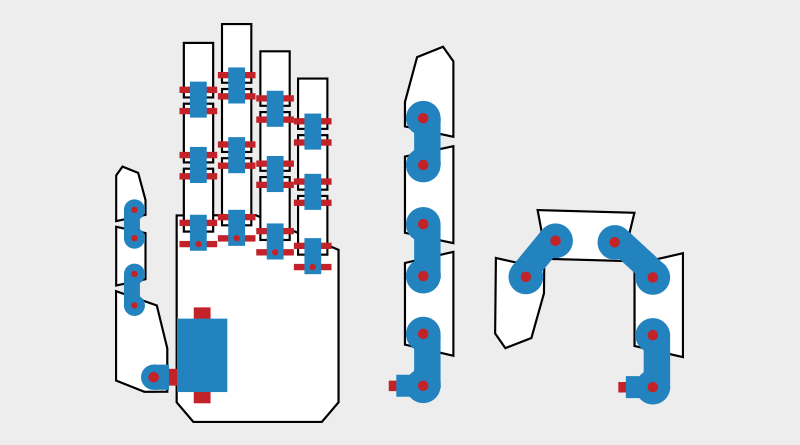
This tutorial uses XYZmaker to model basic 3D shapes, combine, and edit them – teaching you to create a functioning model of a robotic hand that is able to close and open. First collect some reference material and compare all the different types of robotic hands.   Next,  using paper or sketching software, plan all the parts that you need to make and their individual rotation joints. After creating this reference drawing, use a chain-like structure for the joints, and give the finger links a bigger range of mobility. The blue parts in the image above are the joints, and the red parts will act as shafts that hold the pieces together.   Create a cube and change its dimensions to X: 14,Y: 28,Z: 14 mm and position to X: 0,Y: 0,Z: 7. Call this part the Finger joint A.   Select Finger joint A and click Clone. Next, change the dimensions to X: 20,Y: 10,Z: 30 mm, and position to X: 0,Y: -18,Z:

Read more

XYZmaker tutorial – the Excavator part 1

This tutorial’s scope covers how to use XYZmaker to make an excavator, and use the modeling tools to create articulated parts. For example, after putting all the parts together you will have made an excavator that will be able to move its scoop and arm. Because XYZmaker is targeted towards beginner modelers, we can only use the modeling features to create a basic structure, adjust the proportions according to your preferences, to create a unique 3D model. The excavator individual part groups are a little complicated, because of this, the model has been divided into various parts. These are: body, track, Chassis, boom, digging arm, bucket and other blocks. Individually create the parts and save them, then lastly take all the parts and combine them together, to finish a complete excavator 3D model. After collecting all of the reference material , hand draw or use graphic software to draw the outline

Read more

XYZmaker tutorial – Airplane part 1

Go to the Geometric figures library and create a paraboloid. Rotate the part 270 ° along the X-axis, and in the Properties window change the dimensions to X: 40,Y: 120,Z: 40 mm and position to X: 0,Y: 0,Z: 20. This part will be called the plane body. Tip: For instructions on rotating objects refer to the beginner tutorials.   Make a Capsule from the Geometric figures library, and rotate it 90° along the X-axis. In the Properties window change its dimensions to X: 40,Y: 30,Z: 40 mm and position to X: 0,Y: -70,Z: 20. This will be called the engine.   Create a Cylinder and rotate it 90° along the X-axis. In the Properties window change the dimensions to X: 30,Y: 20,Z: 30 mm and adjust the position to X: 0,Y: -80,Z: 20. This will be called the cutting part.   Select the engine and click on Hole, then click on the cutting part and click

Read more

XYZmaker tutorial – Pen holder part 1

On the left hand side you will find the model bar; in this menu, locate and click on the pyramid icon labeled Geometric figures library(1), then double click on the cube icon(2). A cube that is selected will drop into the center of the grid. Tip: If you just click on the icon once, you can drag the 3D object and place it in the grid manually.   In the Properties window change the cube’s dimensions to X: 120,Y: 60,Z: 100 mm.   Because the cube’s height increased, the bottom half is now obscured by the modeling grid. Press the Land button to stick the base of the cube to the modeling grid.   Select the cube and press the Clone button, this will create a duplicate cube in the same position.   In the Properties window of the duplicate cube, change its dimensions to X: 110,Y: 50,Z: 100 mm and position to X: 0,Y: 0,Z: 60.

Read more

XYZmaker tutorial – Fish bone card holder part 1

In the center of the work plane, create a cube and choose a color in the properties window. From the properties window set the dimensions to X: 105, Y: 5, Z: 20 mm. This part will be called backbone.   Clone backbone (1&2) using the clone tool, then use the mouse button to click and hold the blue Z axis line(3). As shown, drag the model up slightly (4) along this Z axis line.   Take the cloned backbone, and in the properties window, change its dimensions to X: 115,Y: 15,Z: 20 mm, and color to black (4&5). Call this the cutting part. Tip: You can also use the controller orb to freely adjust the part’s X and Y dimensions, you just need to make the cloned part slightly larger than the origin.   Select cutting part (1) and click on X-Ray in the Properties window (2). Now you can clearly see where  the backbone and cutting

Read more

XYZmaker tutorial – the Brick part 1

On the left hand side you will find the model bar; in this menu, locate and click the on the Geometric figures library(1), then double click on the cube icon(2). A cube should drop into the center of the plane. Tip: If you just click on the icon once, you can drag the 3D object and place it in the plane manually.   The newly placed cube will be outlined in orange, indicating it is currently selected, and a properties window will be displayed on the righthand side of the screen. Click on this new properties window and enter the following dimensions: X: 45mm,Y: 45mm, and Z: 17mm, to dimension the “Base”. Tip: If you accidentally click on the plane and deselect the “base”, you can reselect the object by using the left mouse button.   Select the”base” object (1) and in the toolbar, click Clone (2) and an identical replica of the

Read more