Toolbar

Last updated on September 19th, 2018 at 10:36 am

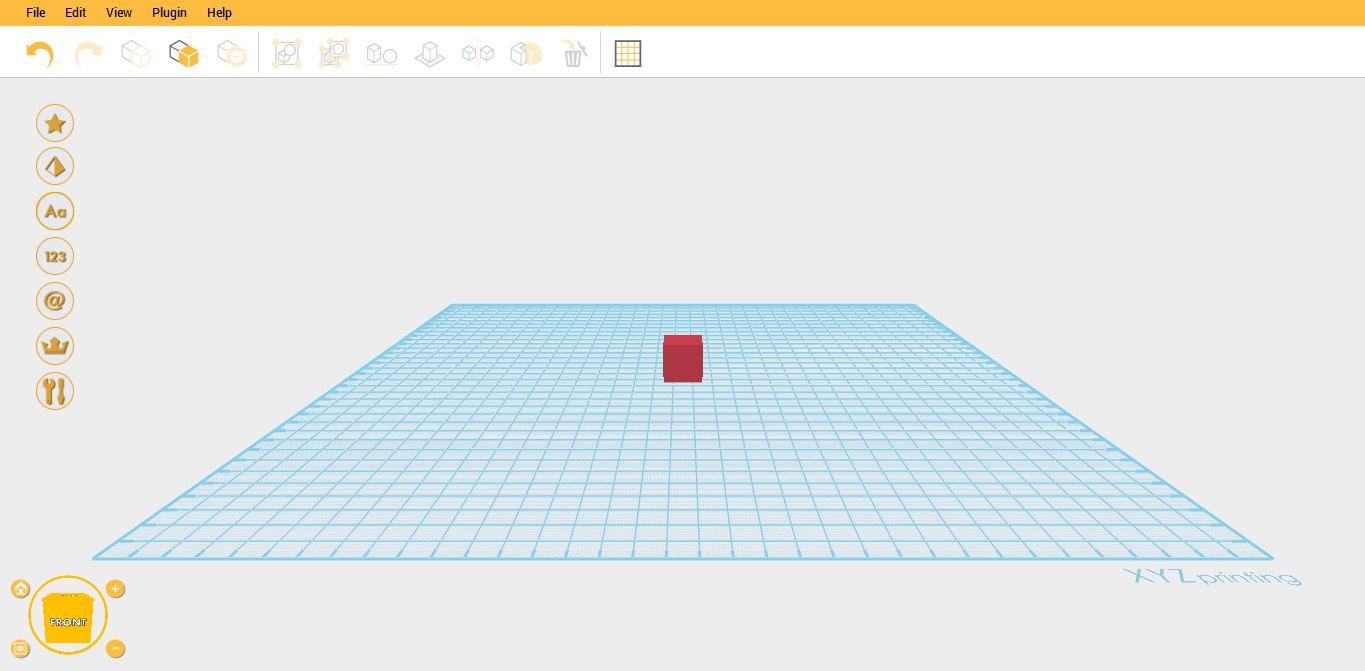
Tool Bar is located below the Menu Bar and has different commands to help you with your project. These are the buttons that will serve as your shortcuts to much easier functions that you will need.

Toolbar

Undo and Redo

To reverse your last Undo, press CTRL+Y or click the Redo button. You can reverse more than one action that has been undone. Redo command will enabled only after using the Undo function.

1. Import any object. In example is Cube.
1

2.Import another object, example is Sphere.

2

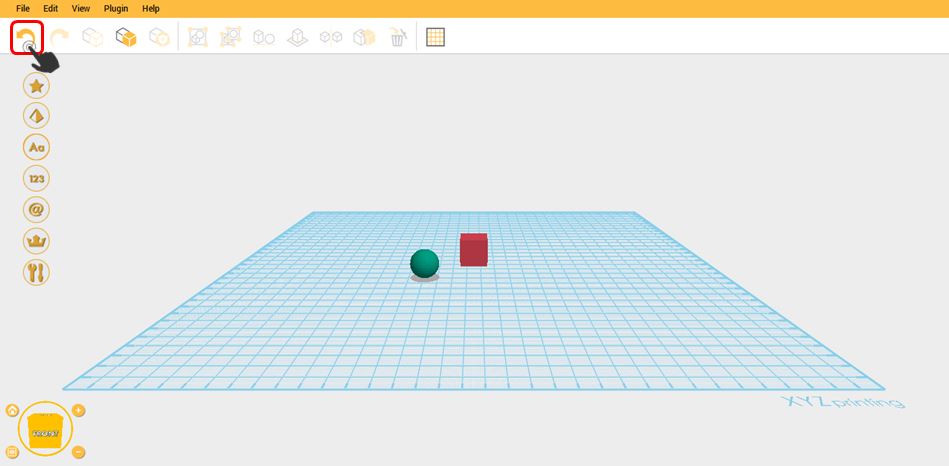
3.Click Undo.

3

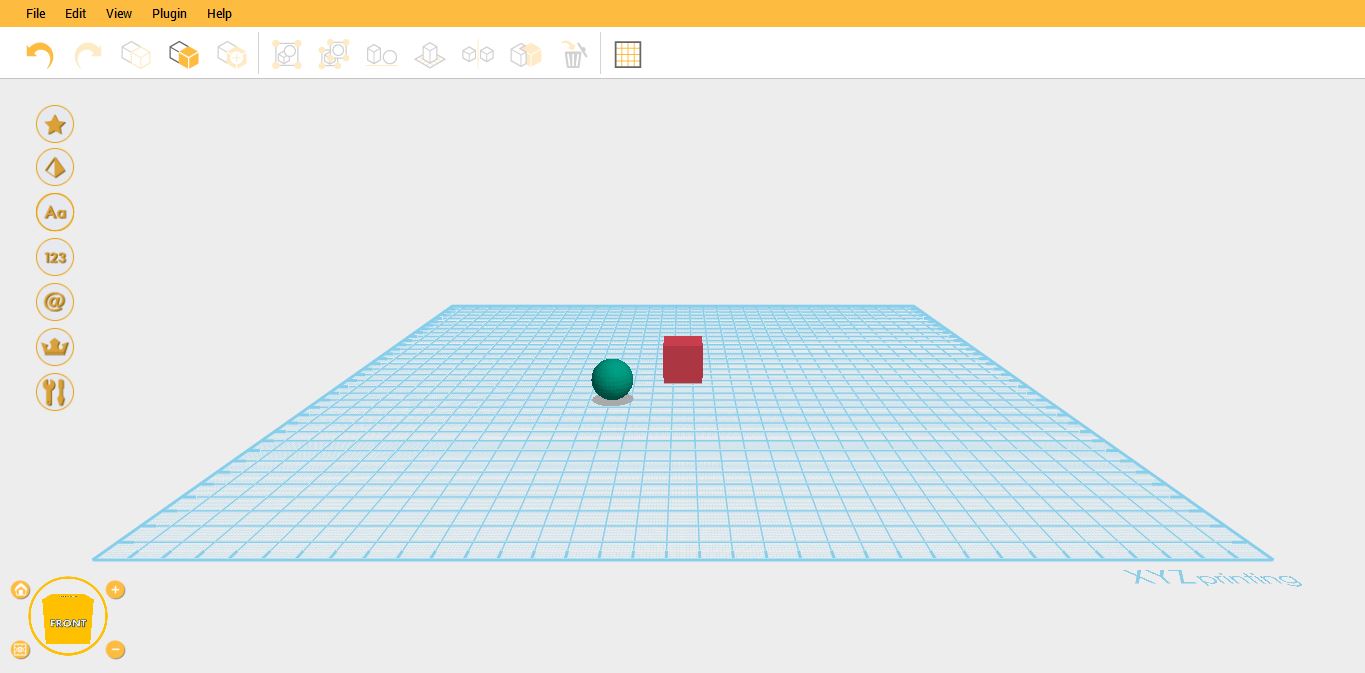
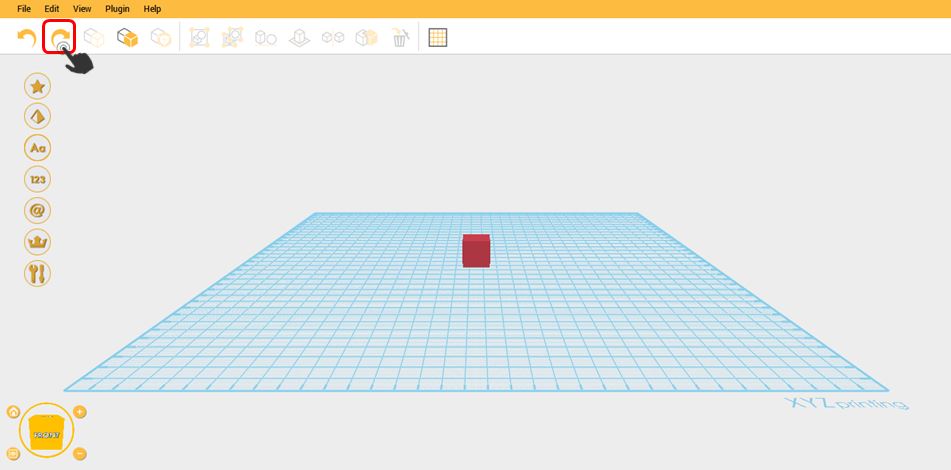
4. It  will revert on the first state. Then click Redo.
5

5.It will return on the last state.

6

Copy and Paste

Copy and Paste function will allow you to copy one or more object to an alternate location. Just click the Copy icon then Paste in the Toolbar.

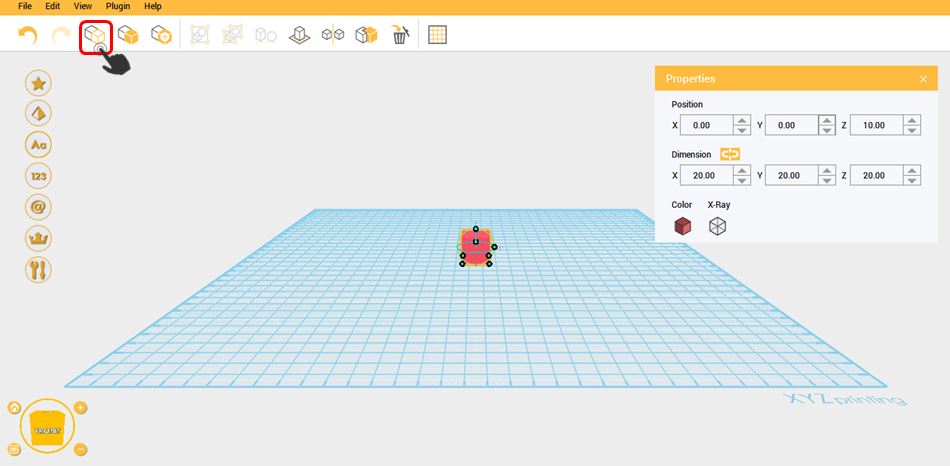
1.Import any object, then make sure it is selected. Click the copy icon on the Toolbar.9
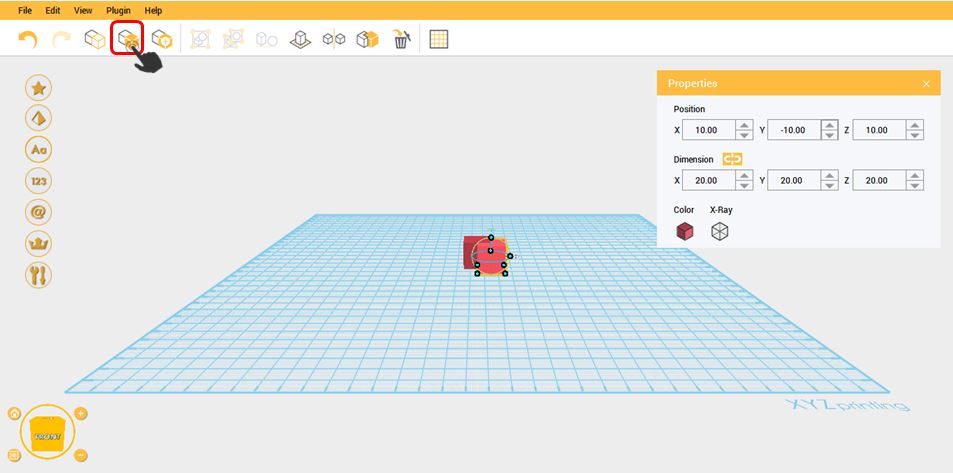
2.After clicking the copy icon, click Paste to duplicate the object.
8

Clone

Clone function will just duplicate the selected object and paste it in original position. You just need to move the object to see the clone done.

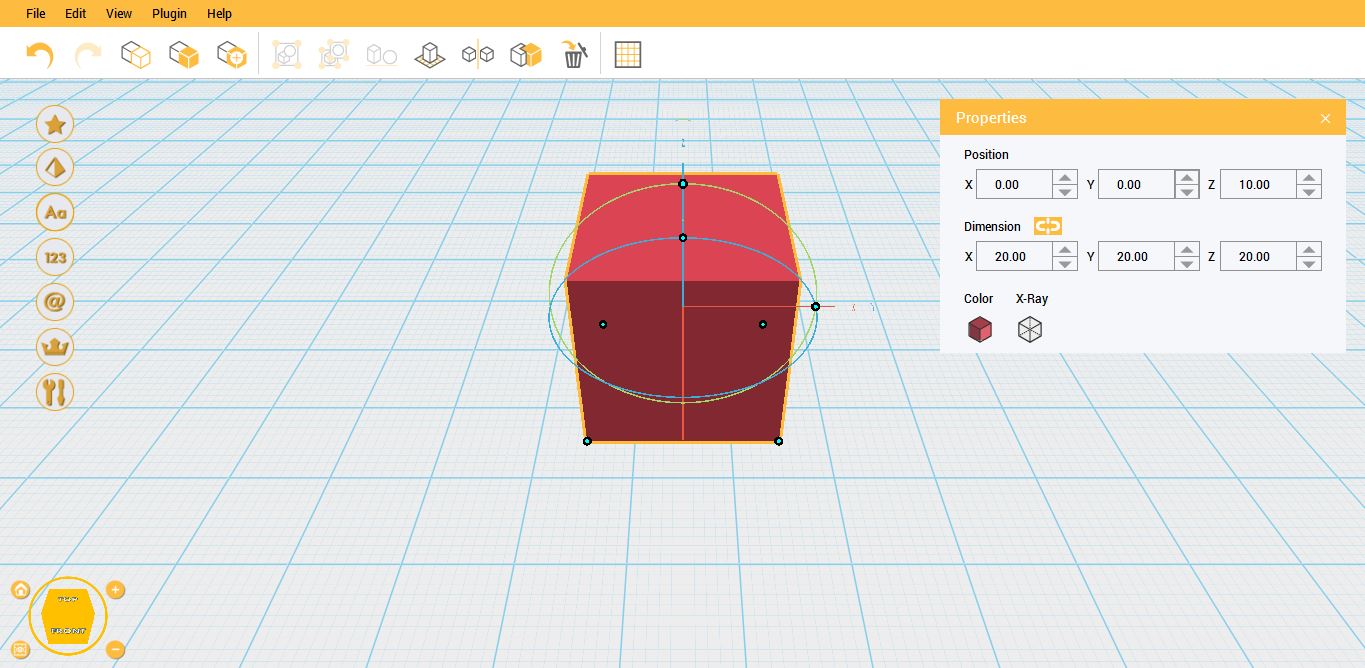
1. Import or select any object on the workplane then click Clone icon on the Toolbar.10
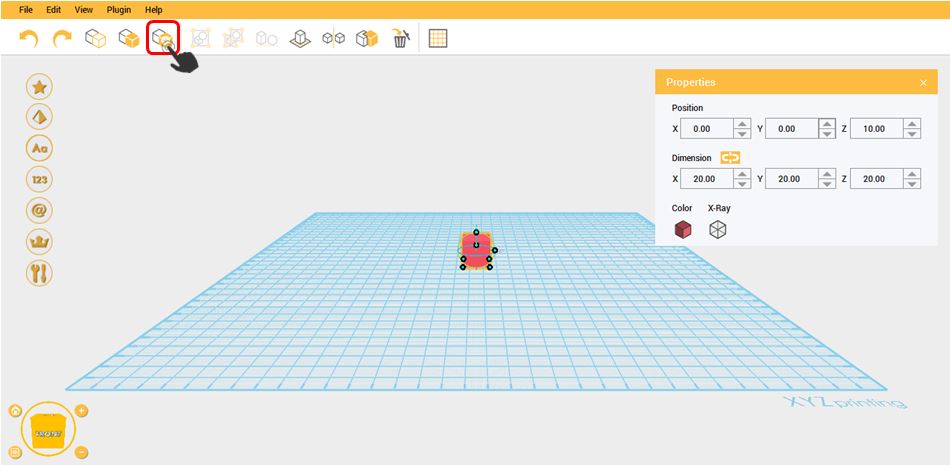
2.Object is already pasted on its original position. 
11

Group and Ungroup

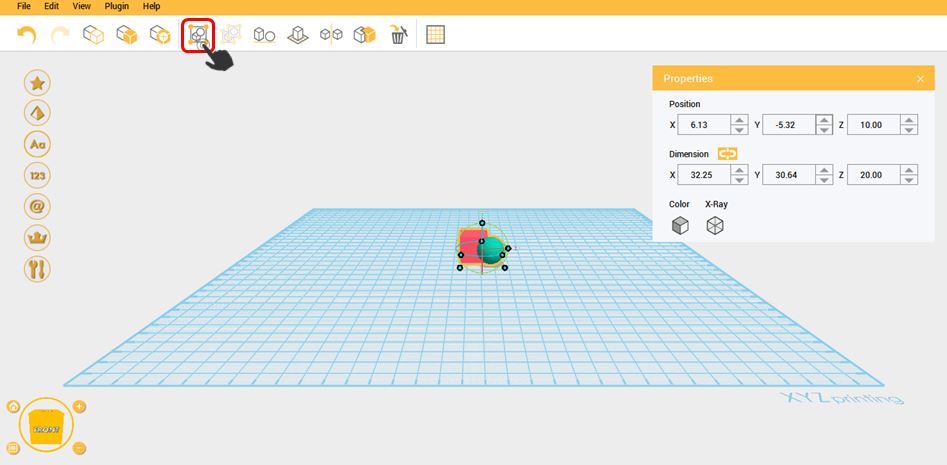
The Group Function instructs XYZmaker to combine two or more objects into a single object and can move as a single object. To group the objects, you must select two (2) or more objects using the Ctrl key then click the Group button or Ctrl + G.

1.Import 2 or more object on the workplane.14
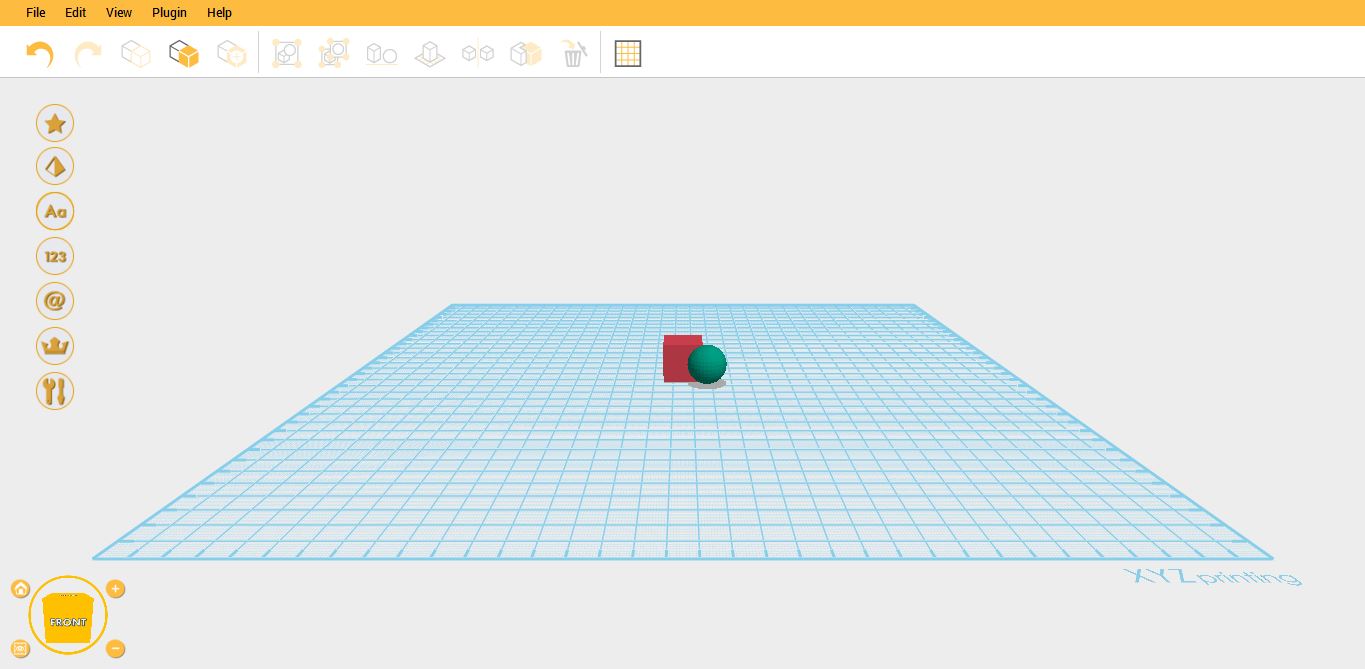
2.Click Ctrl+A to select all the object then click Group. It is now grouped into one.
13

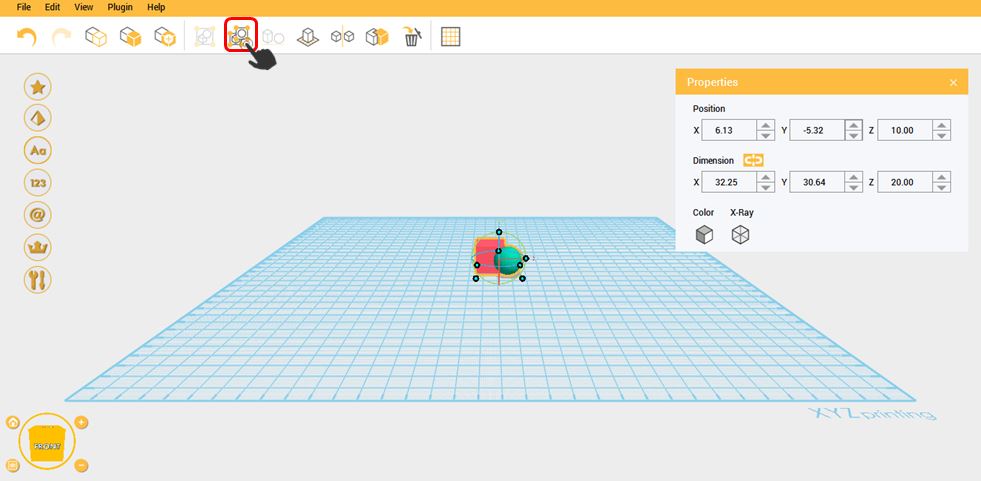
3. To ungroup the grouped object, select the grouped object then click Ungroup icon.
15

Align

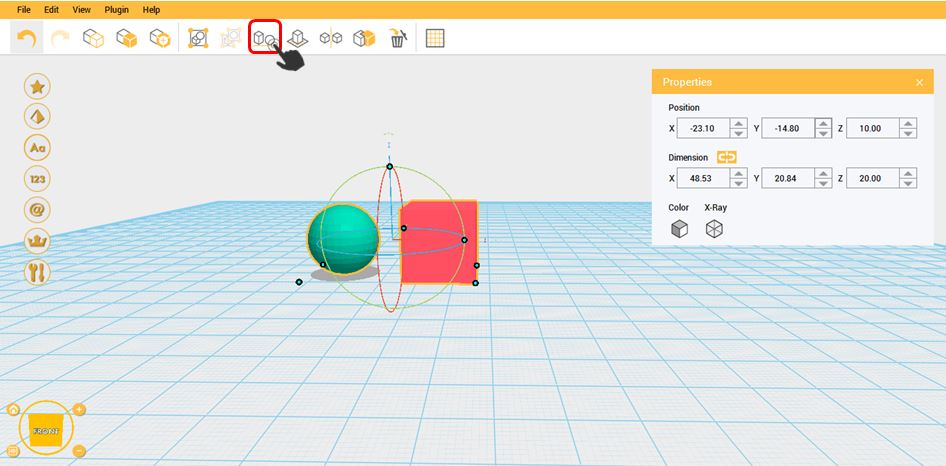
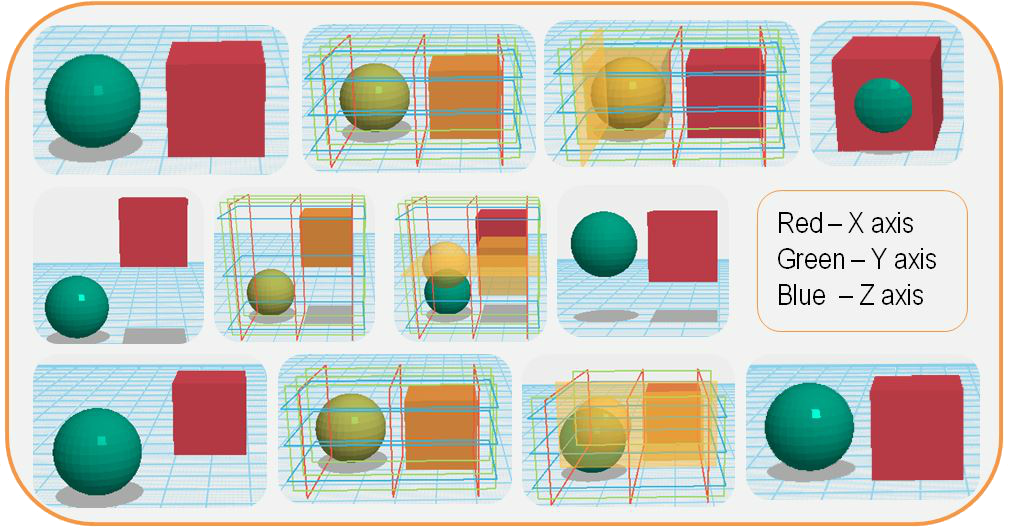
If you ever want to move and align objects in one command that is exactly what the Align command does. Select the objects that you want to align, and click the Align button. Move the mouse to point it where the position of alignment you want. The lines provided will guide you. Red line indicates Alignment in X Axis; Green Line indicates Y Axis and Blue Line are for Z Axis Alignment.

1.Select the objects that you want to align the position. After selecting, click Align function on the Toolbar.11
2.You can select whether you want to align the object on X, Y or Z axis position.
Align

Land

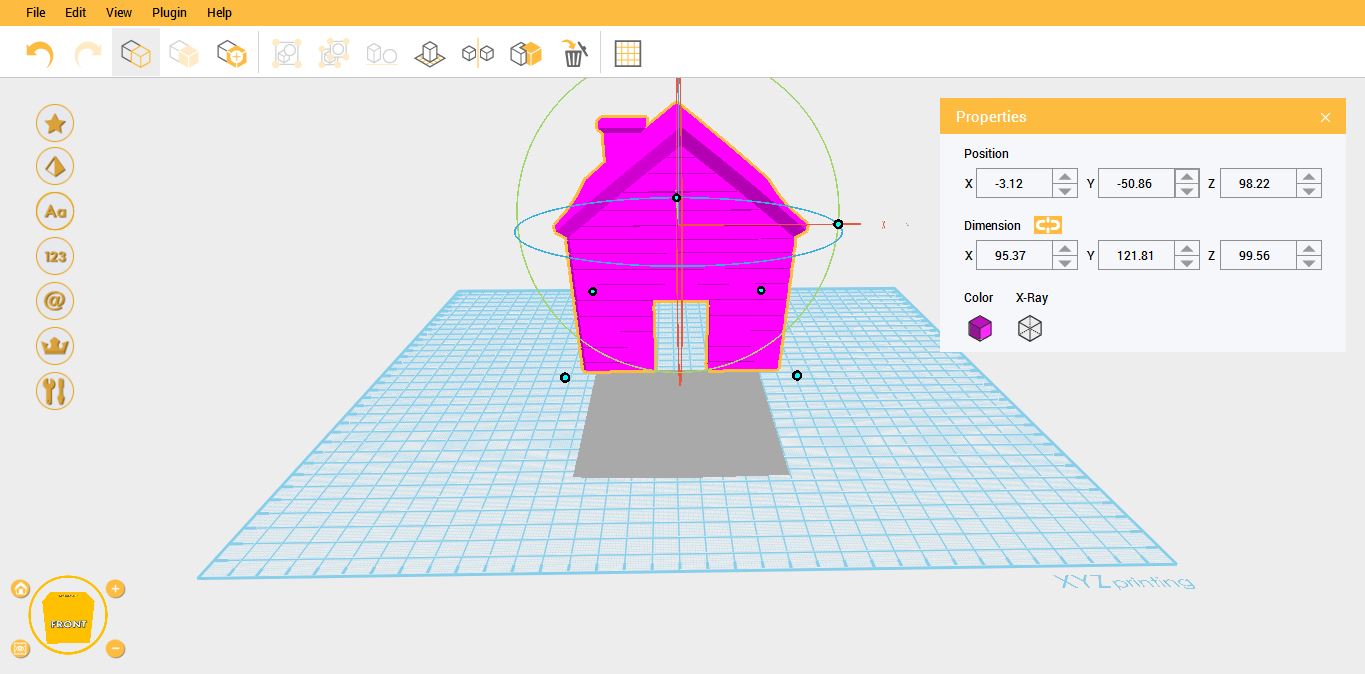
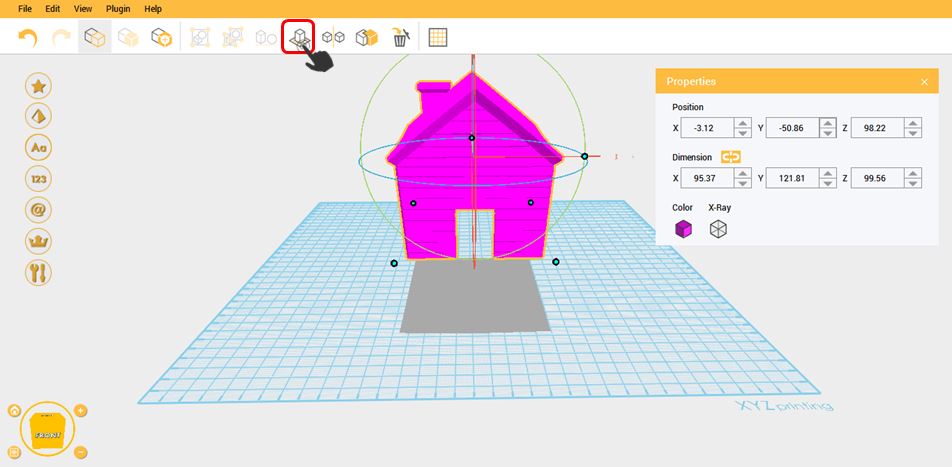
This function is used if your selected object (z axis) is not landed on the workplane. The z axis of the object will revert to 0.  Select the object and click the Land button on the tool bar and it will landed on the workplane.

1.Select the object that you want to land on the workplane.16
2.After selecting the object, click Land.
17

3.Object is already landed.

18

Mirror

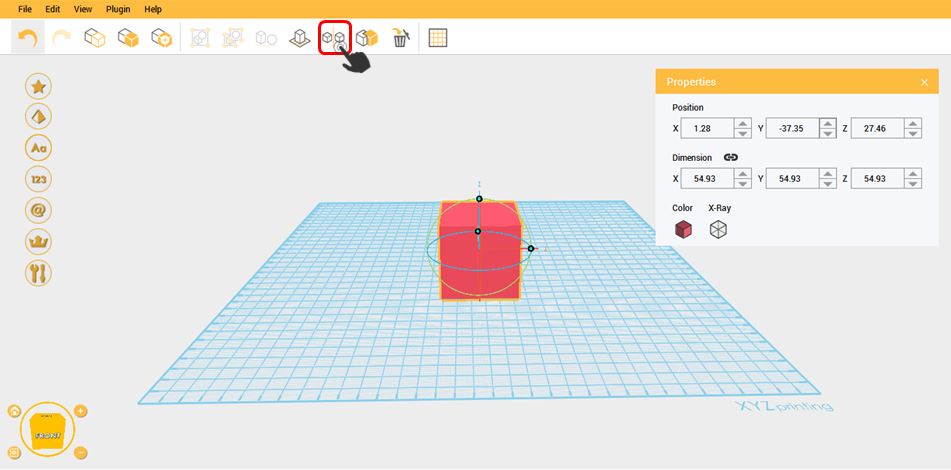
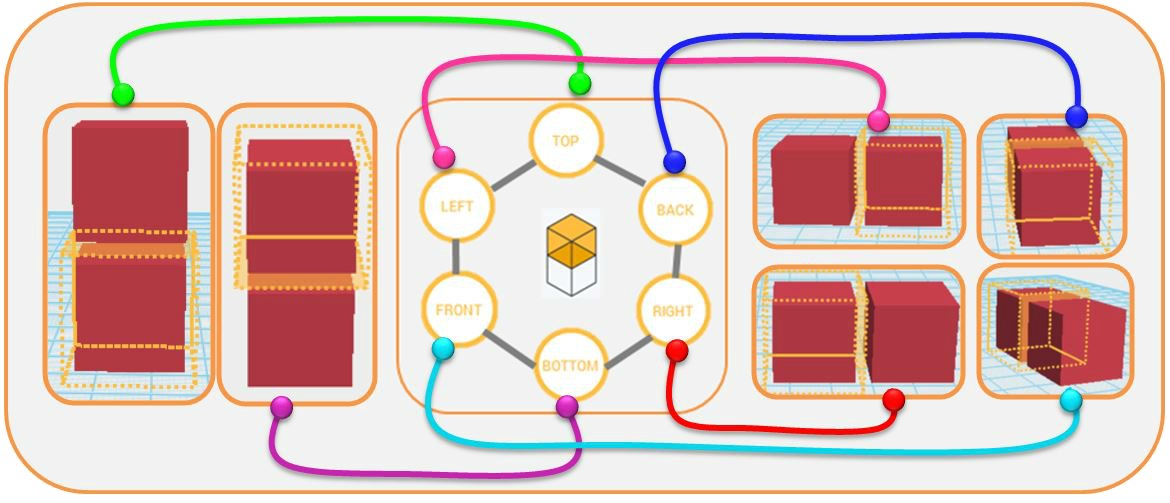
This function creates a duplicate of your desired object, a reflection of your object in a reversed position. Select the object that you want to duplicate and click the Mirror button in the tool bar. A bounding box will appear for the options of the mirror: Top, Left, Back, Front, Bottom and Right Position.

1. Import or select the object that you want to mirror. After selecting, click the mirror icon.20
2.You can choose whether you want to duplicate your object on Top, Back, Bottom, Left, Front and Right.
Mirror

Hole

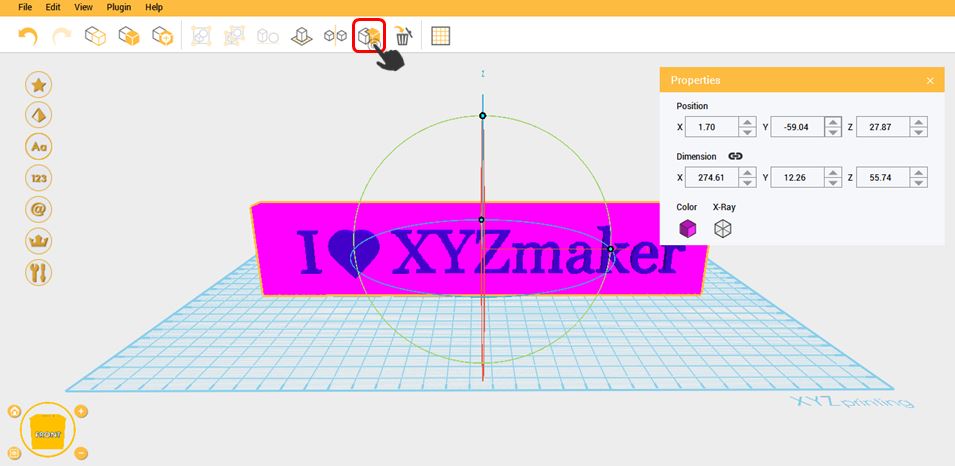
Hole Function will help you to subtract one object to another. It can be use in single or grouped objects. Select the base that you wanted to holed, click H, and then click the object that you want to remove in the base and click H also. Or you can click the Hole button in the Tool Bar.

1.In order to use the Hole function, you should have 2 objects on the workplane.1

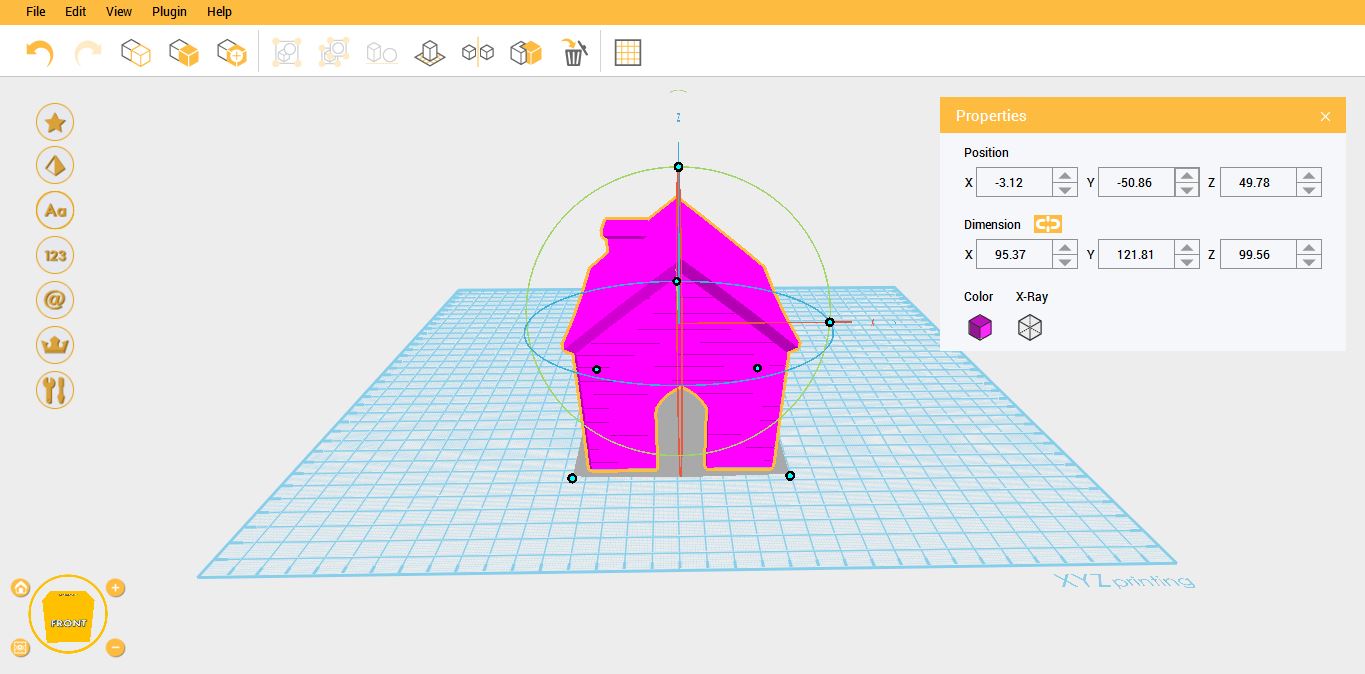
2.Select the object that you want to retain then click Hole. (Ex: Purple Object)
3

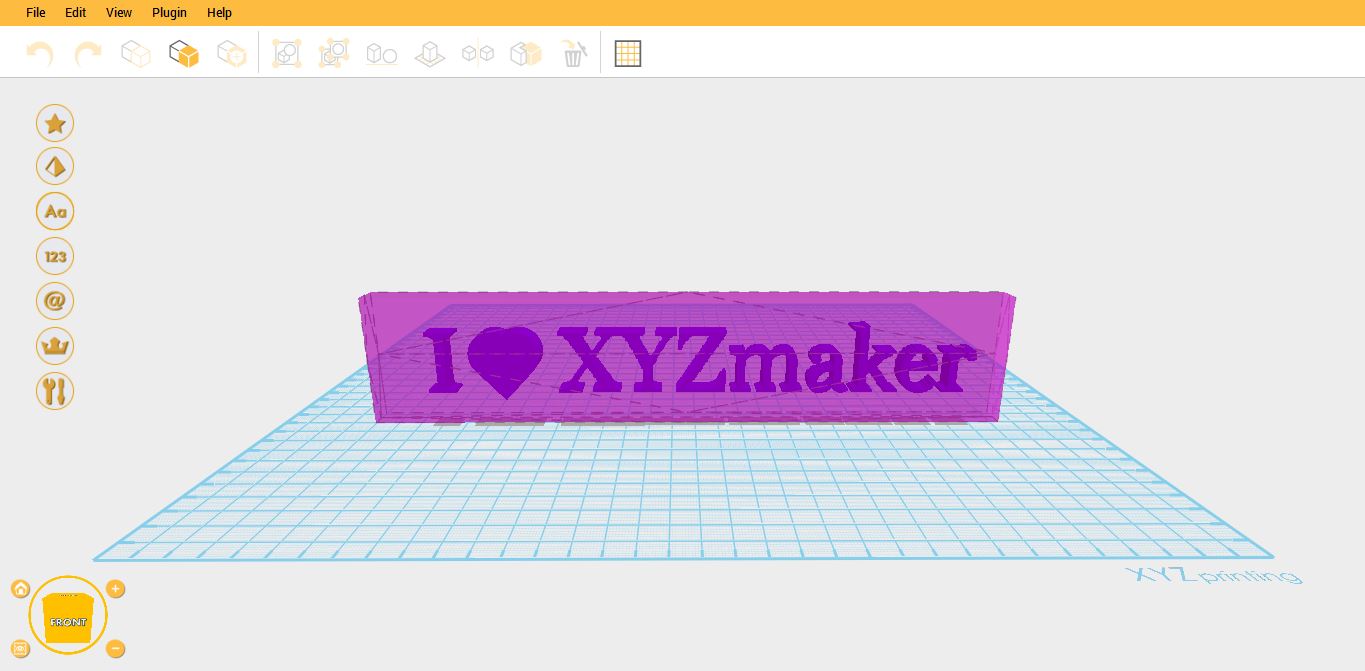
3.Purple object is already in Hole state.
4

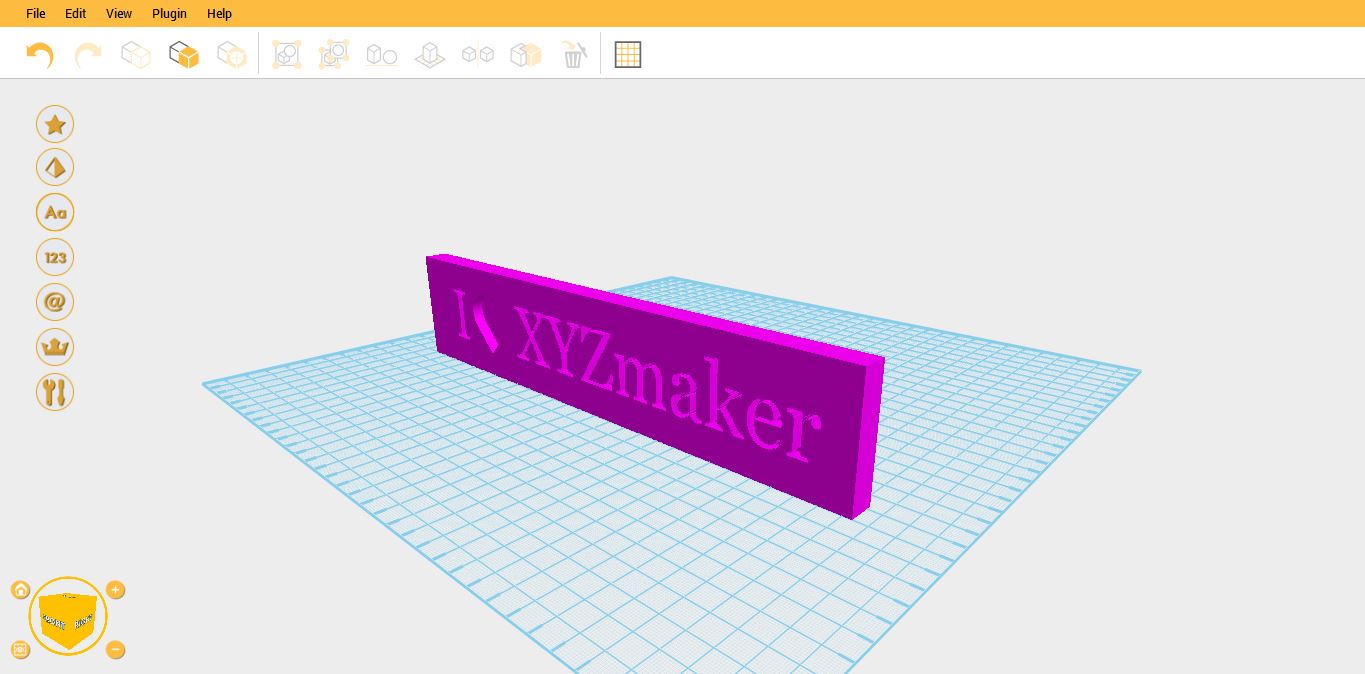
4.After selecting the object that you want to retain, select the object that you want to subtract then click Hole.  (Ex. I <3 XYZmaker)
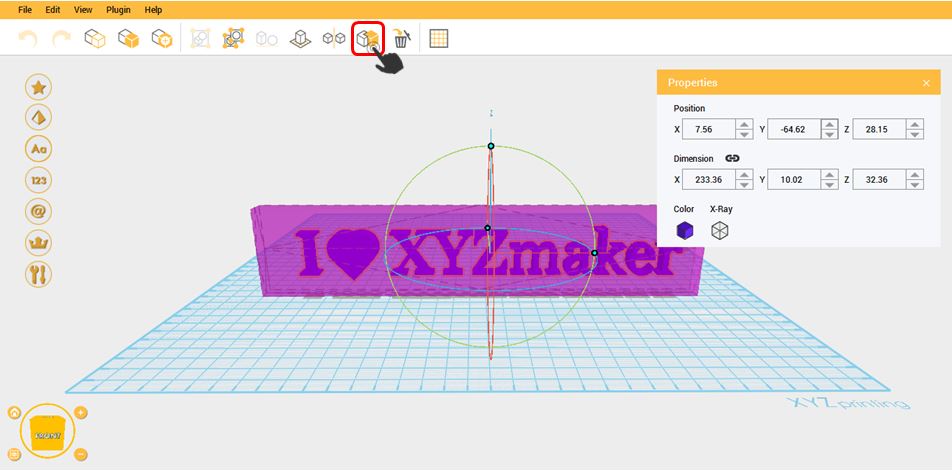
6

5. Holing object is done!

7

Delete

This function will allow you to remove the object you imported in the workplane.

1.Select the object that you want to delete. Then click the delete icon.
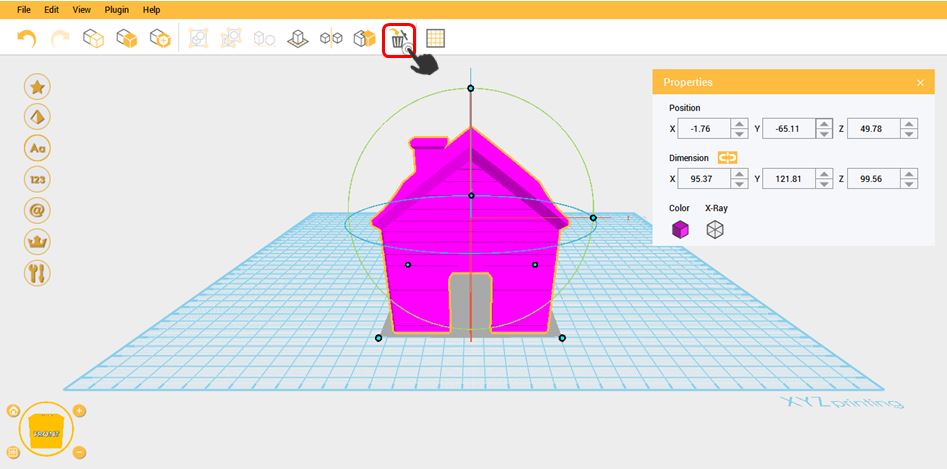
9

2.Object is already deleted on the workplane.
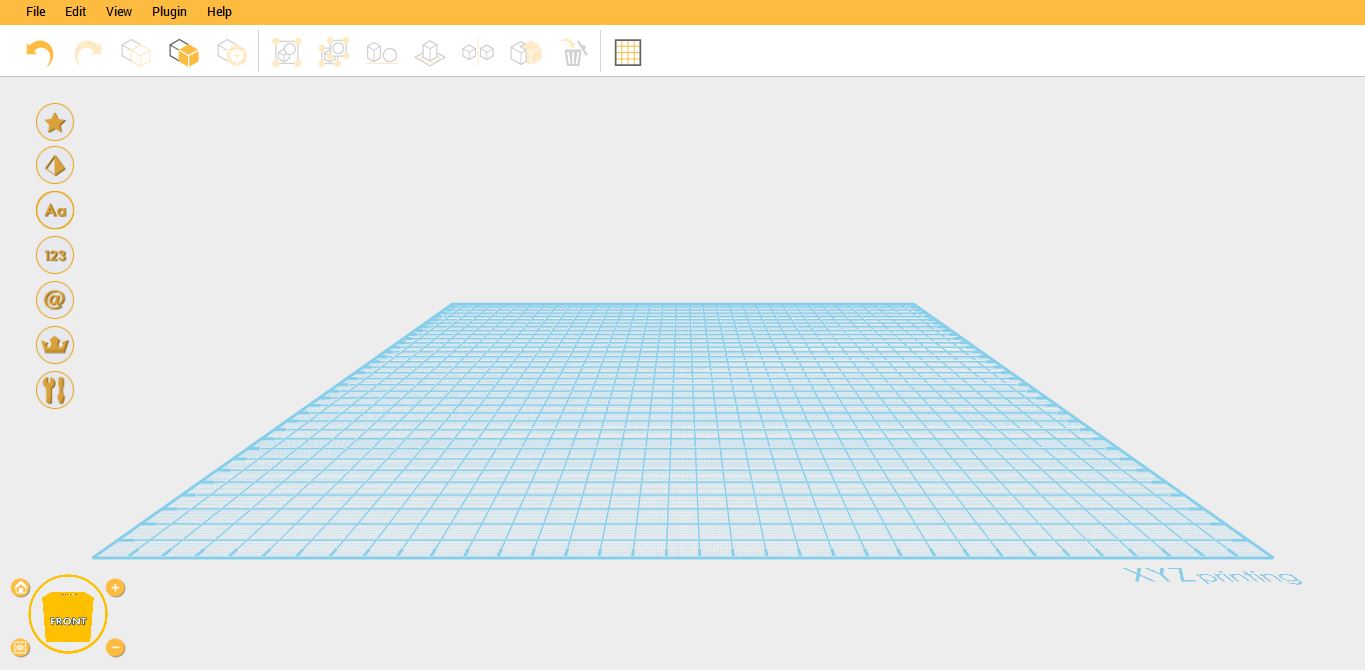
10

Grid

This function will allow you to change the grid size of the workplane; from millimeter which is the default size of the grid you can change it into centimeter or inches. The unit size of your object will be based on your selected grid.
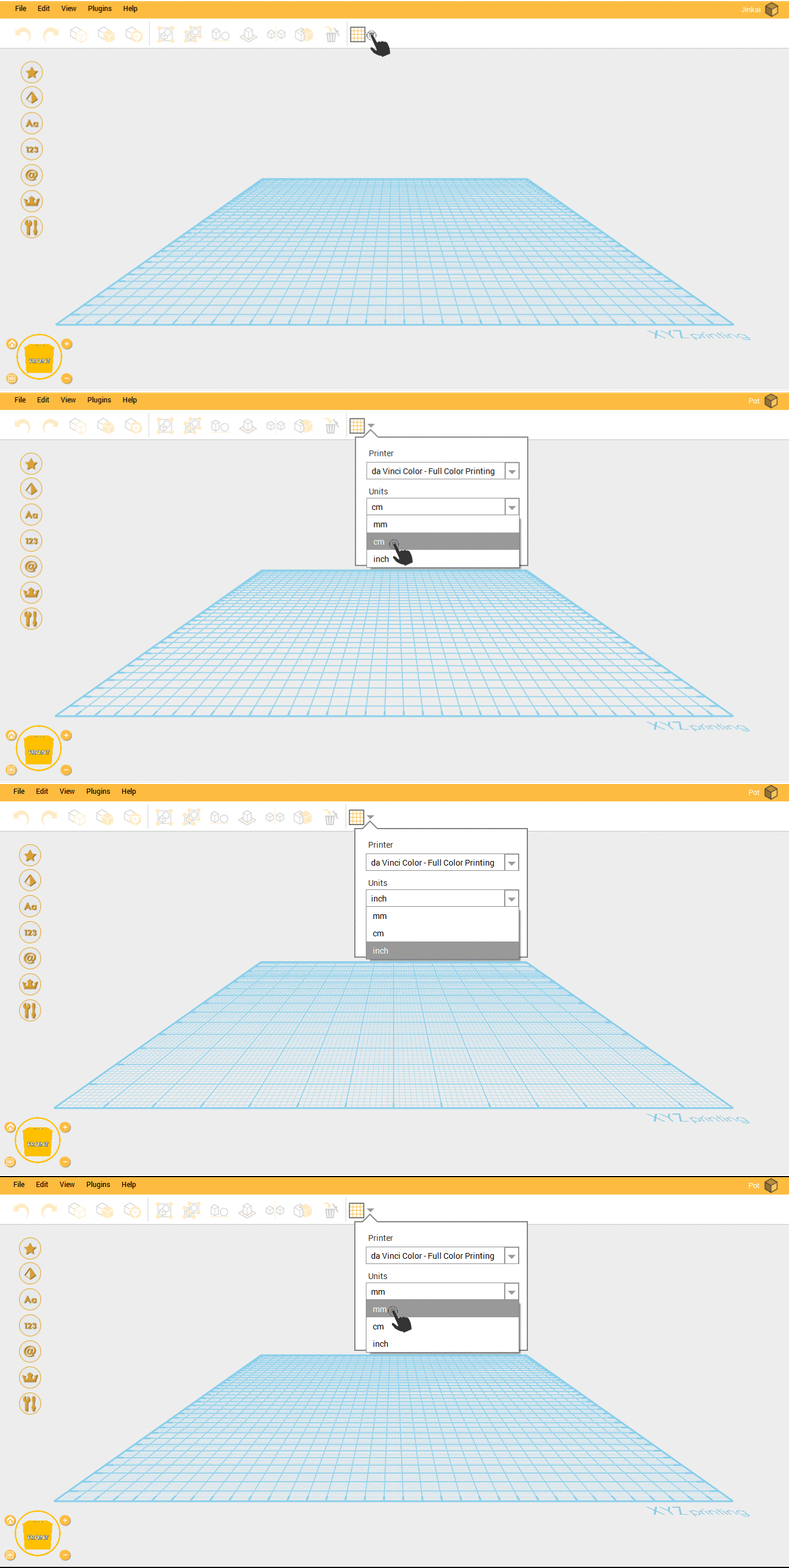
Grid


Under Grid function you can also see the actual preview of your model inside your printer in Printer Plugin Window. By the use of this function you can avoid designing of large objects that are not printable on your printer or make your objects Out of Boundary.
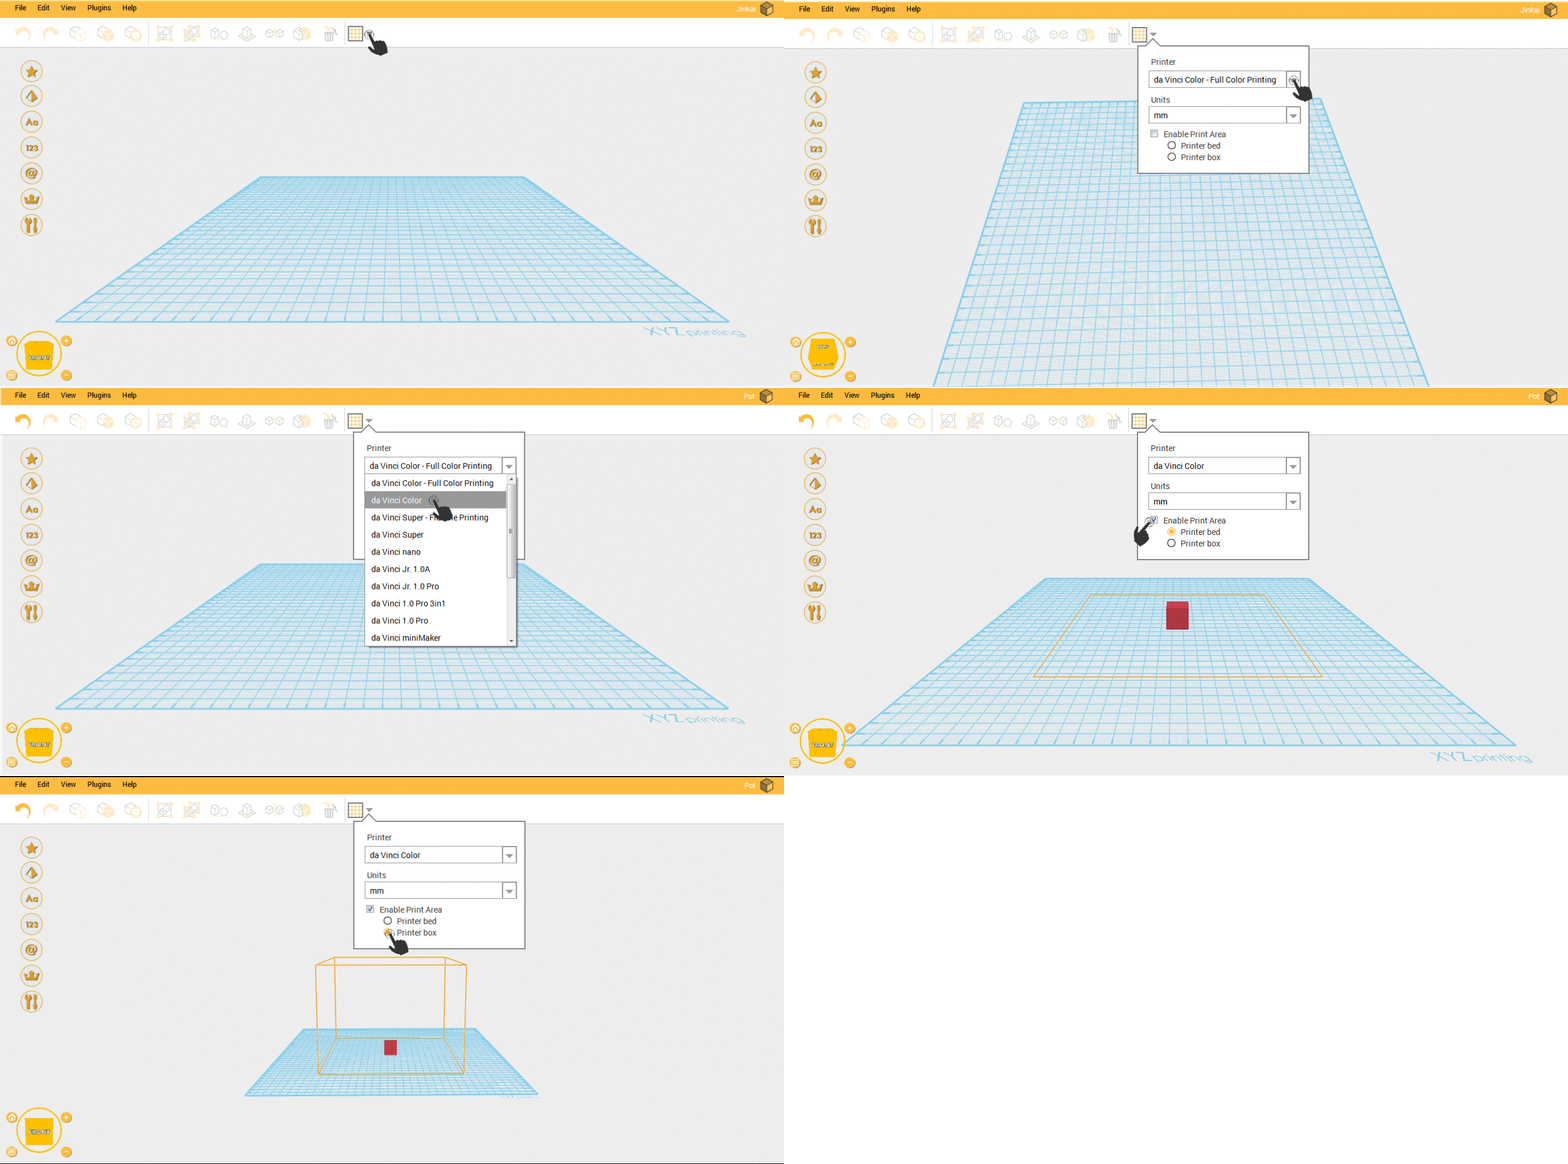
Print bed and box final


File

Last updated on September 19th, 2018 at 10:46 am

File consists of New File, Open, Open Recent, Save, Save As and Add Item.

New File

This function will just reset the workplane. If there is an object in the workplane and you want to create a new one, just simply go to File then click New File.

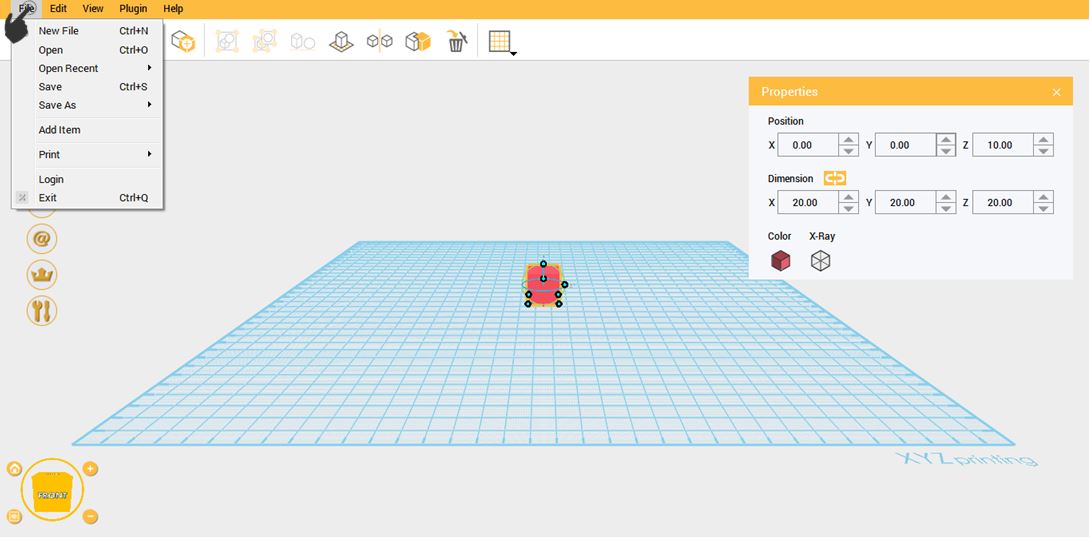
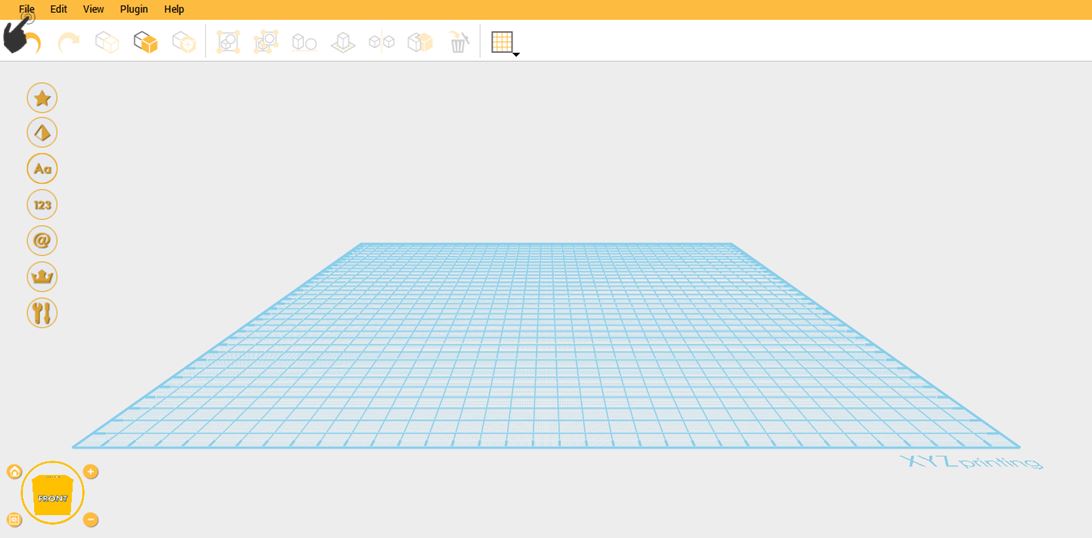
1.Click on File

1.1.1

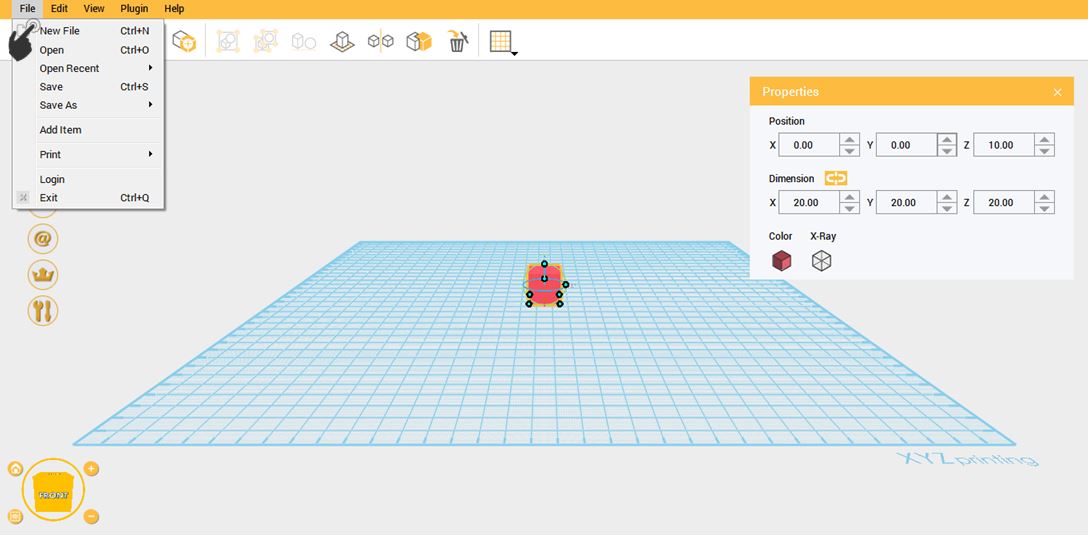
2. Click on New File

2.1.1

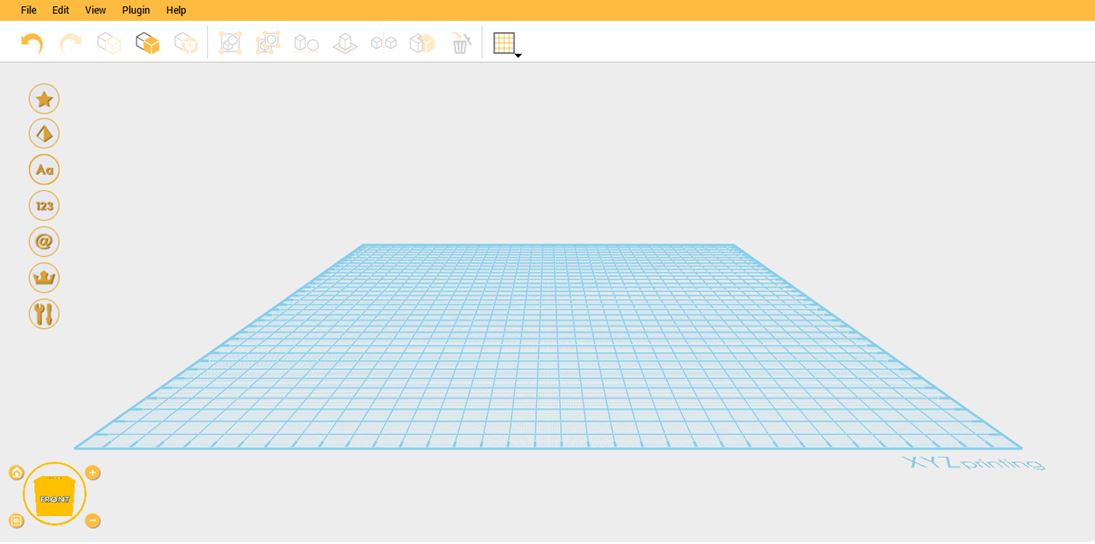
3. Workplane is already reset.

reset na

Open

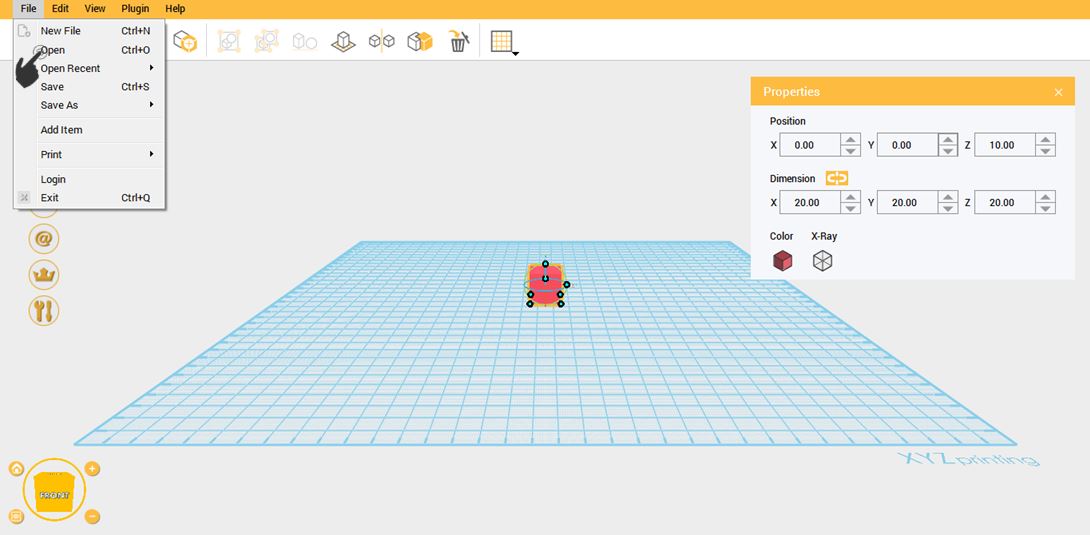
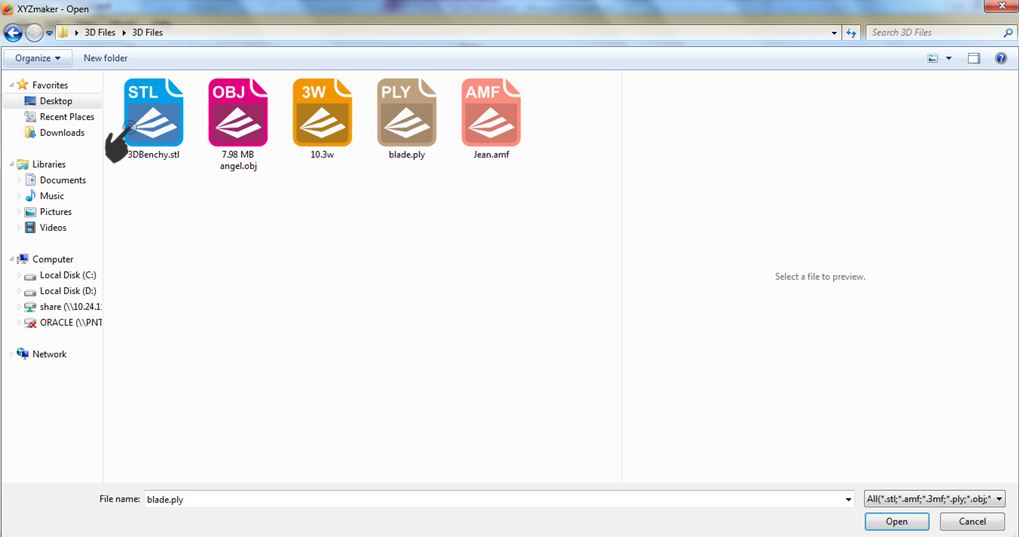
To open a certain file just click File then Open. File type supported to open by XYZmaker are STL, AMF, PLY, OBJ, 3MF and 3w.

1.Click File

1

2. Select Open

2

3.Select the file that you want to open. It can be STL, OBJ, 3W, PLY or AMF.

3

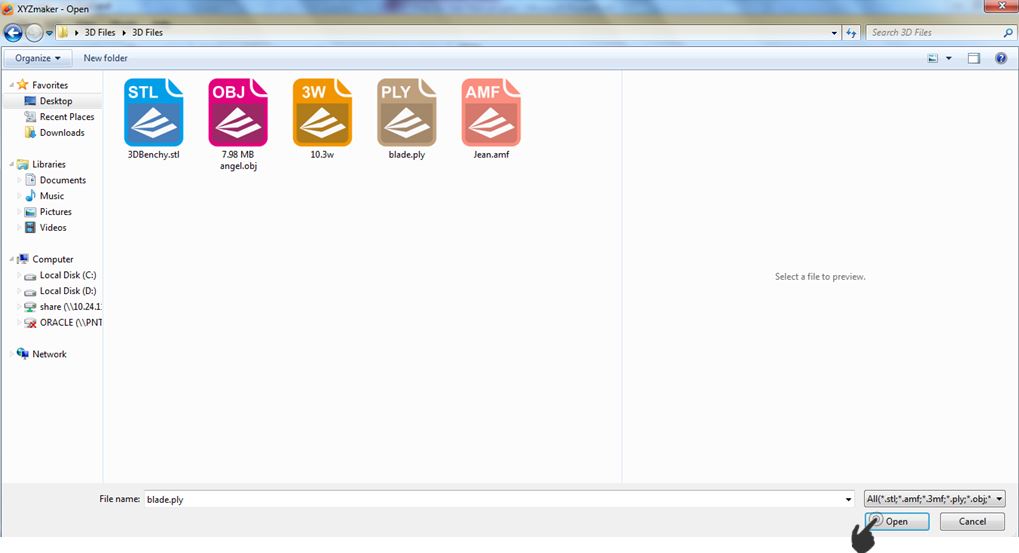
4. Click Open on the lower corner

4

Save and Save As

There are two different way of saving file in XYZmaker. First is “Save As” then the other one is “Save”.

Choosing Save simply saves your work by updating the last saved version of the file to match the current changes you have on your screen.

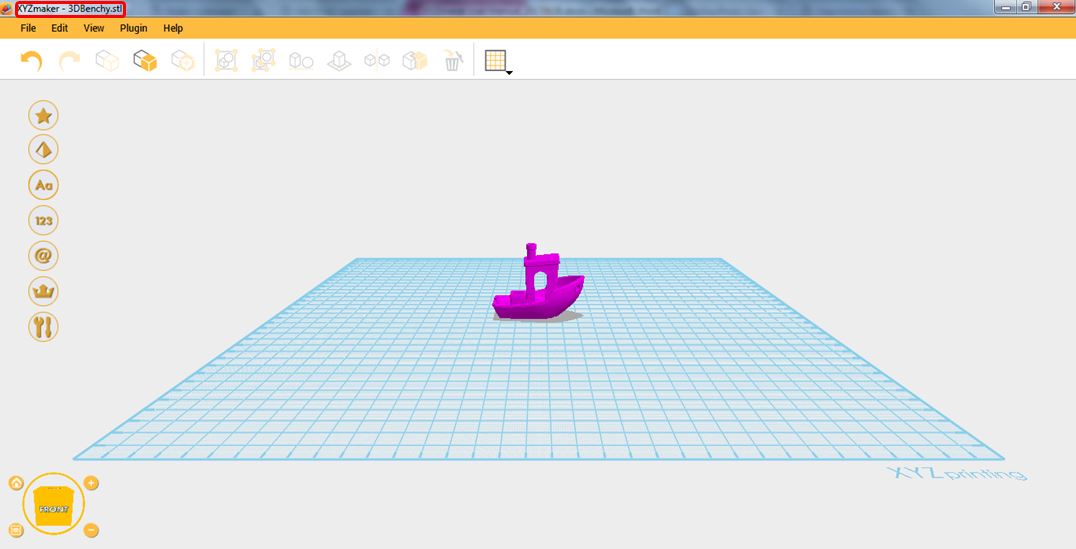
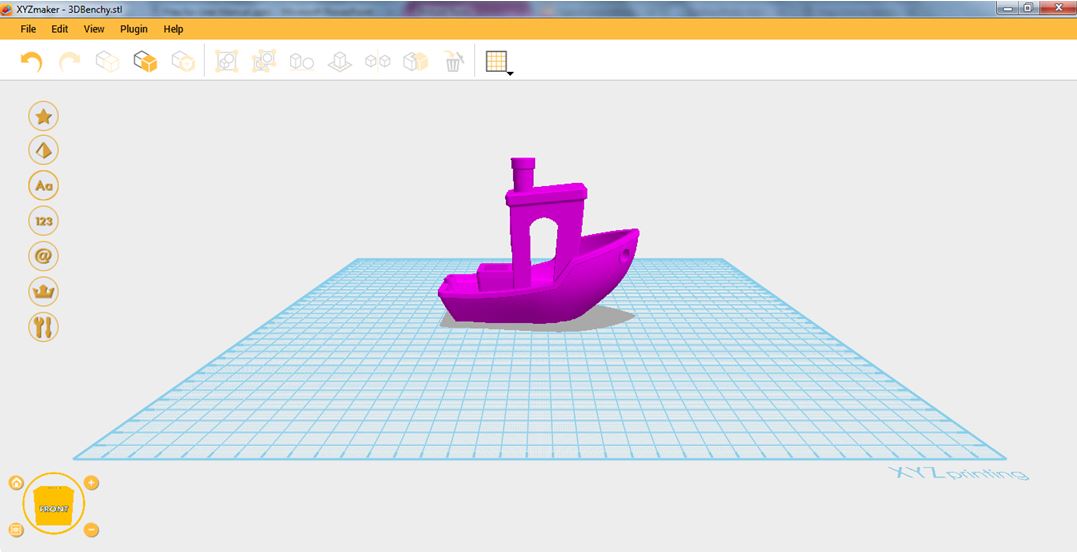
1. Open any file. In example, the opened file is 3DBenchy.stl

1

2. Resize the object or make any changes.

2

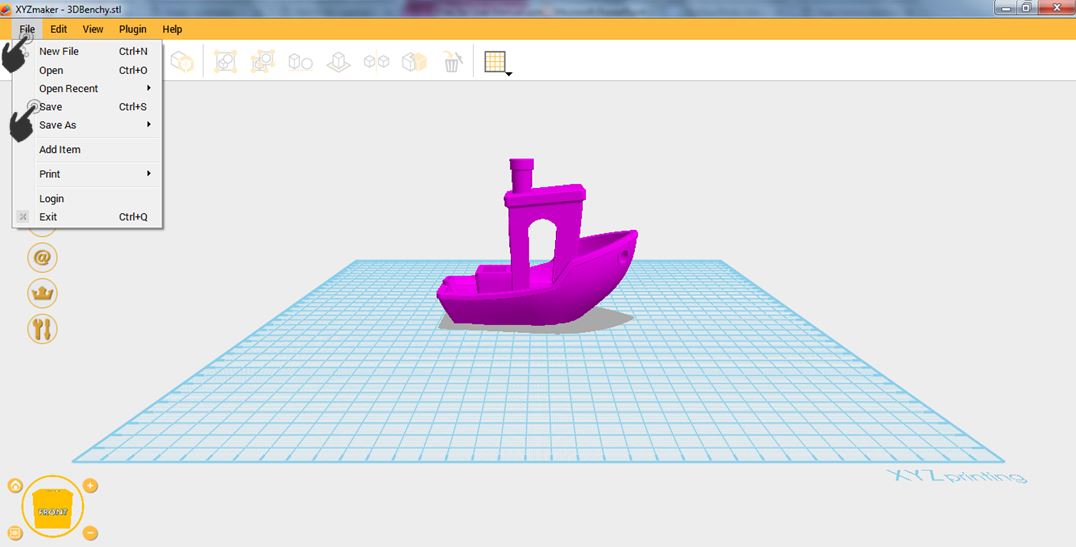
3.Click File then select Save

3

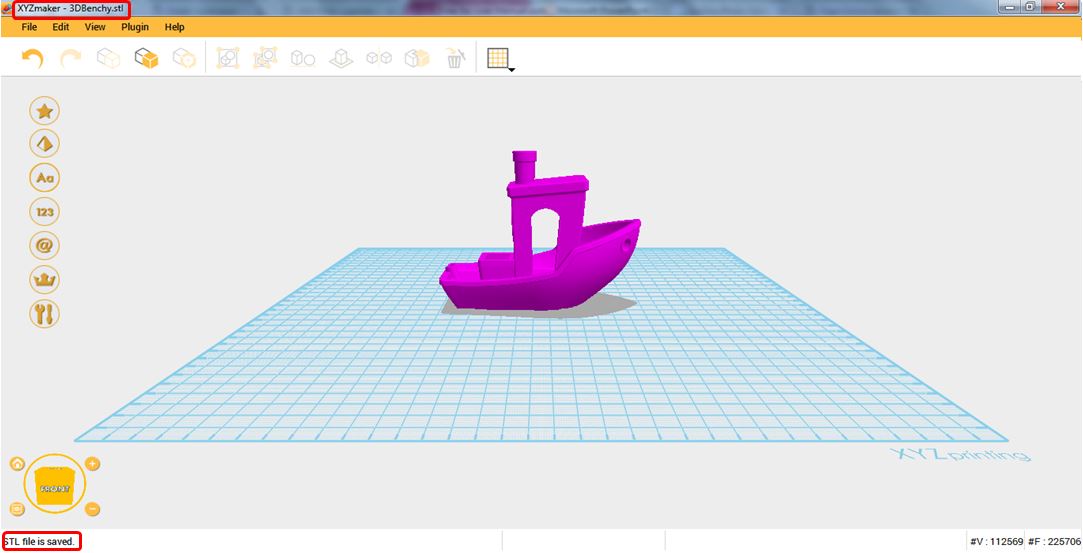
4. It will notify on the status bar that the file is already saved. For save function, notice that it will just rewrite the changes made on 3DBenchy.stl file.
4

Choosing “Save As…” brings up a prompt to save your work as a file with a different name. For example, you might choose to save a document called “Test.amf” as “Test.stl”. This way, you can save your file at different format.

1.Open any file. (I.E : 3DBenchy.stl)

1

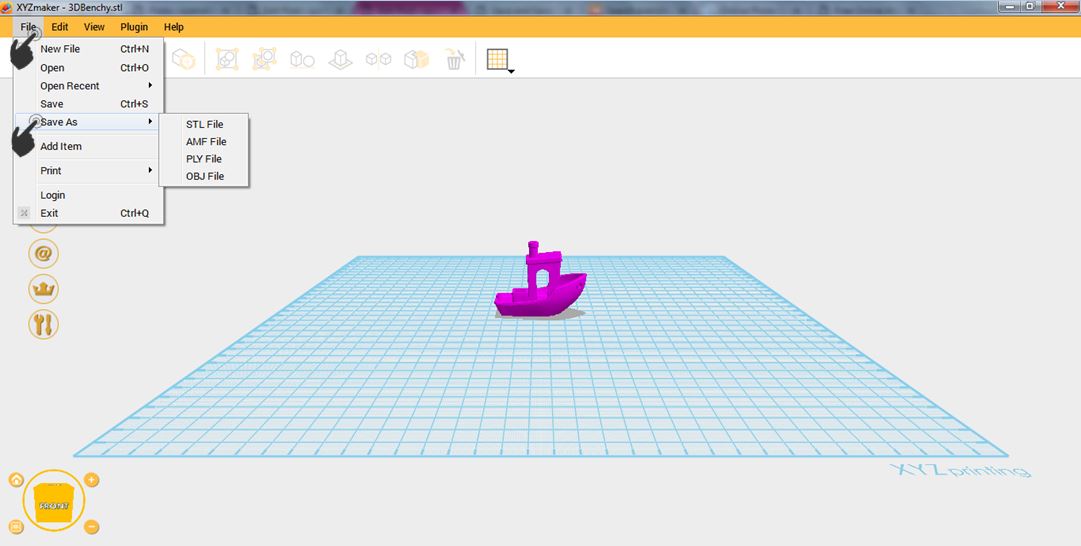
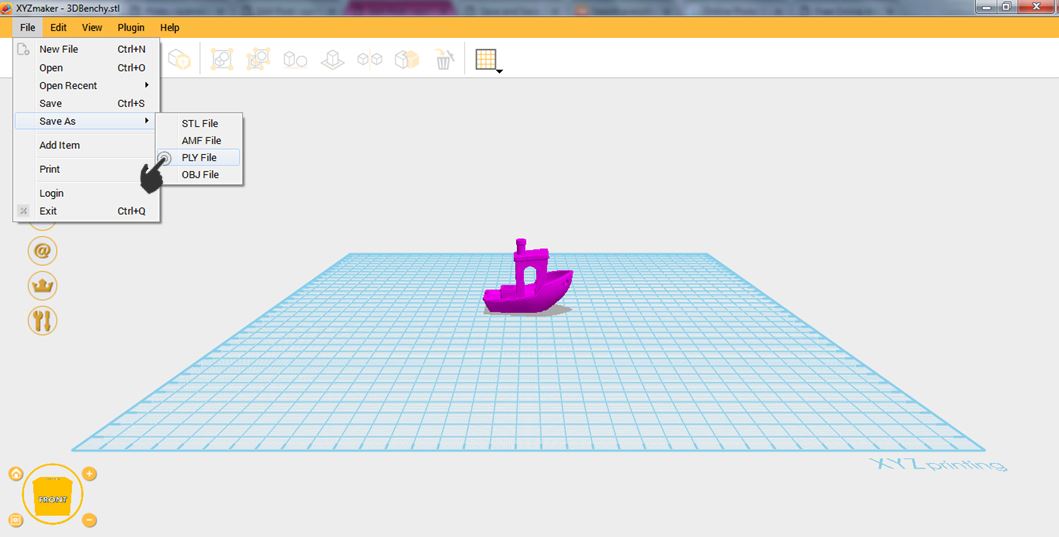
2.Click File then select Save As. You can choose to save 3DBenchy.stl into AMF, PLY and OBJ file extension.

1

3. In example, 3DBench.stl is Save As PLY.

2

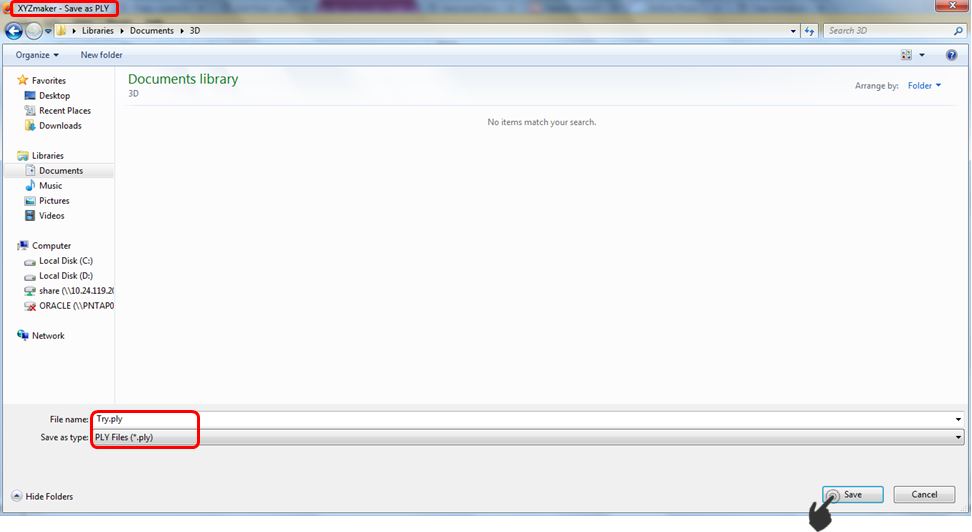
4.Save As window will display. Type the desired filename then click Save. In example, the filename set is Try.ply
3

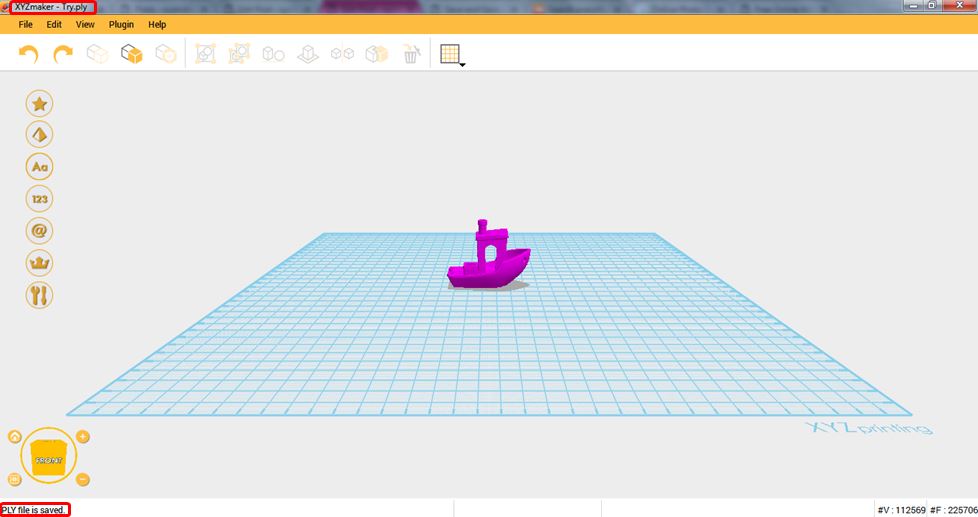
4. Notice that Title bar changed from 3DBenchy.stl to Try.ply after saving it as PLY.

4

Add Item

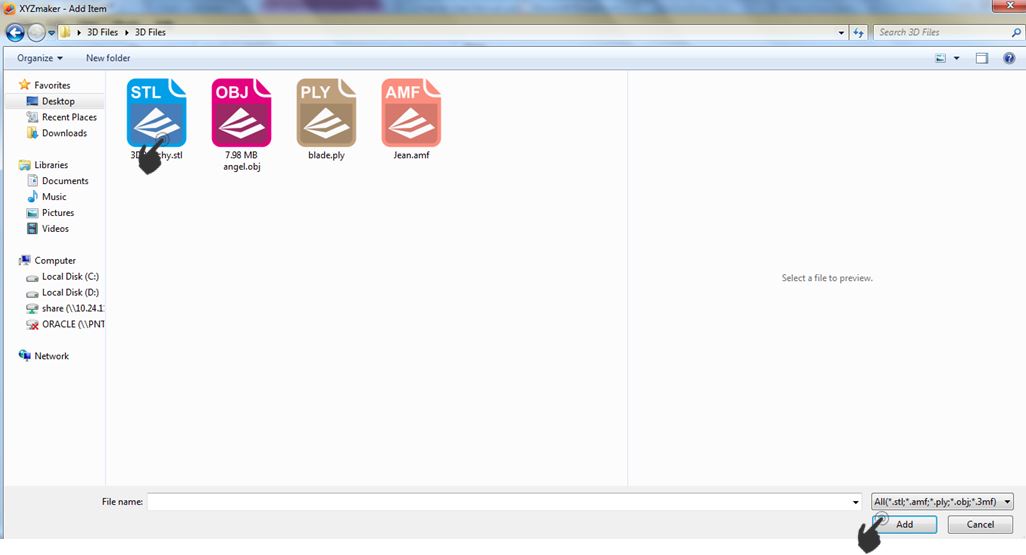
This function will help you to combine several objects in the workplane. Once you use the Add Item, you can add any object as many as you can in your current project.

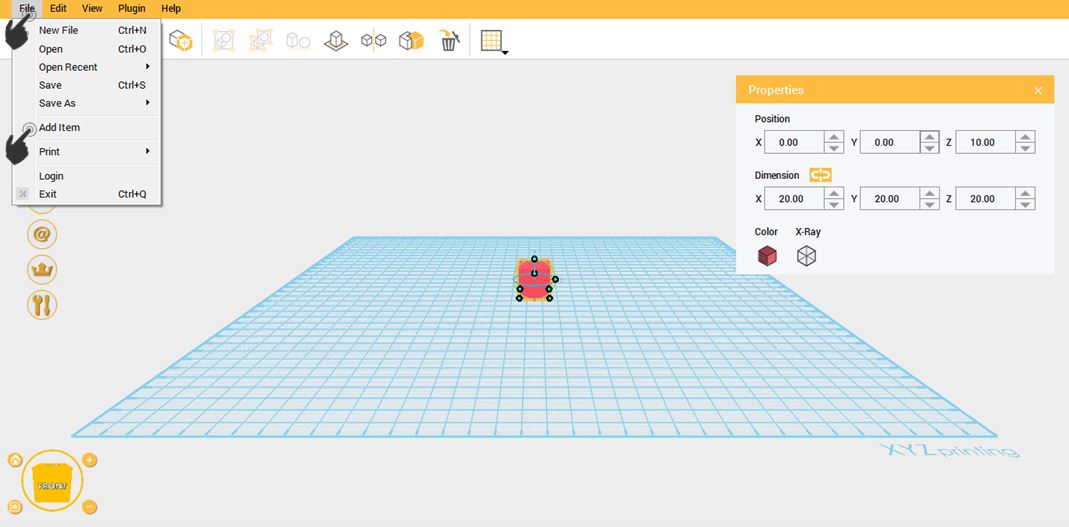
1. Click File then select Add Item.

1

2. Select the file that you want to add in the workspace then click Add.

2

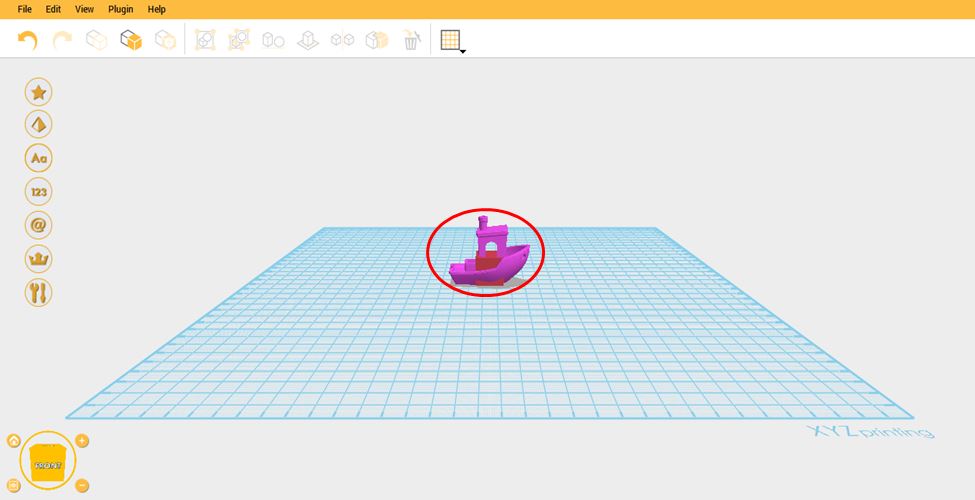
3.3DBenchy object is already added on the workspace. Notice that the cube retain on the workplane.

3

Plugin

Last updated on September 19th, 2018 at 10:52 am

In XYZmaker, you cannot just combine the objects in the model bar to create an objects but you can also use some built in plug-in to make your project extra awesome. It consists of Geometry Generator Plugin, Object Array, Triangular Subdivision, Photo Emboss and Reduce Mesh. This page will show you how to use the plug-in function in order to boost your creativity.

1

Geometry Generator

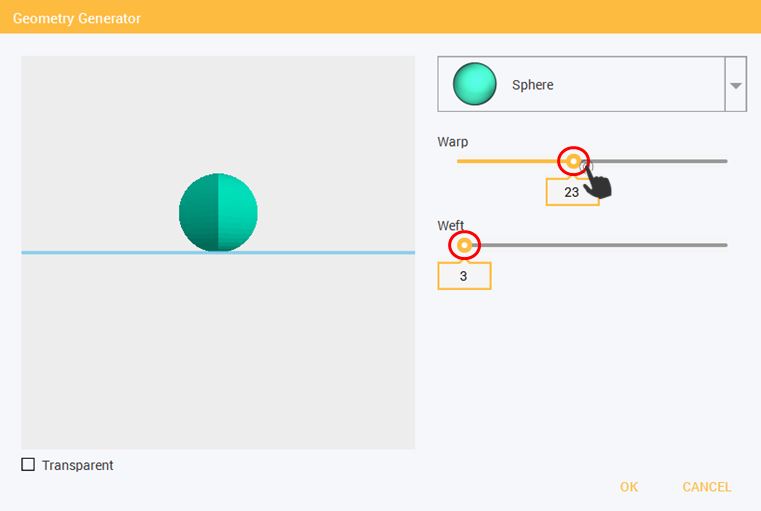
This function will help you to create several objects by just adjusting the triangles in the objects. Out of one object, you can create different style by just adjusting the value given per object. All the objects in Geometric figure are the contents of the object in this function.

geo


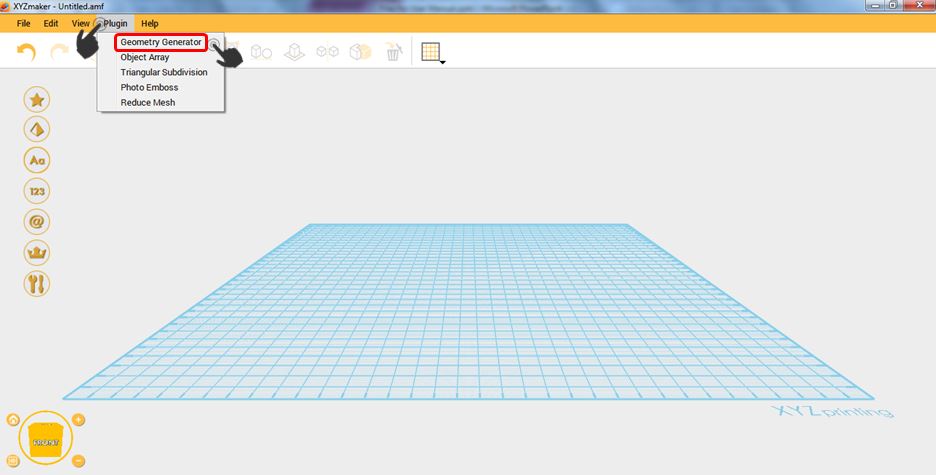
1.Click Plugin then select Geometry Generator

3

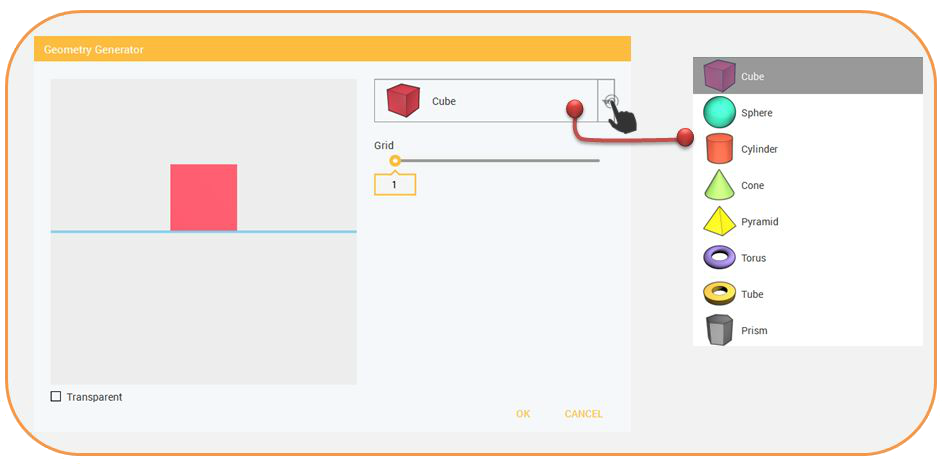
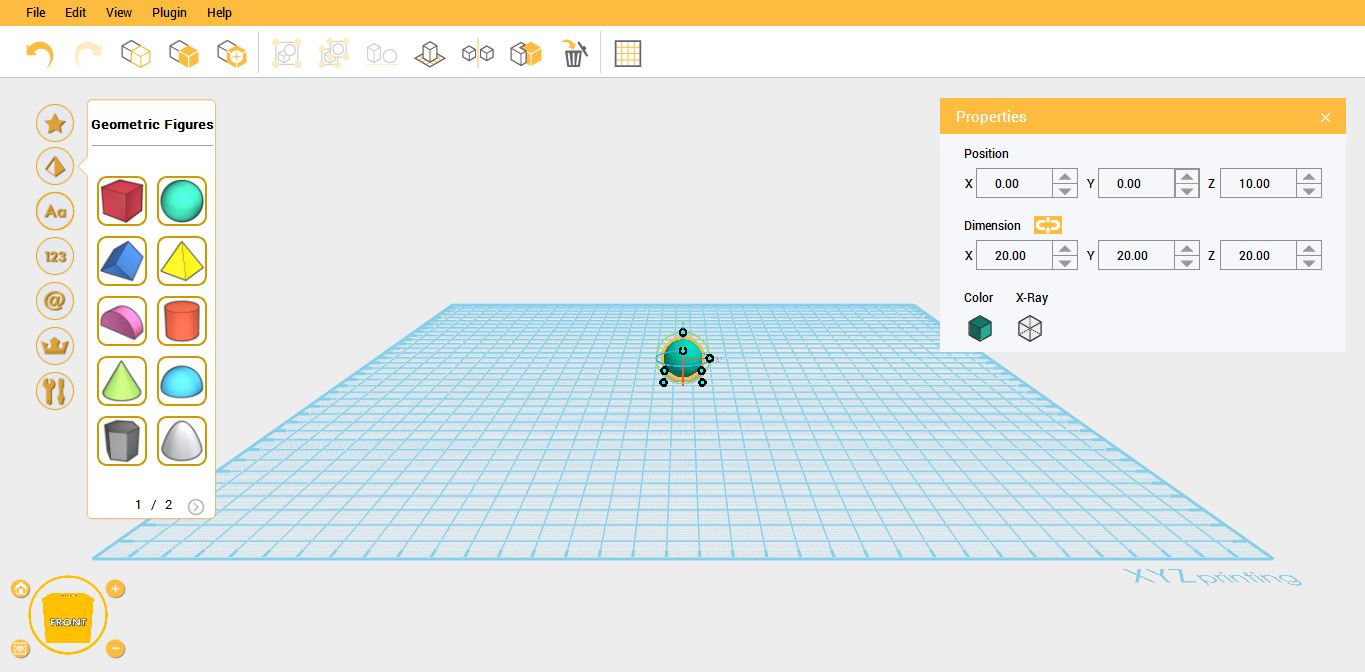
2.Click the dropdown to view the objects available.

4

3. In example, the chosen object is Sphere. Set the desired value in the Seek bar then click OK.

5

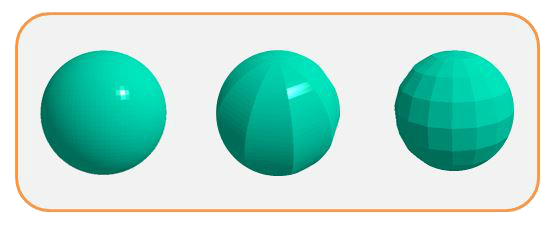
Below are the sample output  sphere when Warp and Weft is set in different value.

6

Object Array

An Object Array plug-in is a function wherein the object are duplicated in a certain position. The 3 different sub-menus of Object Array plug-in are Array Copy 1D, Array Copy 2D and lastly is Array Copy Circle. You will learn how to use this function on this page, just keep on reading.

7


1.To use the Object array, there should be a selected object in the workspace.

1

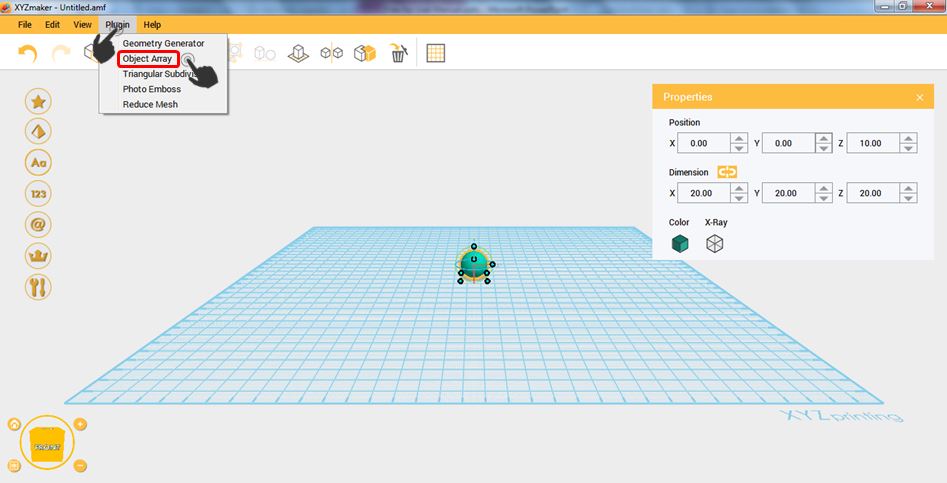
2.Click Plugin then select Object Array.

2

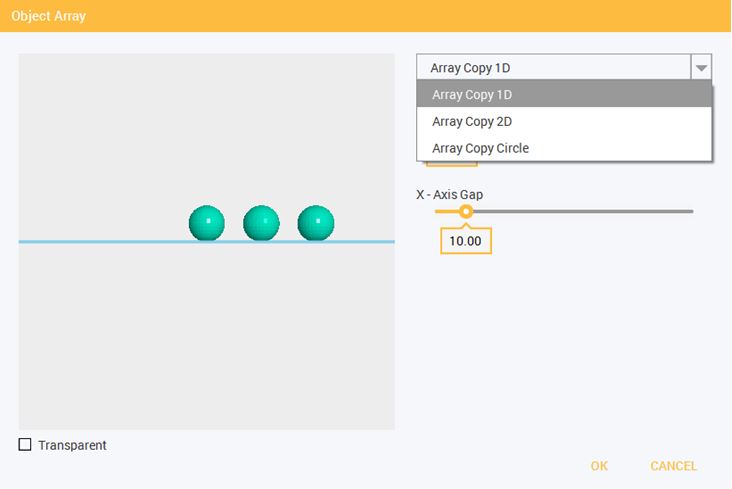
3.Object Array window will display. You can choose whether you like to duplicate the object in 1D, 2D or by circle.

3

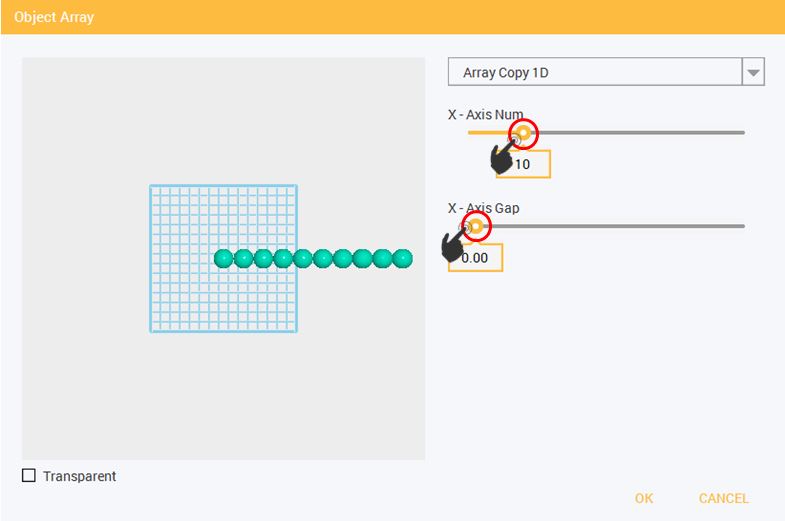
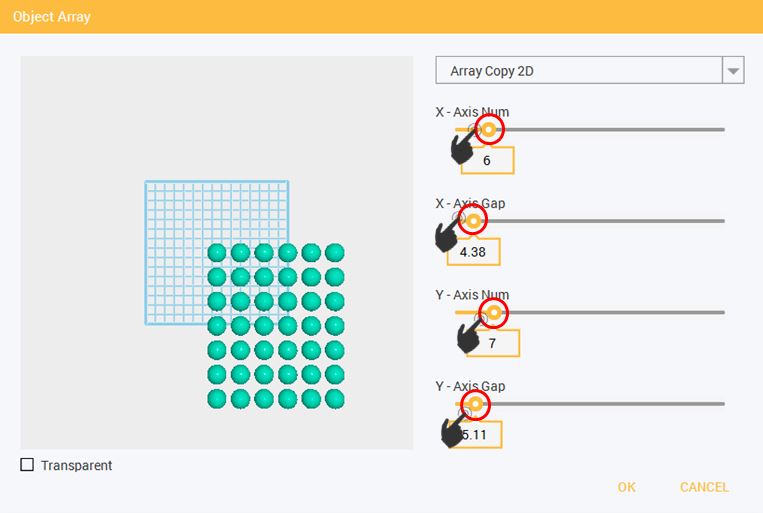
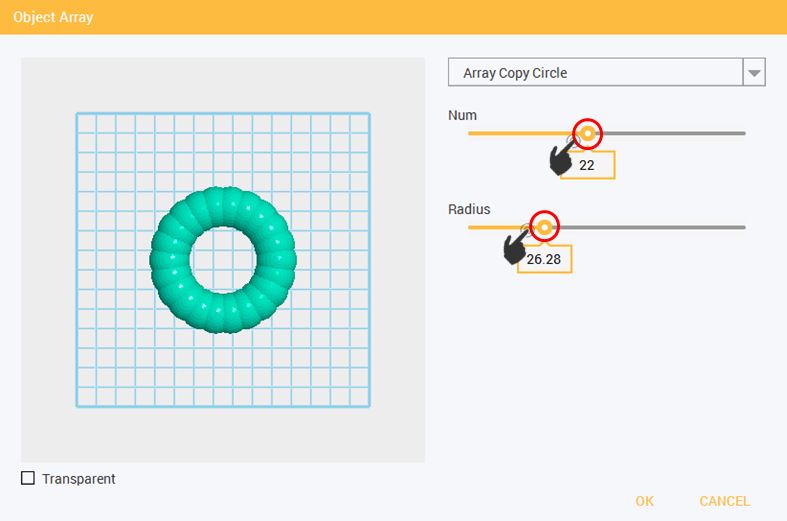
Here are the samples using Array Copy 1D, Array Copy 2D and Array Copy Circle.

  • ARRAY COPY 1D – it will duplicate the object in X axis direction only. The number of the duplicated object depends on the value set on X-Axis Num.

5

  • ARRAY COPY 2D – this function will duplicate the object in X and Y axis direction. The number of duplicated object will depends also on the value set on X-Axis Num and Y-Axis Num.

6

  • ARRAY COPY CIRCLE – For this function, it will duplicate the object in a circular direction. The number of duplicated object depends on the value set on Num.

4

Triangular Subdivision

In order to change the number of the vertices and faces of the object, you can use the Subdivision Triangle Plugin. This will help you  smoothen the surface of the object.

8


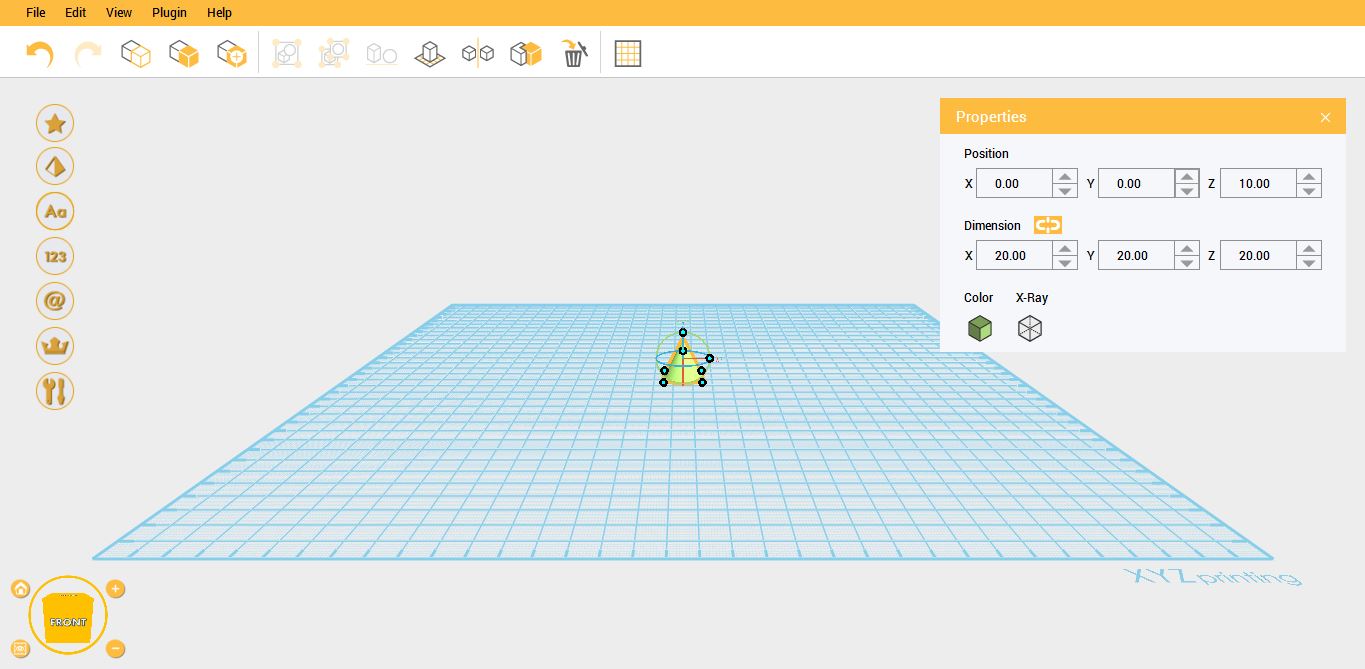
1.To start using Triangular Subdivision, there should be a selected object. In example, the object is cone.

1

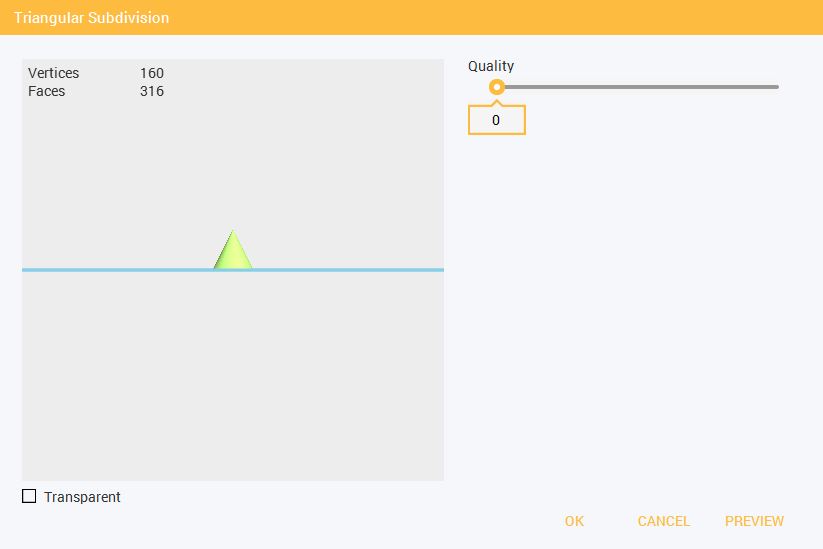
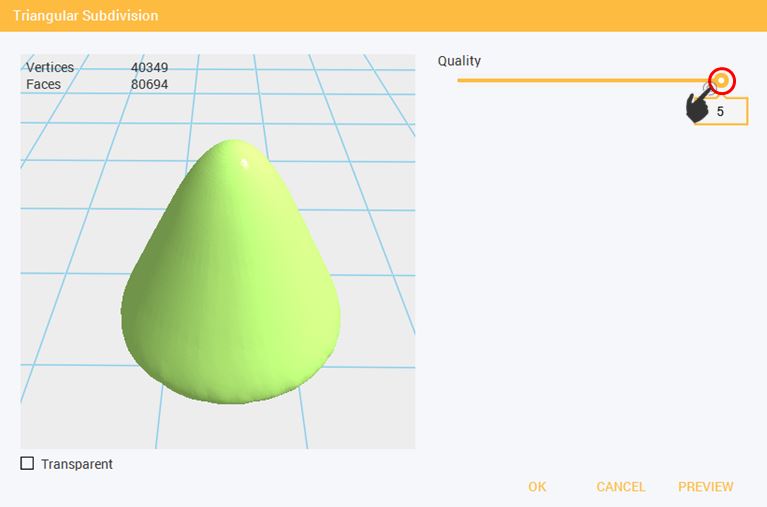
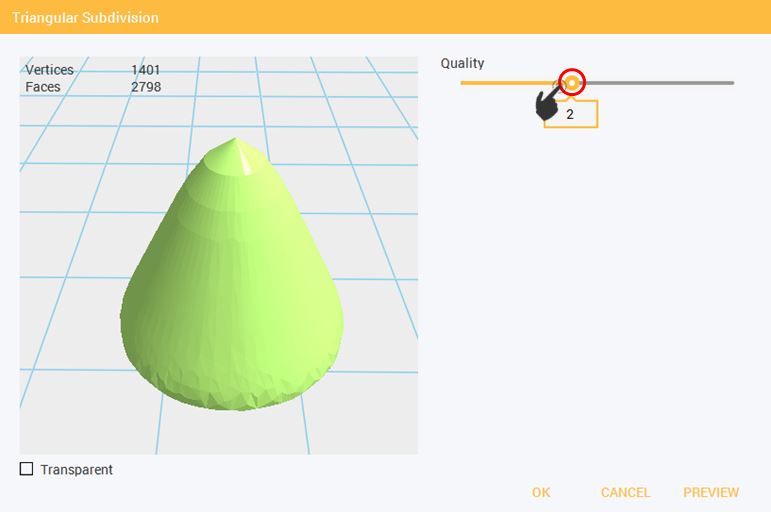
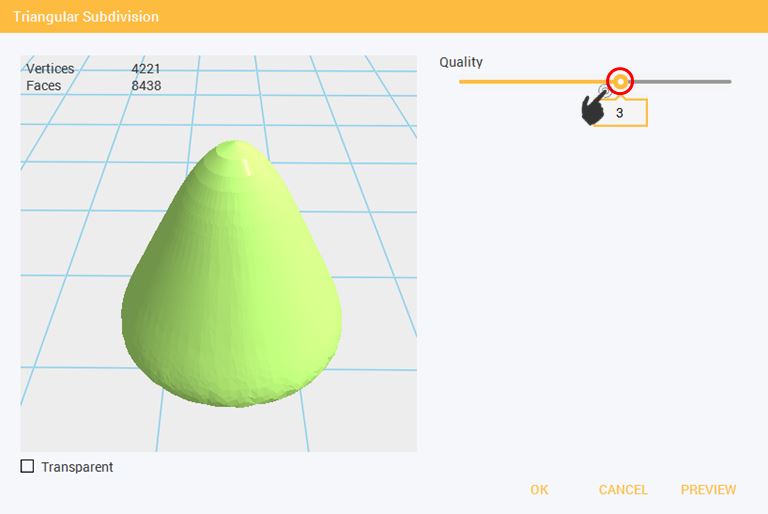
2.Subdivision Triangle window will display. By adjusting the seek bar, you can change the vertices and faces count.

2

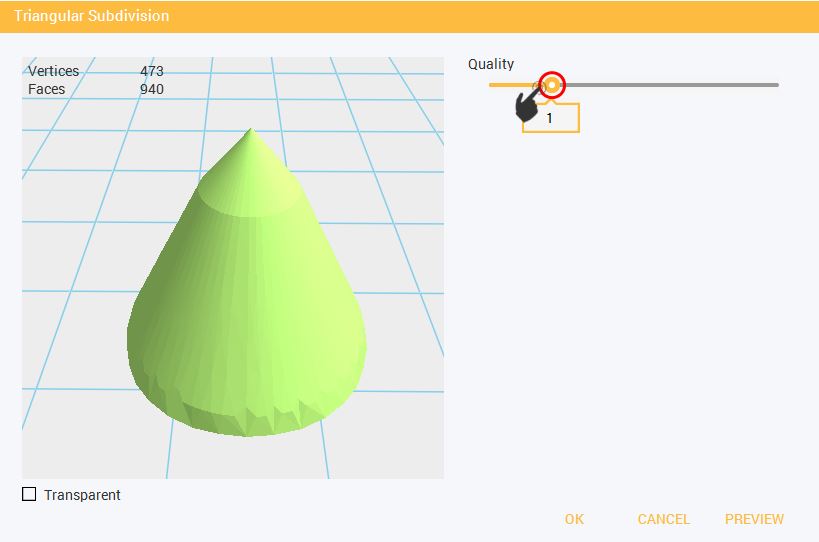
  • Quality is set to 1. In order to view the changes in the object, you should click the Preview after setting the quality.

3

  • Quality is set to 2. 

4

  • Quality is set to 3.

5

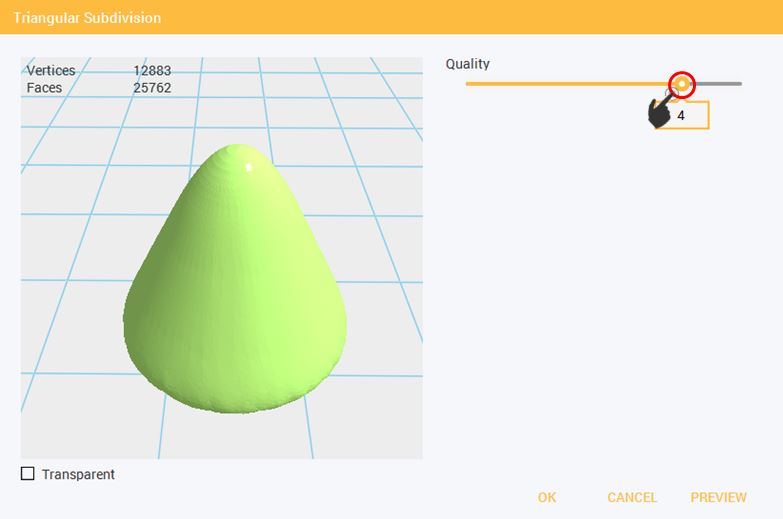
  • Quality is set to 4.

6

  • Quality is set to 5.

7

Photo Emboss

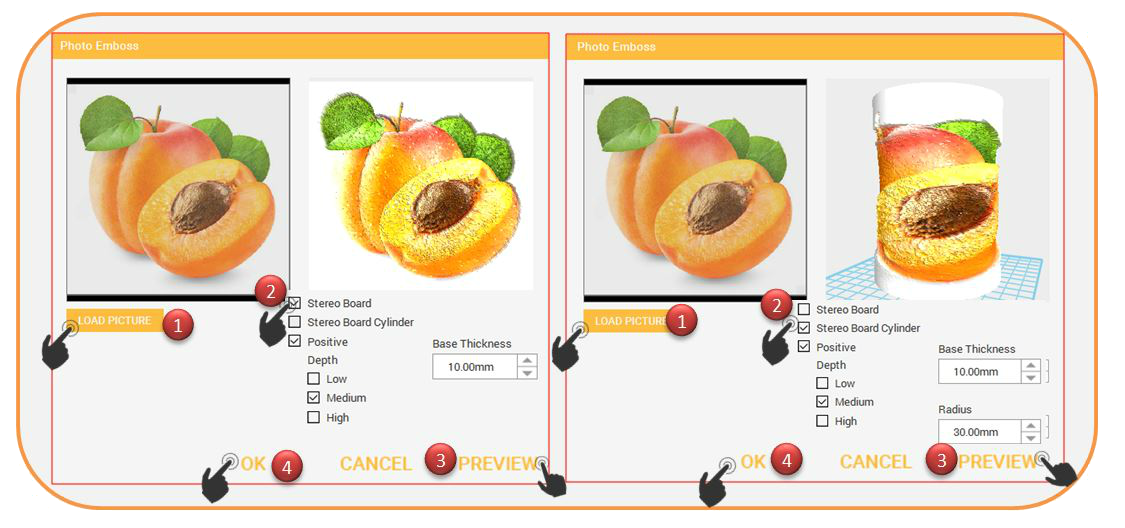
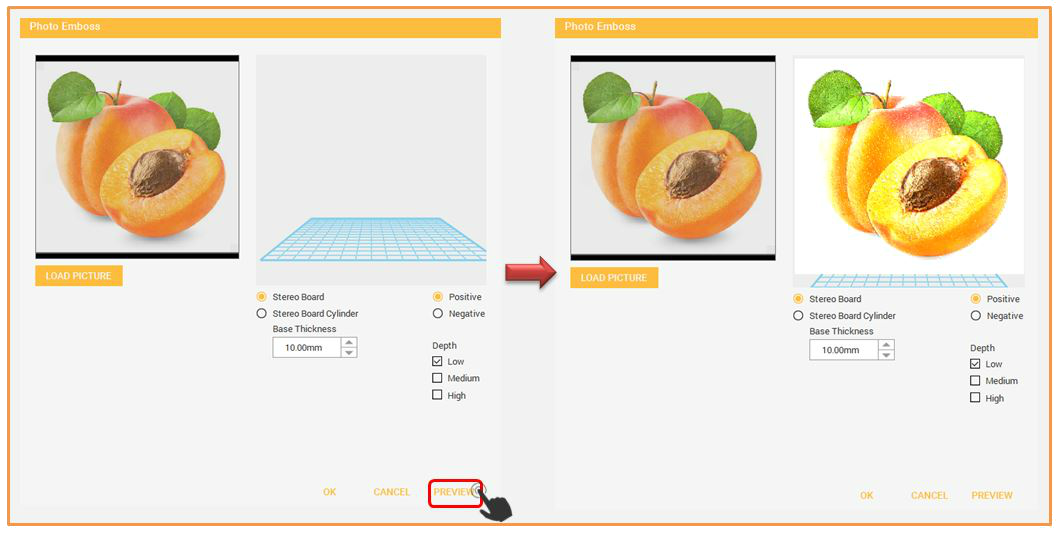
Your creativity will boost more using XYZmaker, because this software will help you to convert your image into 3D image. Well, yeah that’s true! As easy as 1, 2, 3, you can convert your Jpeg, PNG image easily to 3D. It consists of two types in turning your image into 3D.

1


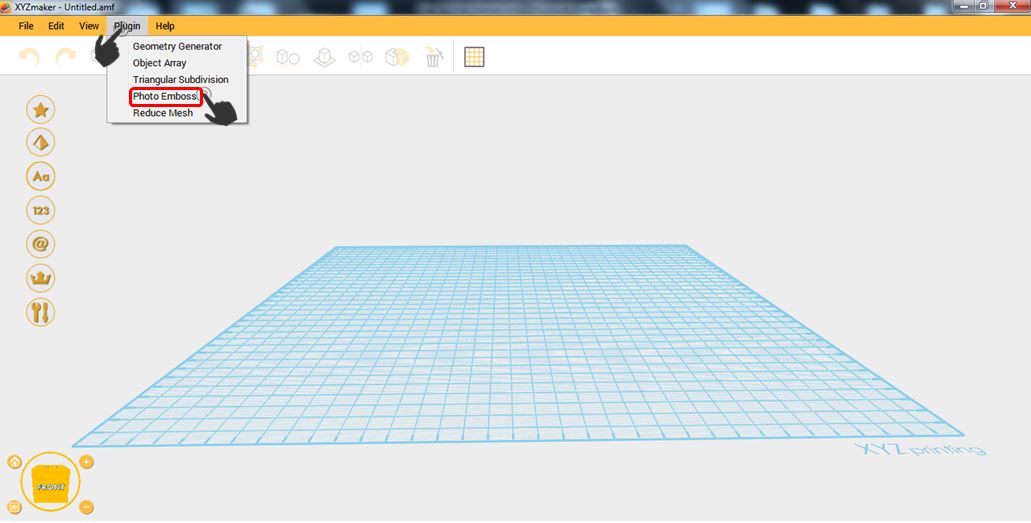
1.To start converting your image into 3D,  click on Plugin then select Photo Emboss.

2

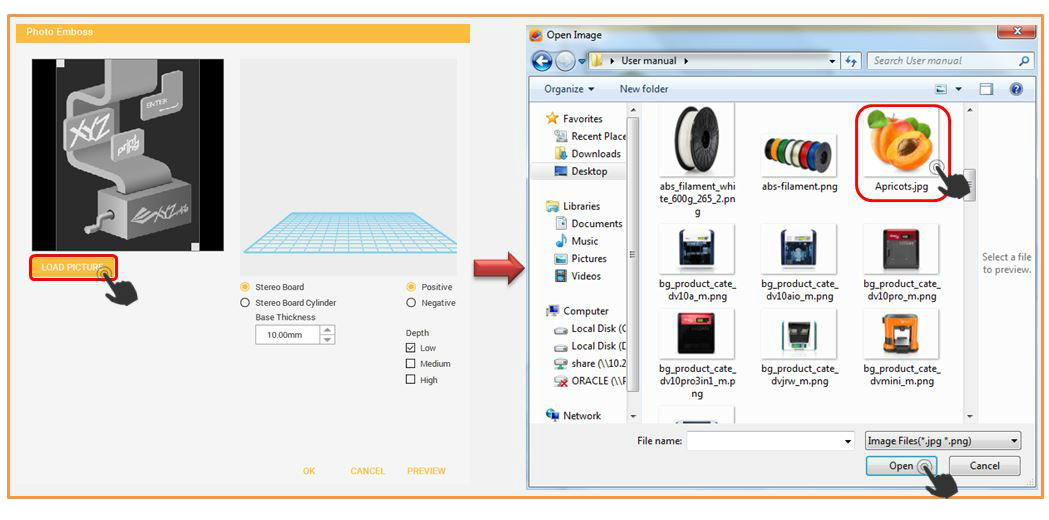
2.Click Load Picture to select any PNG or JPG image then click Open.

4

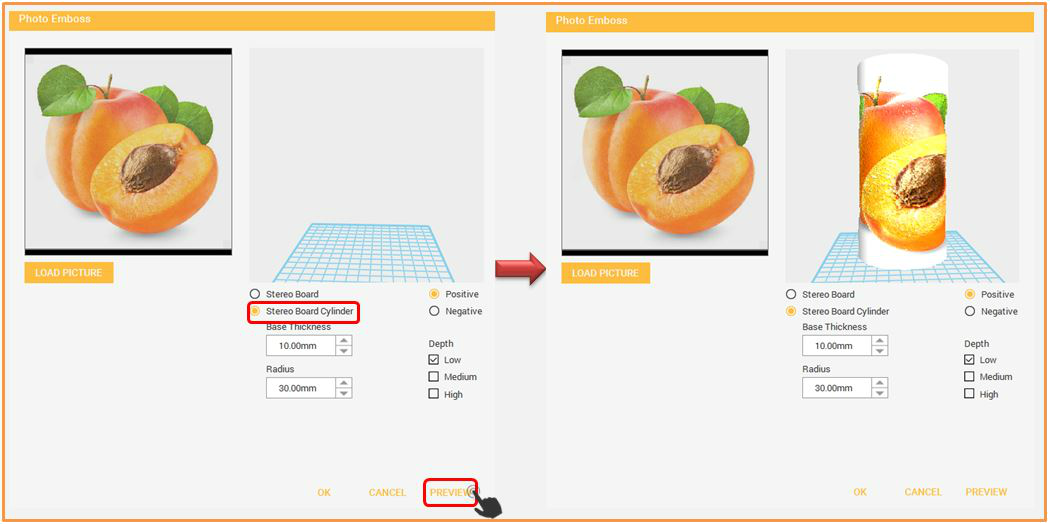
3.After step 2, select what type of photo emboss you want to use. It can either be Stereo Board or Stereo Board Cylinder. In this example, Stereo Board is selected.

5

4.Below is the example of Photo Emboss using Stereo Board Cylinder.

6

Reduce Mesh


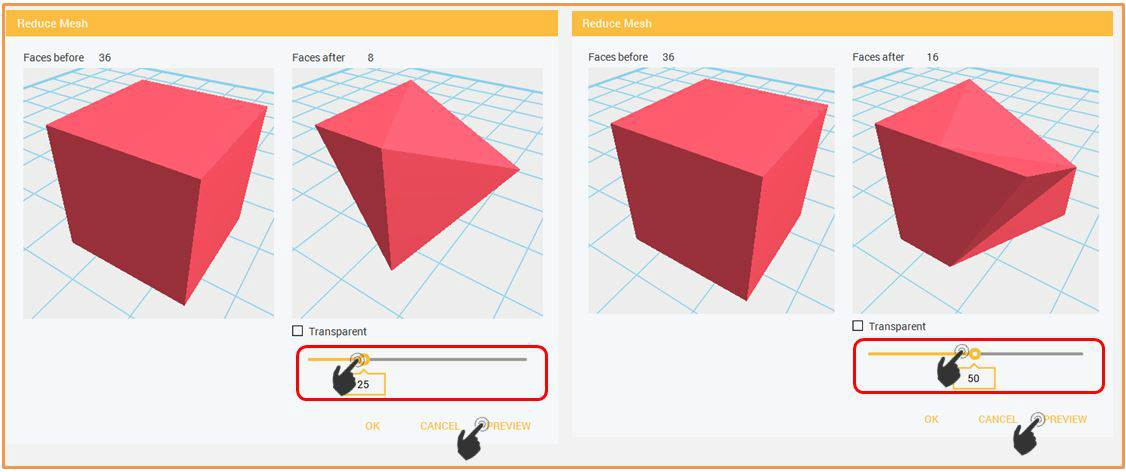
This function is use to reduce or decimate faces count of an object. By simply adjusting the seek bar, you can decimate the object easily.

1


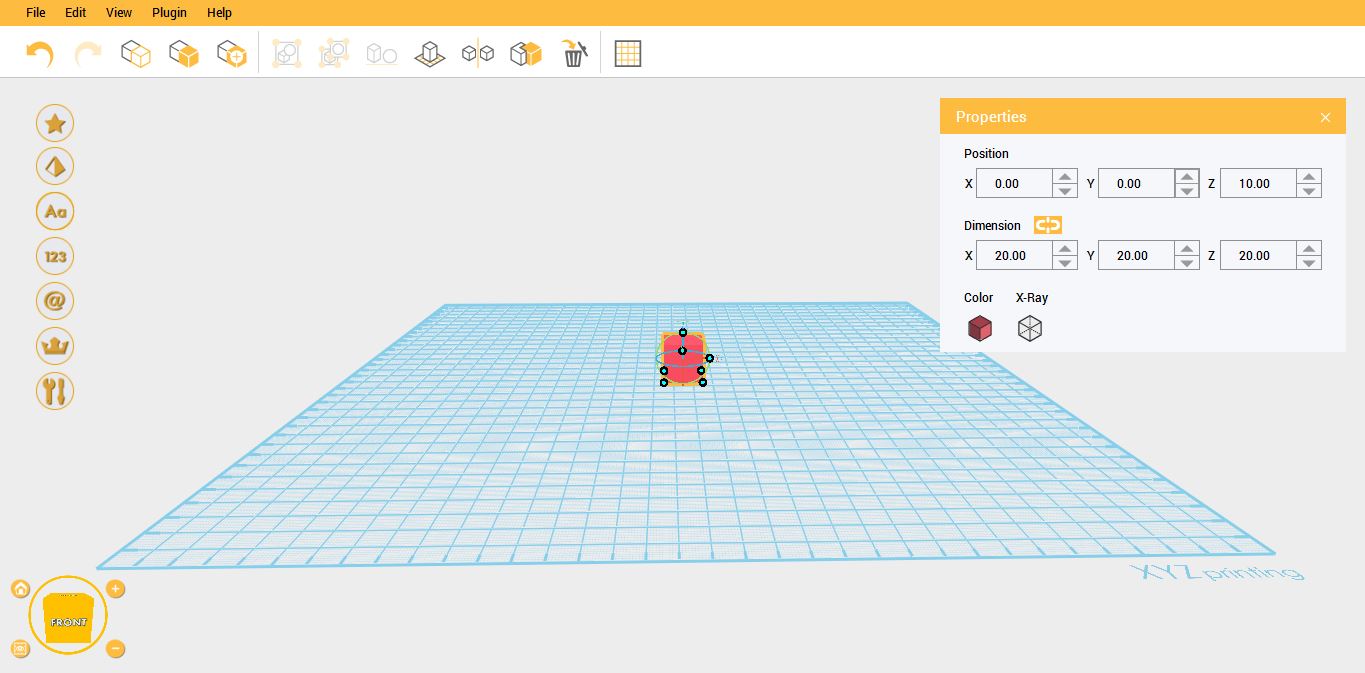
1.In order to use the Reduce Mesh function, you need to select object in the workplane. (I.E: Cube)

2

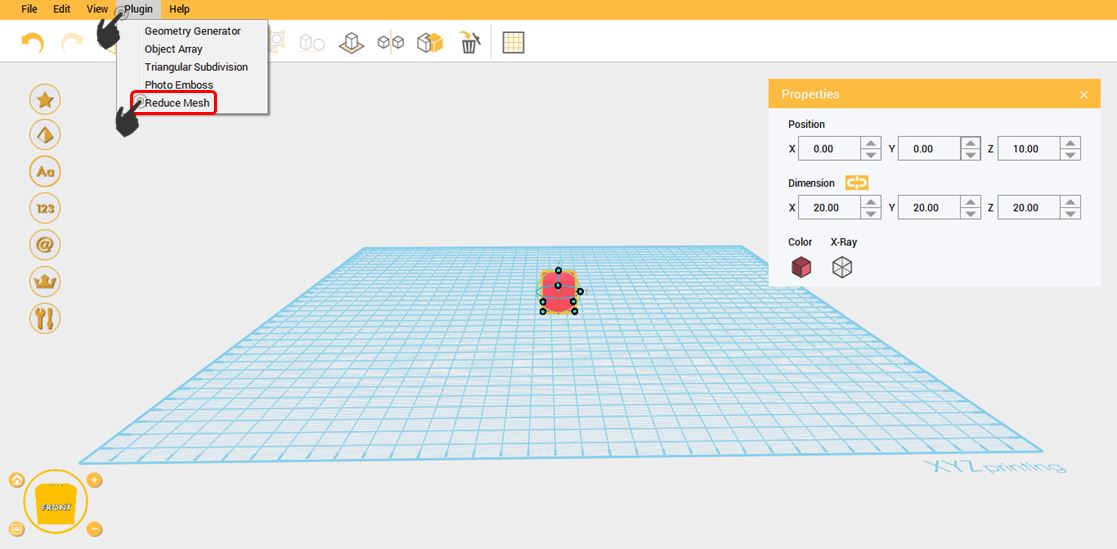
2.After selecting the object, click Plugin then select Reduce Mesh.

3

3. Set your desired value on the seekbar then click Preview. Below are some example:

4


Help

Last updated on September 19th, 2018 at 10:54 am

Help Tab will help you to access the About, Feedback, Tutorials and Shortcut Keys. It will surely help you to have more idea about the software.

1

About XYZmaker

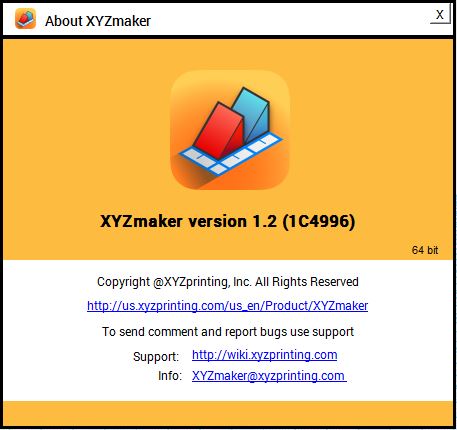
This function will show you the version of XYZmaker, as well as the copyright link wherein you can have more idea about the software; you can also send feedback whenever you found some issues on the software by clicking the link in Info.

  • About XYZmaker Window

2

  • Copyright page

3

  • Support Page

4

  • This will display after clicking Info and you can send feedback regarding the software performance.

Feeback Mail

Tutorials

Object drawing and usage of XYZmaker is easier because of the Tutorials provided. By clicking Tutorials, it will help you to redirect on the website that contains several Tutorials in order to create objects.

Tutorial

Shortcut Keys

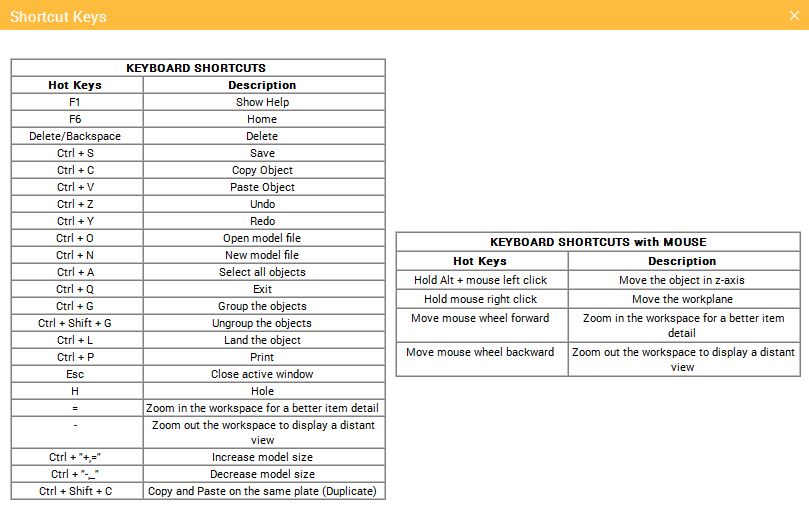
Shortcut Keys help provide easier and usually quick method of navigating and executing commands in XYZmaker.

sk

Edit

Last updated on September 19th, 2018 at 10:57 am

The function inside the Edit menu is just the same with the command in the Toolbar. It has Undo, Redo, Copy, Paste, Clone, Delete, Group, Ungroup, Mirror, Align, Land, Hole and Preferences.

Edit

Preferences

Preference Window under the Menu Bar – Edit tab, is where we can see the General and Appearance Properties. Coming from the word itself Preference, users like you can choose your own design, color, language, where to save the project, thus this means, and this software is for all your preferences!


1.Open XYZmaker.1

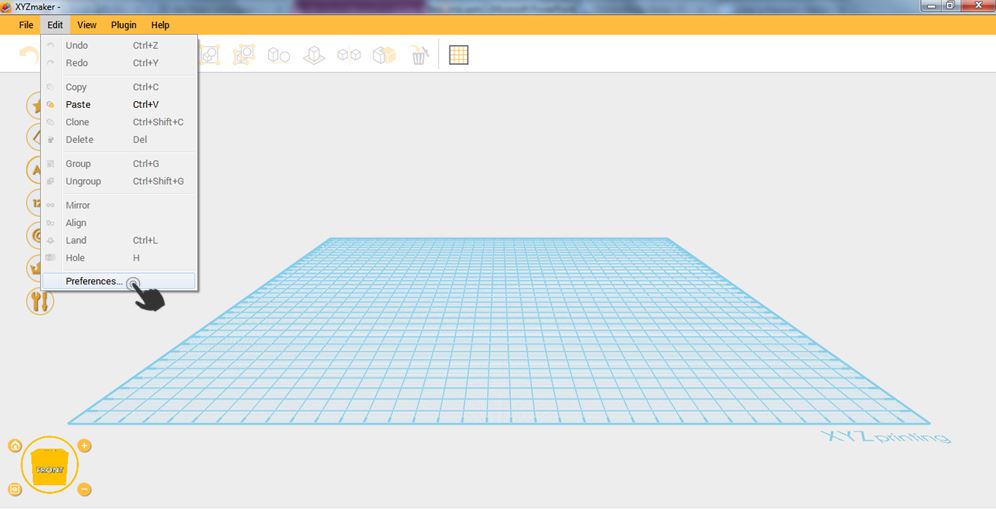
2.Click on Edit then select Preferences.

2

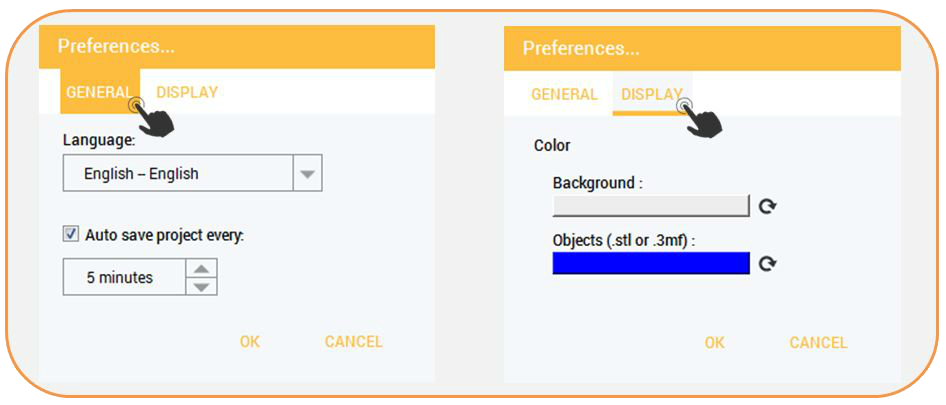
3.Preferences Window will display. General Tab consist of Language and autosave while on Display Tab, it consists of Background and Object Color.

3

Display


In display, you can customize XYZmaker. You can set the color of the main window depends on the shade that you wanted. Object color can also be change depends on what you want.

Background

This function is use to change that color of the main window into your preferred color. In short, you can customize your window.


1.Open XYZmaker.

1

2.Click Edit then select Preferences.

2

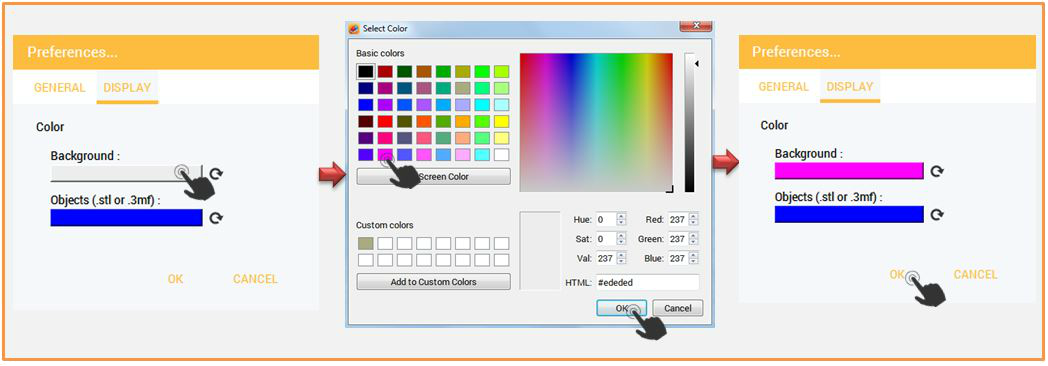
3.Click Display Tab click on Background, choose the color that you want to apply then click OK. After choosing desired color, click OK again.

4

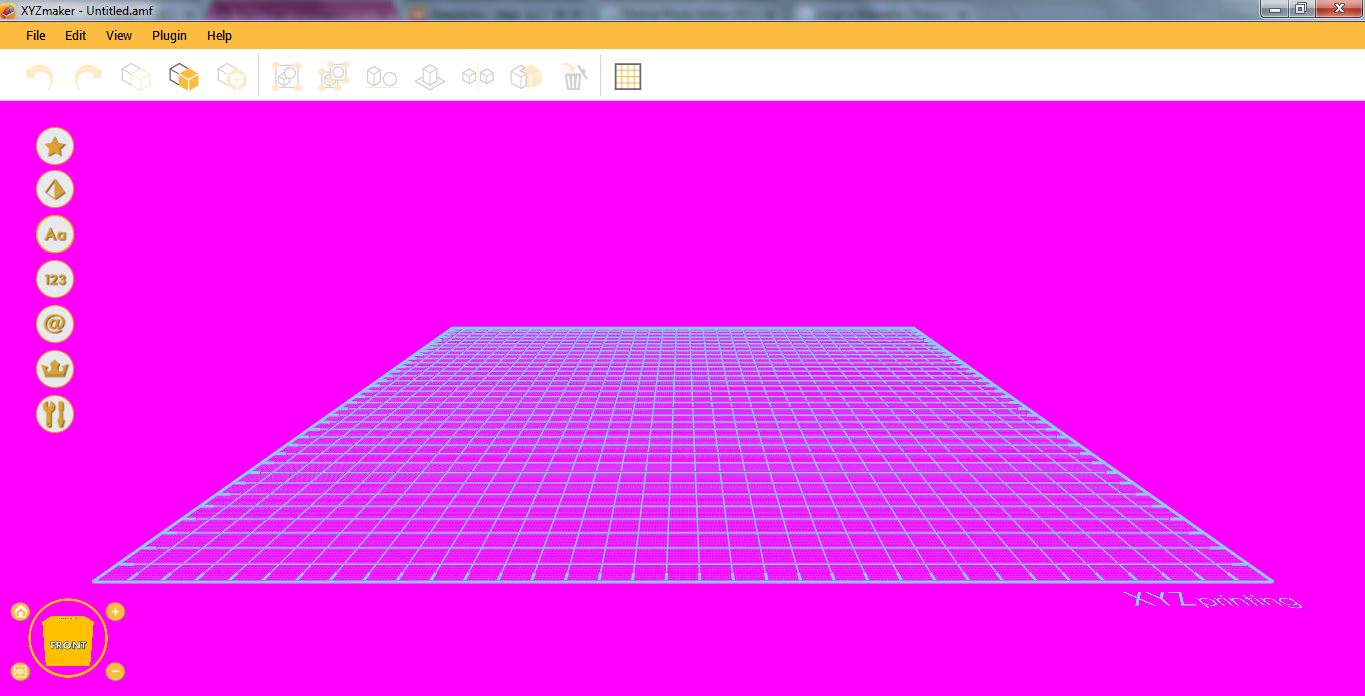
4. Background color changed!

5


OBJECT COLOR

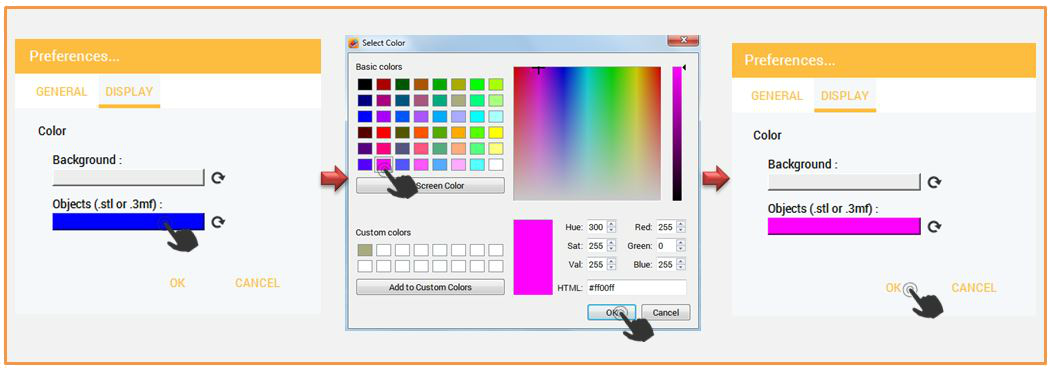
This function is applicable only to STL and 3mf. In this function, you can set the color of STL and 3mf object when opening it in XYZmaker. In example, you want o make your object color is pink when opening.

1.Click on Display Tab then click on Objects (.stl or .3mf). Choose the color that you want to apply then click OK. After choosing desired color, click OK again.

6

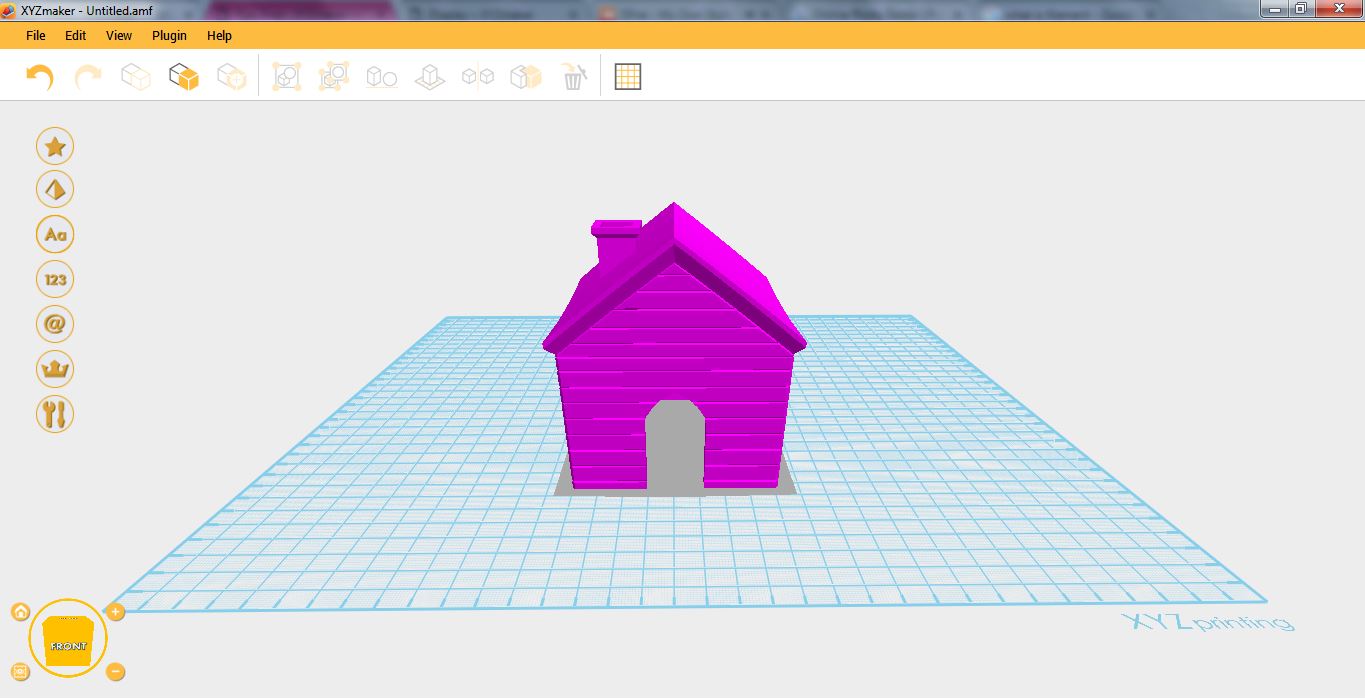
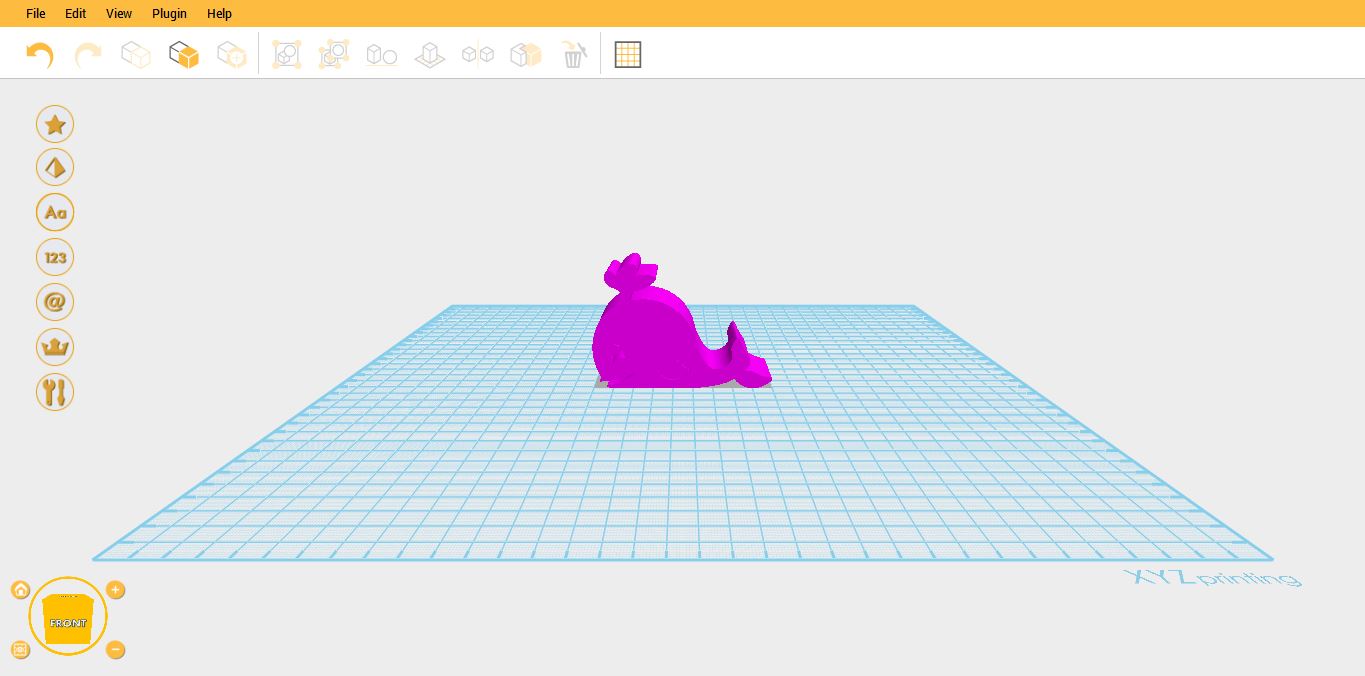
2.Object color changed to pink.

7


Supported Modeling SW

Last updated on September 19th, 2018 at 10:13 am

For da Vinci Color, XYZmaker not only could do file slicing but also basic modeling.
Furthermore, you can also use other 3rd party software to create color 3D models with texture for da Vinci Color!

File Format Support - For Color Model

XYZmaker and the da Vinci Color support the following file formats for printing 3D models:


  1. .PLY (We only support vertex texture .ply, not texture materials.)
  2. .OBJ

–    We support textured .OBJ files. This is the most common type of 3D color file being used. Information about the model and it’s texture is stored on 3 different files that should be in the same folder. These files types are: .OBJ, .MTL, and .PNG or .JPG

–    We also support vertex texture .OBJ files. You only need 1x .OBJ file to show the vertex texture. This type of file is usually created by 3D scanner.

  1. .3mf

Recommended Software

Below is a list of software that we have tested. Using this software, you can create one or more supported files that can be opened using XYZmaker, our slicing and 3D modelling software:


  1. Maya:

You can create textured .OBJ files in Maya for XYZmaker with no extra post-processing required. Please make sure you export 1x .OBJ file, 1x .MTL file and at least 1x texture material in .PNG or .JPG image into the same folder.

  1. Zbrush:

Same as Maya.

  1. Win10 Paint:

You can create an .3mf file. No extra post-processing is required so you can open this file type directly in XYZmaker.


Software that requires post-processing before being able to open in XYZmaker correctly:

  1. Blender:

You can create textured .OBJ file in Blender, but to ensure the applied materials will show up in XYZmaker, you need to link the texture material to your model. Below is a tutorial video that shows you how to link texture material.

  1. Import a file of 3D model
  2. Click on texture button to add a new texture material
  3. Locate the texture file to link it with the material
  4. Click on Object Mode -> Texture Paint to preview the texture and make sure the material is applied to your object
  5. Export the file as .OBJ
  6. Click on “Write Materials” at the export settings to export materials with your model file
  7. Import the .OBJ file again and click on texture to confirm you have linked the material successfully


Not Fully Supported Software

The software below doesn’t create supported files.

  1. Mudbox:

You can create an .OBJ file in Mudbox, but it doesn’t include an .MTL file. Please use different other software to create colored models for the da Vinci Color.

Troubleshooting

  1. I’ve got 1x .OBJ file, 1x .MTL file and at least 1x texture material in .PNG or .JPG image, but the texture still won’t show up in XYZmaker.

A: Please make sure all files are placed in the same folder and check the texture material path written inside the .MTL file. You can use any type of text editor to open an .MTL file. The .MTL file contains the texture materials’ file name and path info. When opening the file, it should look like below:

newmtl Material.001

Ns 96.078431

Ka 1.000000 1.000000 1.000000

Kd 0.640000 0.640000 0.640000

Ks 0.500000 0.500000 0.500000

Ke 0.000000 0.000000 0.000000

Ni 1.000000

d 1.000000

illum 2

map_Kd monkey_texture.png


Please pay attention to the last line of each material starting with map_Kd.

Behind “map_Kd” follows the path and names of the associated texture material.

Sometimes when you transfer and edit the file using different software, the texture material path will be missing or misspelled. Please compare the name of the texture material here with your texture material file name. Even a space or a character difference will cause XYZmaker not able to find your texture material.


Sometimes the .mtl file doesn’t contain info on the last line. There is no “map_KD+ texture material name” line. It happens when you create a 3D model and forget to link its texture material. In this case, please go back to the software you used to create it to link the texture material and save your .OBJ file again.

Printer Plugin Dashboard

Last updated on March 28th, 2018 at 03:55 pm

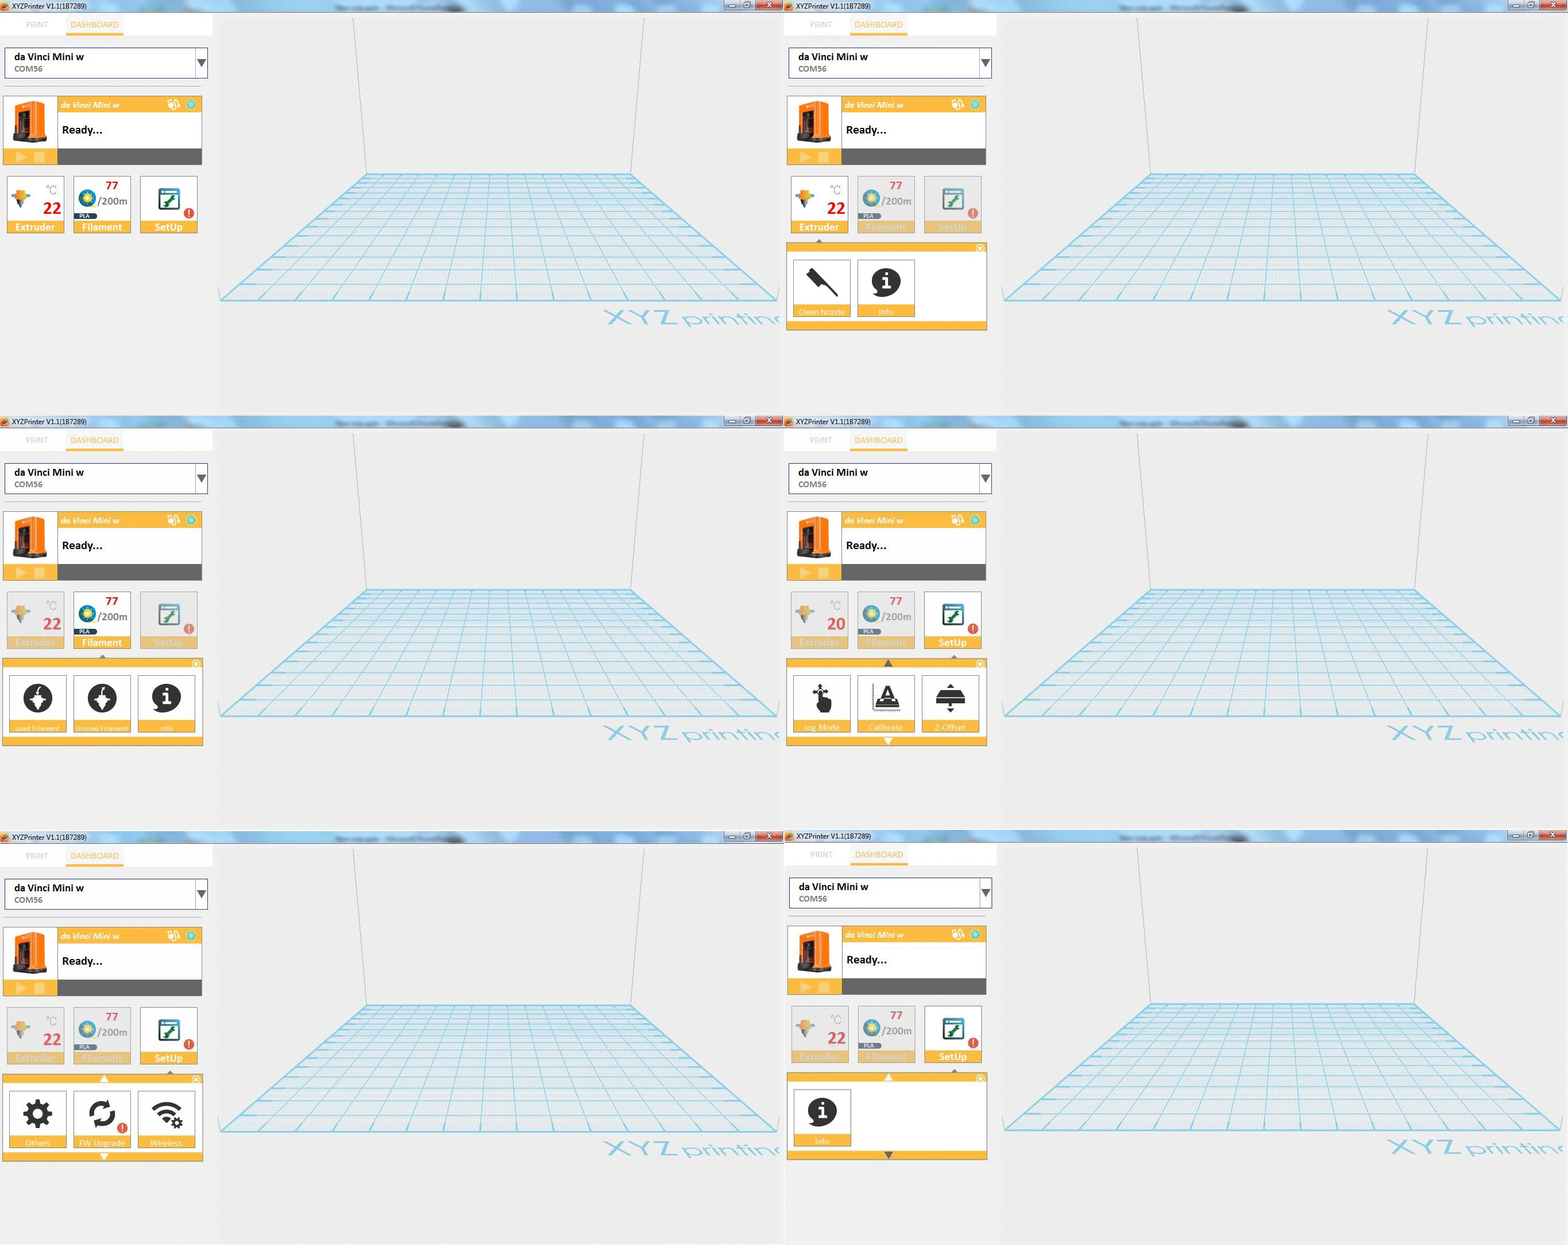
The Dashboard is a special feature that is designed for non LCD printers (da Vinci miniMaker, da Vinci miniWifi and da Vinci nano). It will serve as a caption panel of those non LCD printer. Operations like Loading/Unloading Filament/ Clean Nozzle and other related operations on extruder and printer can be done easily with the help of XYZmaker Dashboard.

Webp.net-gifmaker (6)


Export Saving

Last updated on September 19th, 2018 at 12:03 pm

Saving 3w file is essential especially when you want to have backup of the file with special settings on printing.

3w saving

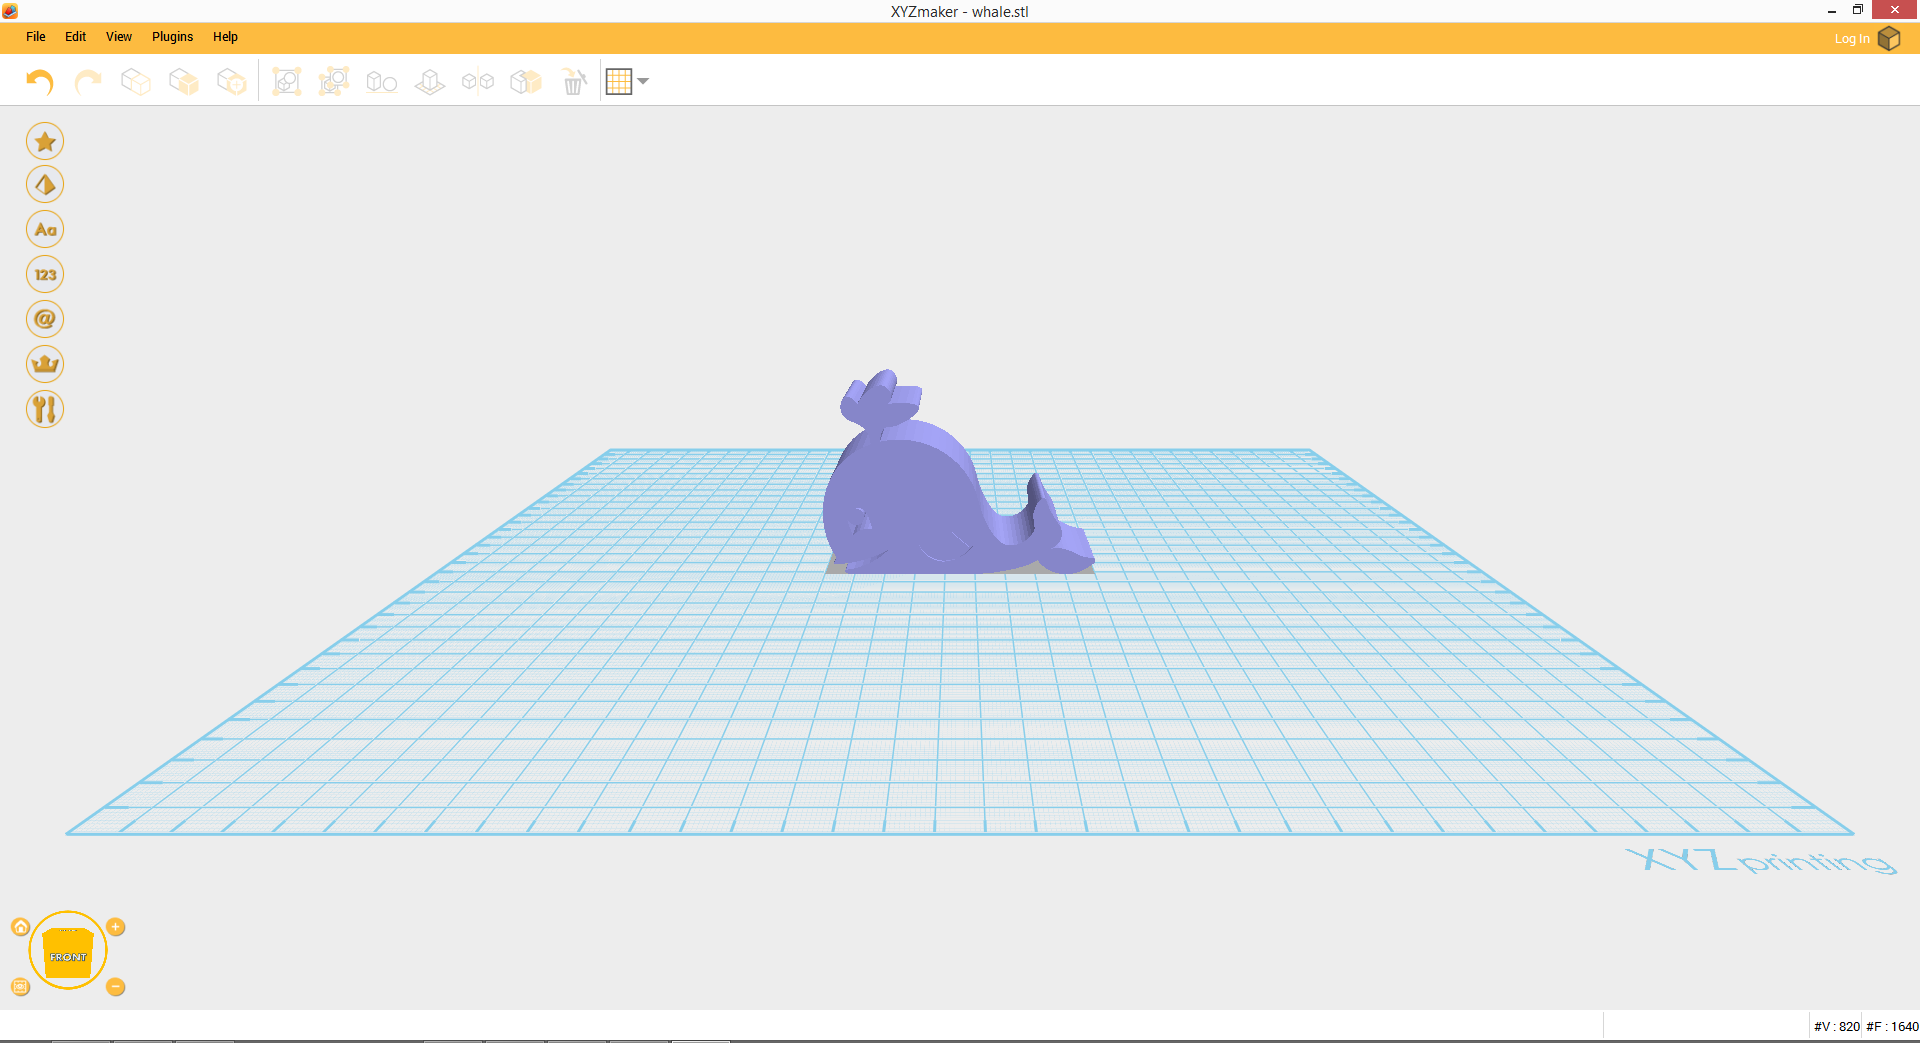
1.Open any object or create  any design

5

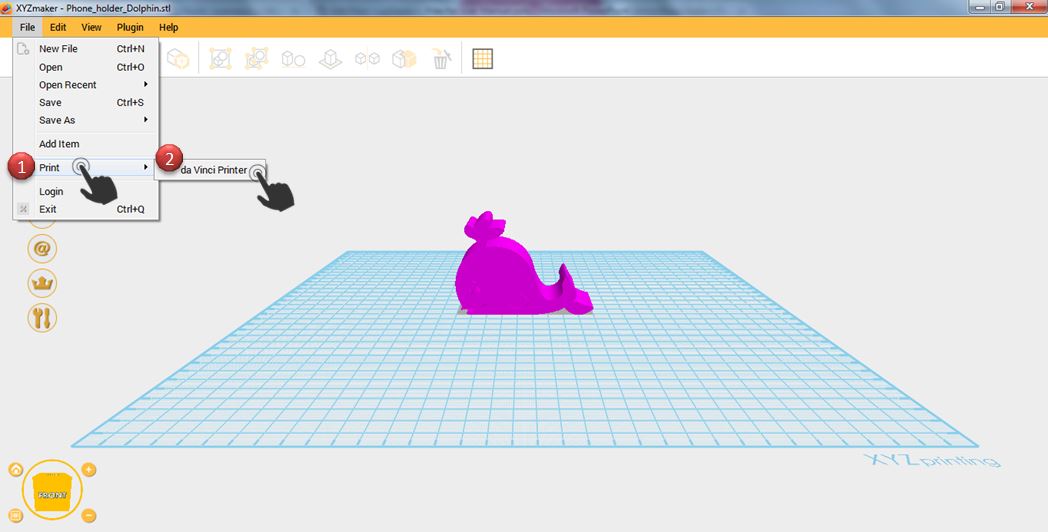
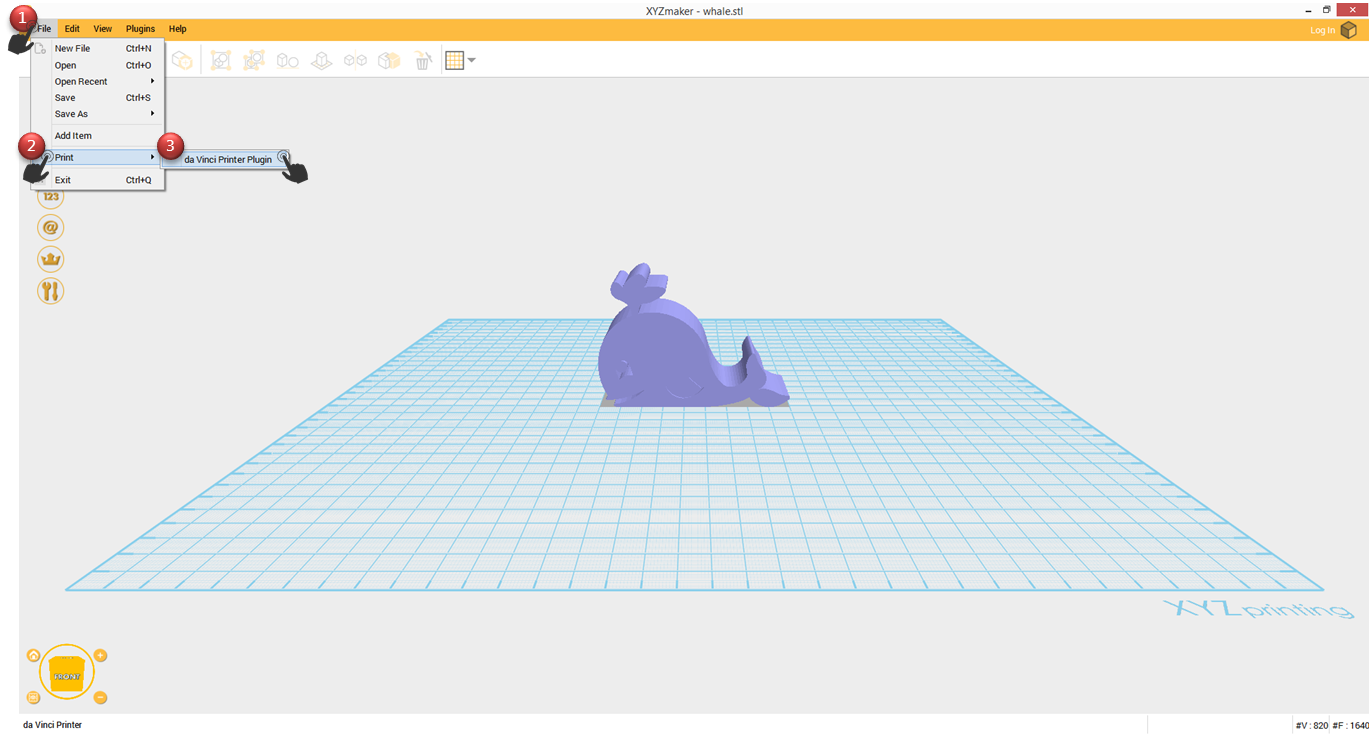
2.Click File then Print – da Vinci Printer

4

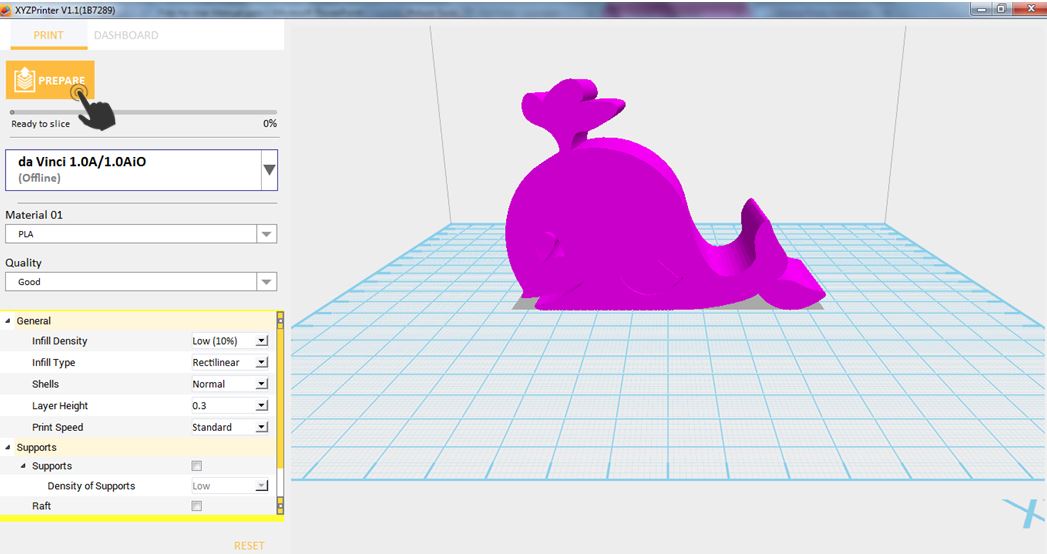
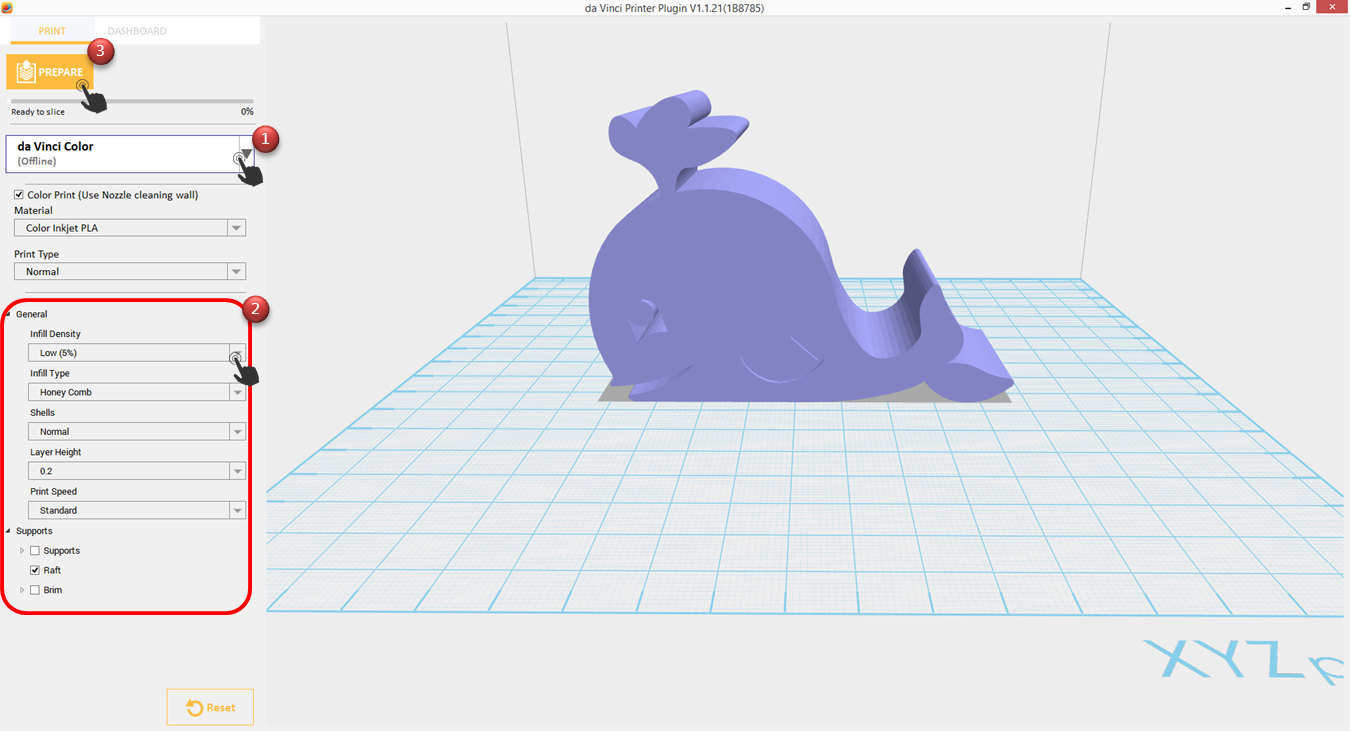
3.Click Prepare.

2

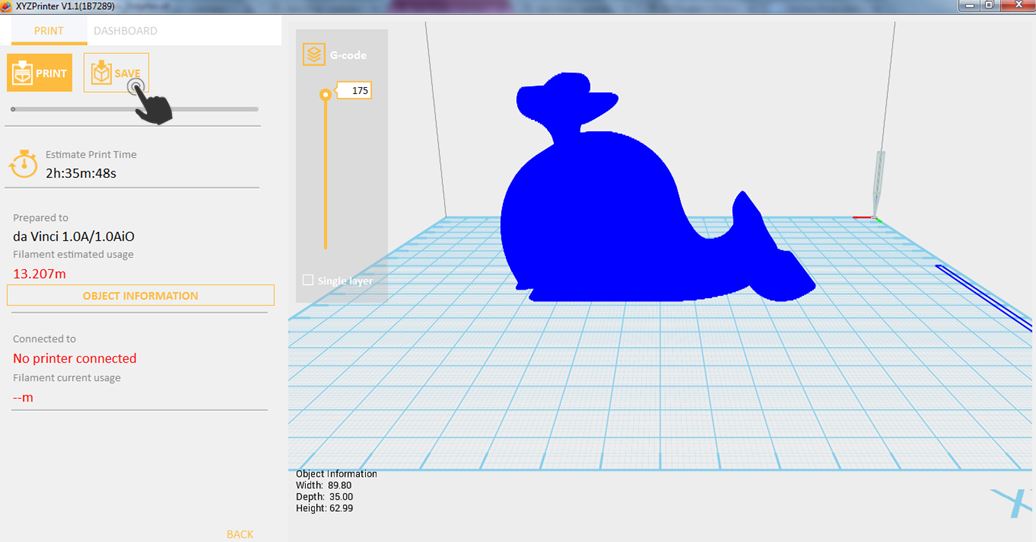
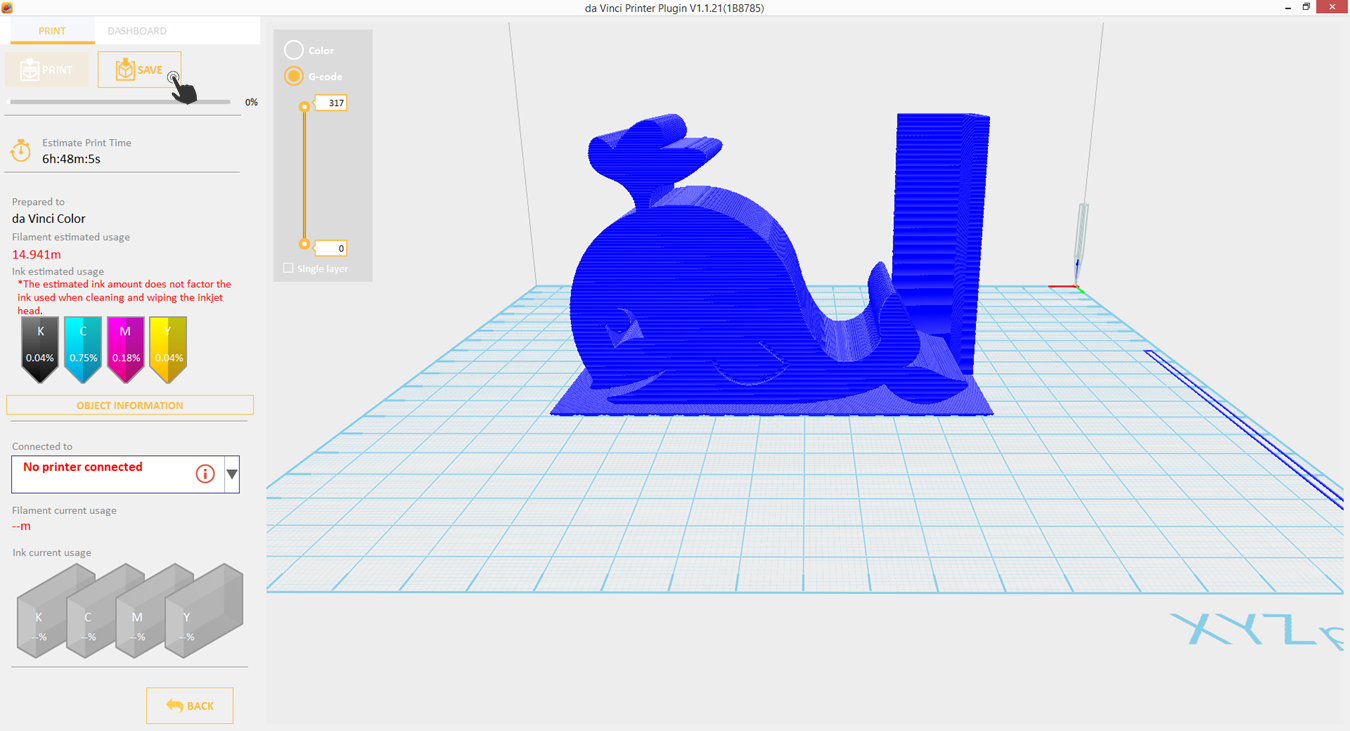
4.Click Save then it will save as 3w.

6

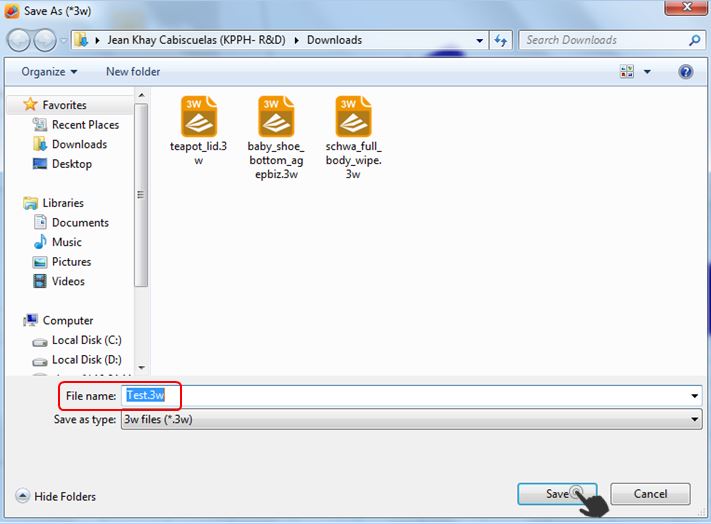
5.Save Window will display. Simply type the filename then click Save to save it as 3w file.

7

3cp saving

You can save your slice model in .3cp format as well. It is a format of sliced object for da Vinci Color and da Vinci Super printers.

  • Import or create any model.Export Saving1
  • Click File then Print – da Vinci Printer Plugin.export saving2
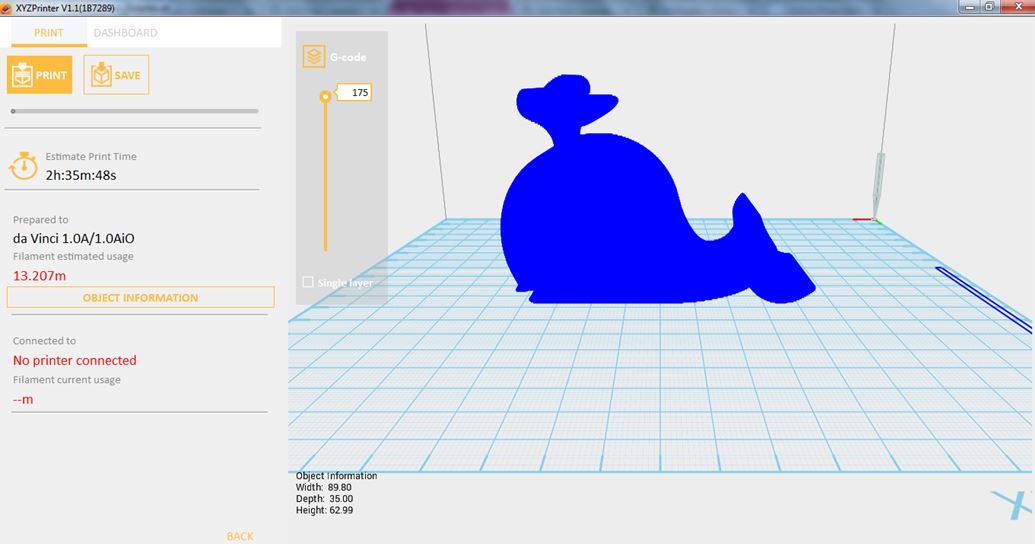
  • Select da Vinci Color or da Vinci Super. Set your desired settings then click Prepare.export saving4
  • Click Save.export saving5
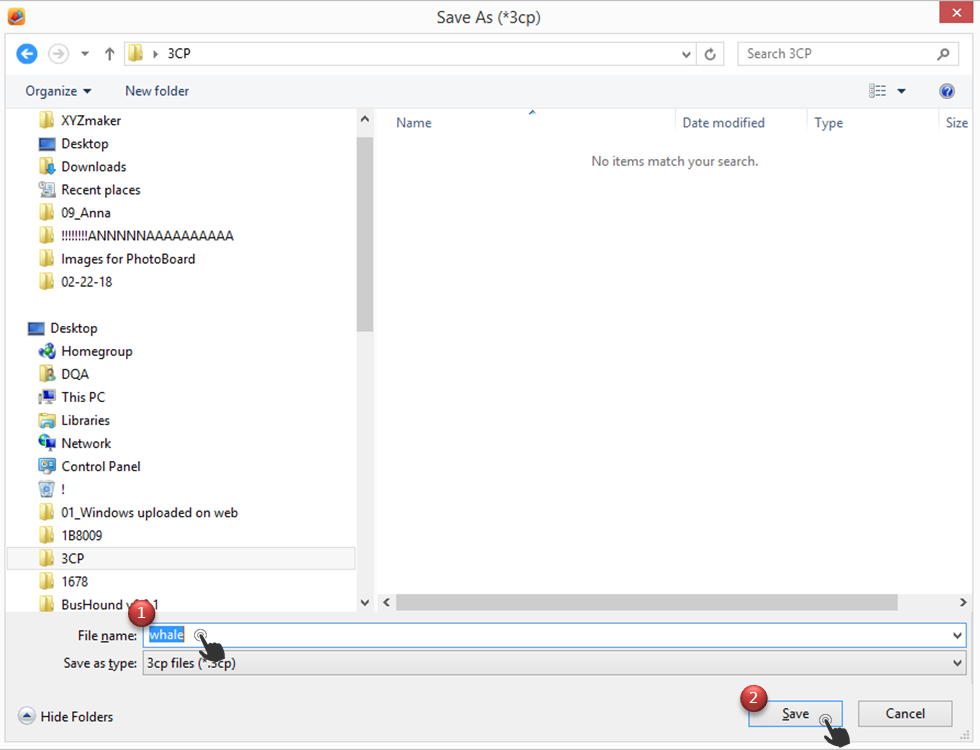
  • Type the filename when Save window displays then click the Save button.export saving6
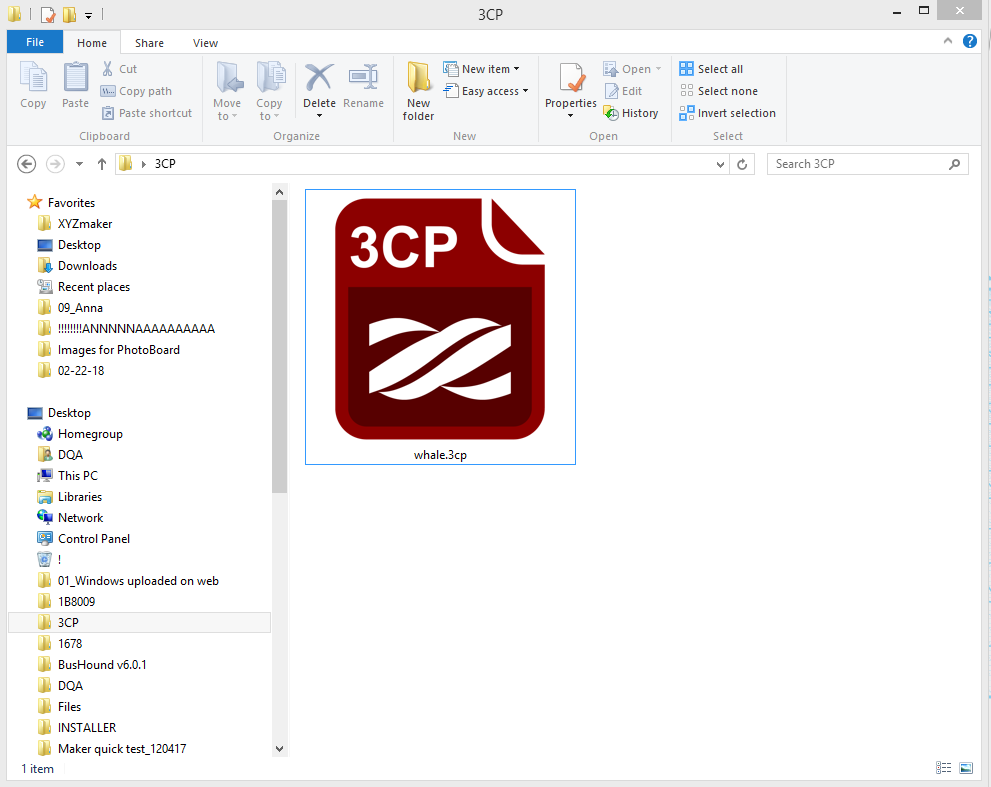
  • Your model was already saved as .3cp file.Export Saving7

Export

Last updated on September 19th, 2018 at 11:06 am

Export will save the file into a *.3w format. A .3w is the specific file format that is developed solely for the “da Vinci” series 3D printers. Programs like XYZmaker will make slicing calculations from file type supported and store the printing profile within .3w file, which will speed up your next 3D printing project.


1.Open any object or create  any design

5

2.Click File then Print – da Vinci Printer

4

3.Click Prepare.

2

4. Object is already sliced. After slicing, you can send it directly to printer or you can save it as 3w.

ex