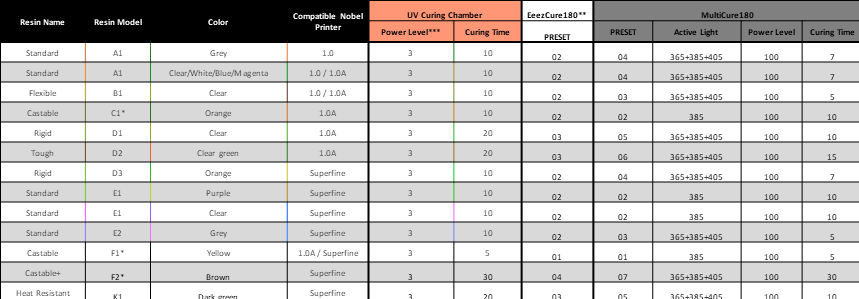
Category / Uncategorized
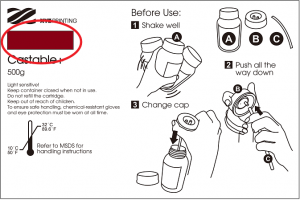
脫蠟鑄造用Plus (F2)
適用機型:Nobel Superfine
脫蠟鑄造用Plus樹脂採用特殊配方,脫蠟過程不留灰燼,能使珠寶設計與創作更有效率。本材料可精確展現設計細節、成品表面光滑,適合用於印製貴珠寶設計品。
圖檔設計建議
脫蠟鑄造用Plus樹脂性質似蠟、結構較軟脆,在列印的過程中特別容易受到分層的拉扯而斷裂。為達最佳列印效果,建議考量以下設計原則:
» 開孔尺寸 ≥0.5mm
» 其餘結構之設計建議請參考這篇文章
注意
» 樹脂槽受損或白化將會影響列印品質。
使用注意事項
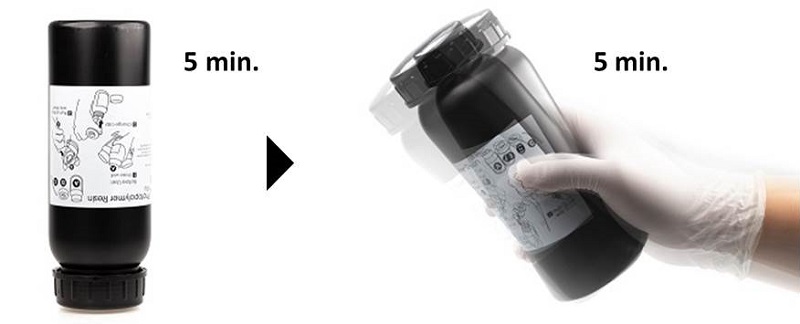
為確保本材料之均勻性與穩定性,每次列印前需將樹脂攪拌均勻,請務必按照以下說明搖勻樹脂。
安裝樹脂罐前步驟
請按照以下說明搖勻樹脂,以確保色料均勻分佈:
轉緊原裝瓶蓋,將樹脂罐倒置 5 分鐘,接著搖晃樹脂罐 5 分鐘。
列印前步驟
每次列印前,請將樹脂槽內之樹脂攪拌均勻。
請避免以尖銳物或硬物攪拌樹脂,以免劃傷樹脂槽底部塗層。請按照以下說明攪拌樹脂。
檢查樹脂顏色
比對樹脂罐標籤上之色塊與您的樹脂的顏色,如果您的樹脂呈半透明色或看起來比標籤上的色塊淺,可能是因為樹脂的成分分佈不均勻。使用未攪拌均勻之材料列印,可能會影響列印品質。
軟體設定
列印設定建議
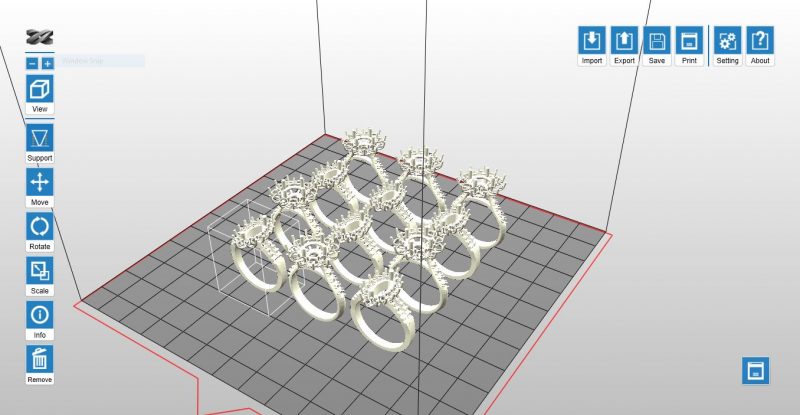
如同使用一般樹脂列印,圖檔具有懸空結構,或是與平臺接觸面積小時,需要增加支撐結構,確保物件能完整列印。
列印軟體具備「自動支撐」功能,能分析圖檔結構,自動生成支撐結構。有時候您可能會需要使用「手動」模式增加支撐,讓模型的所有結構都能完整成型。
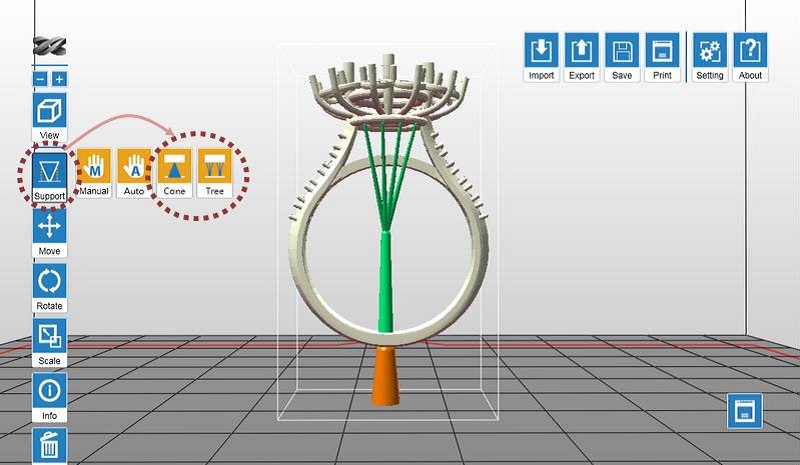
列印珠寶飾品時,可善加利用錐形與樹形支撐。您可以在物件最底部加上錐型支撐,翻模時保留錐形支撐,可做為材料的澆鑄口。
樹形支撐連接物件的接觸面積較小,可用於支撐珠寶飾品的懸空細節處。
支撐功能之使用說明請參考這篇文章。
如果遇到列印失敗的情形,請移動擺放位置、調整角度與支撐結構的設定。
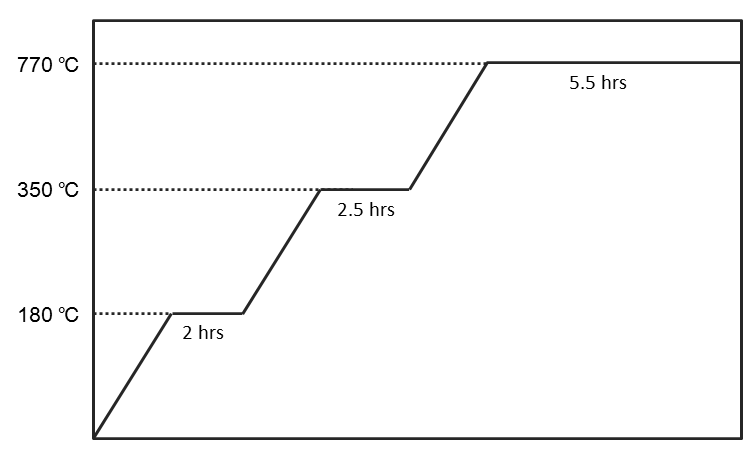
脫蠟過程溫度控制
使用本材料進行澆鑄時,可依照下圖的溫度控制建議操作,使樹脂確實脫蠟,確保翻模品表面光滑無瑕。
後處理建議
清洗
此材料性質柔軟,清洗建議與其他材料有些許不同。清洗時請避免刷洗或搓洗物件表面,以避免刮傷物件表面。
從平臺取下列印品後,將列印品浸泡於酒精 (95%酒精混合5%異丙醇IPA) 5分鐘,再沖洗2~3分鐘;沖洗物件時可用鑷子夾住物件的支撐處。
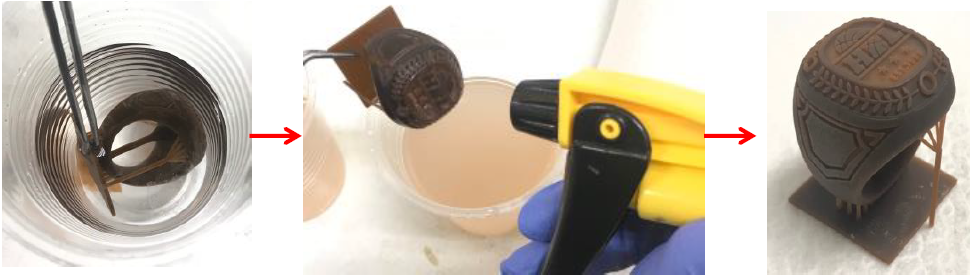
接著在物件上噴灑酒精,將細節內滯留的液體樹脂洗乾淨。
洗除樹脂後,請等待物件表面之液體風乾。
說明
» 請勿將列印品置於清洗劑中超過 5 分鐘;清洗劑可能會侵蝕列印品表面、造成物件損壞。
風乾物件表面的酒精
清洗後的列印品表面會有酒精殘留,請靜置清洗後的列印品,確認酒精完全揮發再進行後固化。酒精風乾後,請仔細檢視細小結構中是否殘留樹脂;請務必清除未固化的樹脂,以免堵塞原始圖檔的設計細節。
注意
» 在列印品表面仍有酒精殘留的狀態下就進行後固化,物件表面將呈白霧狀,可能會影響翻模結果。
清除支撐
請使用工具剪除支撐,直接拉扯將造成列印品表面破損。
後固化
本材料列印品必須經過UV後固化程序增加硬度,才能完整翻模。
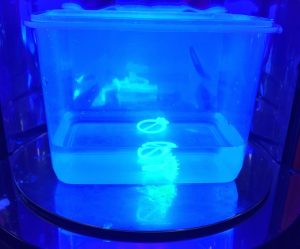
將列印物件泡水後固化 30 分鐘,即可使樹脂成份完全反應。
參考
» 查看 XYZprinting 後固化設備搭配原廠樹脂材料之固化設定。
樹脂槽中之樹脂保存方式
樹脂槽中未固化的樹脂應避免光線照射。樹脂槽中之樹脂如將閒置 24 小時以上,請使用濾網過濾後倒入不透光的容器內保存,下次列印前再倒回樹脂槽中使用。
說明
» 建議使用不透光之 PP 材質容器保存樹脂。
耐高溫樹脂 (K1)
列印後處理
列印完成後,請按照以下步驟處理列印品,以確保列印品表面無樹脂殘留,並達到最佳功能特性。
後處理建議
1. 清洗
列印完成後盡快取下列印品,並以濃度 95% 以上乾淨的酒精洗去表面未固化的樹脂。
清洗過程中可以軟毛刷刷洗物件表面,可確實洗去樹脂。
注意
» 避免將列印品浸泡在酒精中超過10分鐘,以免酒精侵蝕構而造成列印品損壞。
2. 風乾物體表面的酒精
清洗後的列印品表面會有酒精殘留,請靜置清洗後的列印品,確認酒精完全揮發再進行後固化。酒精風乾後,請仔細檢視細小結構中是否殘留樹脂;請務必清除未固化的樹脂,以免堵塞原始圖檔的設計細節。
3. 後固化
樹脂材料列印品需以 UV 光進行後固化,將確保樹脂成份完全固化,使此材料展現應有的機械性質。請於物件表面的酒精蒸發後,盡快進行 UV 光後固化。
使用 XYZprinting UV 固化機時,請參照此固化設定
4. 清除支撐
請使用工具剪除支撐,直接拉扯將造成列印品表面破損。
樹脂保存建議
樹脂槽中未固化的樹脂應避免光線照射,可使用濾網過濾後倒入不透光的容器內保存,下次列印前再倒回樹脂槽中使用。
注意
» 建議使用不透光之 PP 材質容器保存樹脂。
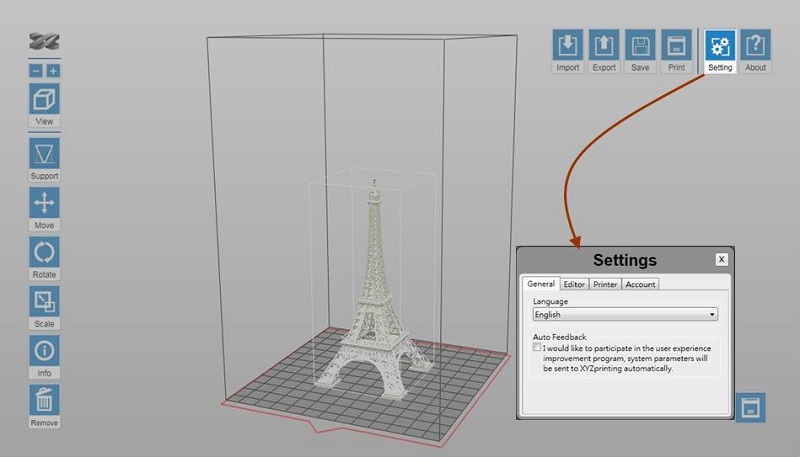
Setting
In Setting function, you can adjust the interface language, display units, printer type, printout scaling, light strength tuning and sign in as XYZprinting member.
Click on below items to read more information on each setting:
Language
Select the display language of the software.
[collapse]
Display Units
Select the display unit of the workspace. You can change the display unit between cm and inch.
Note
Each grid on the virtual platform illustrates 1 cm² / inch² in the actual size.
[collapse]
Auto Position
When Auto Position is selected, the software will adjust the position of the object while importing the file. The option makes sure that the objects will not overlap each other on the workspace.
When the option is not selected, all objects imported will be placed at the center of the workspace.
[collapse]
Printer Type
The change to Printer Type will be reflected at the size of workspace and options in Export and Print functions. If the Printer Type is changed after any object has been imported, the workspace will be reset.
[collapse]
Light Strength Tuning
The delicacy and solidness of prints is determined by the strength of the laser beam. You may adjust the strength of the laser’s power based on common features and purposes of your prints.
The printer prints in moderate laser power by default. You may get more delicate objects when printing with lower laser power, but the printouts may slightly weaken under force. Try post curing the parts in this case. If the objects deform easily, you may try to increase the laser power.
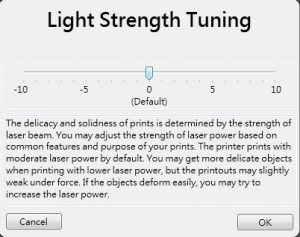
Note
The function is shown only when the printer is connected.
[collapse]
Printout Scaling
To improve the dimensional accuracy of the printer, you may adjust the scale of the X/Y axis with this option. Once adjusted, the setting will be applied to all files processed later on on the same computer.
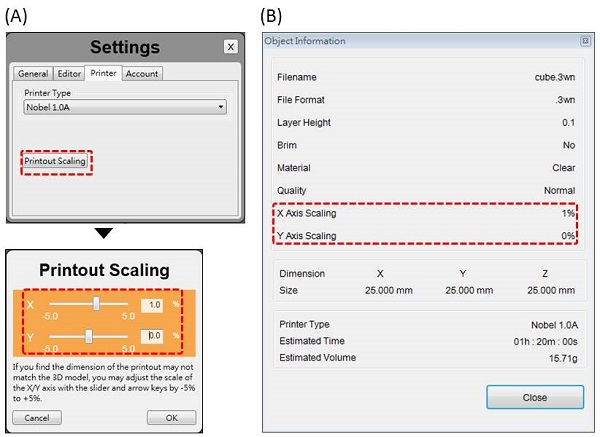
(A)Printout Scaling under Settings. (B) The scaled ratio is included in the “Info” of the file.
[collapse]
Account
Log in your XYZprinting account.
[collapse]
灰色樹脂 (E2)
適用機型:Nobel Superfine
此材料呈不透明灰色,容易觀察列印品細節,適合用於各類用途之打樣需求。
圖檔設計建議
為達最佳列印效果,設計圖檔時請參酌此處之圖檔設計原則。
使用注意事項
為確保本材料之均勻性與穩定性,每次列印前需將樹脂攪拌均勻,請務必按照以下說明搖勻樹脂。
安裝樹脂罐前步驟
請按照以下說明搖勻樹脂,以確保色料均勻分佈:
轉緊原裝瓶蓋,將樹脂罐倒置 5 分鐘,接著搖晃樹脂罐 5 分鐘。
列印前步驟
每次列印前,請將樹脂槽內之樹脂攪拌均勻。
請避免以尖銳物或硬物攪拌樹脂,以免劃傷樹脂槽底部塗層。請按照以下說明攪拌樹脂。
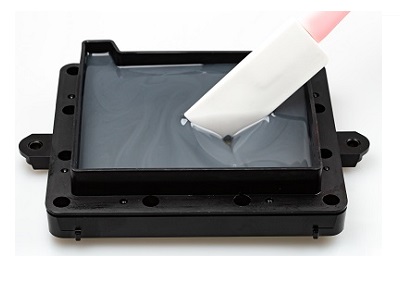
方法 1:以矽膠刮刀攪拌
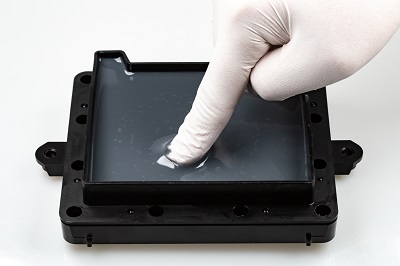
方法 2:戴防滲手套,以手指攪拌
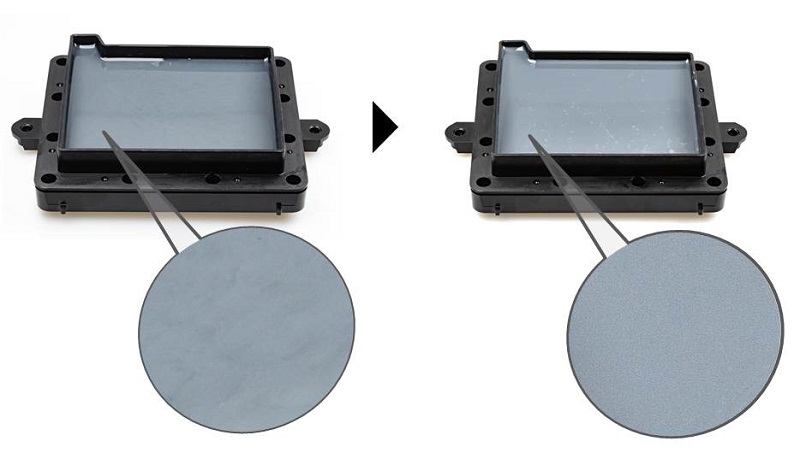
攪拌均勻之樹脂將呈現下圖之狀態:
注意 » 請避免用力攪拌樹脂,以免劃傷樹脂槽底部塗層。 » 列印前請先檢查樹脂槽中之樹脂殘量,請先將樹脂補滿再開始列印 (請注料至 Max 線之高度)。» 樹脂罐內的樹脂如已超過 24 小時未使用,請換回原裝瓶蓋、將樹脂罐倒置 5 分鐘、搖晃 5 分鐘,再繼續列印。
樹脂槽中之樹脂保存方式
樹脂槽中未固化的樹脂應避免光線照射。樹脂槽中之樹脂如將閒置 24 小時以上,請使用濾網過濾後倒入不透光的容器內保存,下次列印前再倒回樹脂槽中使用。

注意
» 建議使用 PP 材質容器保存樹脂。
» 將樹脂倒回樹脂槽前,請先將保存樹脂的容器倒置並搖晃各 5 分鐘。
後處理建議
完整後處理流程請參照此篇說明。
Manual Mode
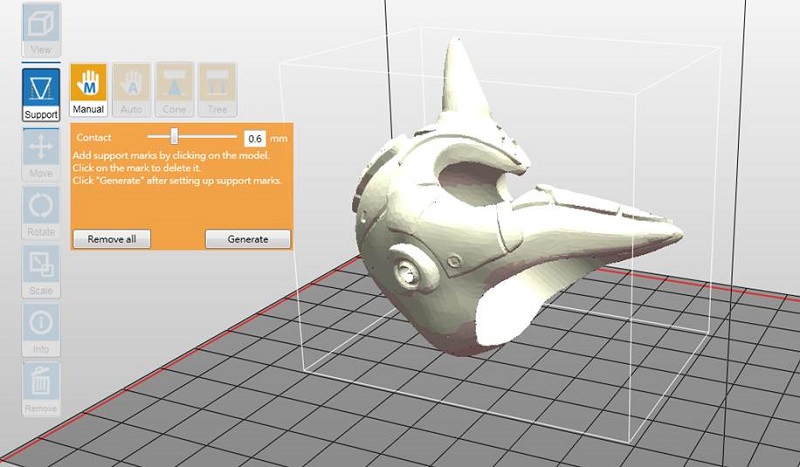
You can build the supports from scratch with the manual mode, or use it to adjust the supports generated in the Auto mode.
In Auto Mode, all supports are in the same size at the contact points. However, the size of the contact can be set to different based on the features of the object.
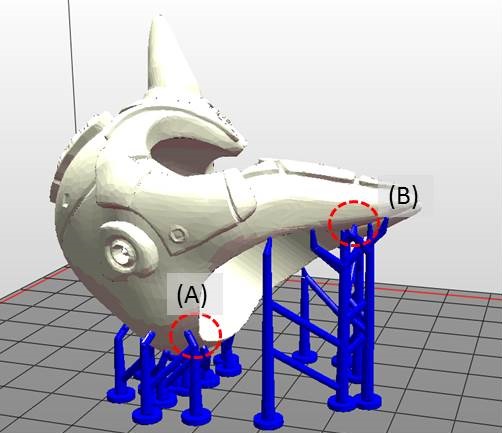
(A) Larger contact may be required for heavy part.
(B) Smaller contact is good enough for holding lighter structure. Also it is easier for post-processing.
To Edit Supports Manually
Step 1: Resize, rotate and/or move the object as the way you want to print it.
However, if you have already generate supports with the Auto Mode, you can only move the object horizontally. Other adjustments to the object will lead to the reset of supports.
Step 2: Setup below settings based on the features of your object.
If supports were added in the Auto Mode, they will be shown as blue dots in the manual editing mode.
To add support, simply select a proper size of the contact point and then click on the model at the overhangs.
To delete support, just click on the support mark (the blue dot).
Step 2: Click “Generate” to finish editing.
Note
» When there is more than one object on the platform, you will need to select one of the model before you can launch the support options.
» If the object is resized, rotated, or moved vertically, the support structure will be reset. Please set up the supports again.
Auto Mode
In Auto Mode, the software will analyze the features of the model and add support structure to where necessary.

To Add Supports Automatically
Step 1: Resize, rotate and/or move the object as the way you want to print it.

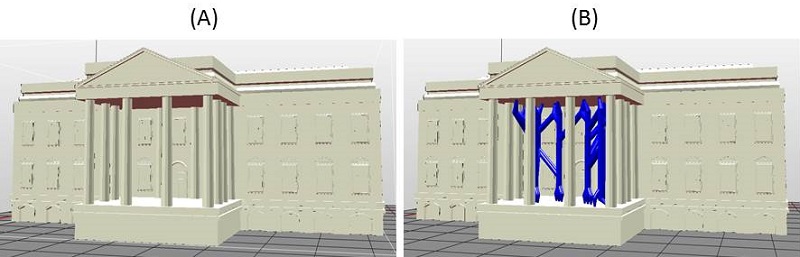
The orientation of the object is especially essential for a successful print. The above object was rotated to avoid below issues:
(A) Heaviest part is away from the bottom
Objects may drop easily when the heaviest part is away from the bottom due to the peeling force. Also, heavy supports may be required to hold the whole object steadily. The best practice is to rotate your object to move the heaviest part of it to the bottom.
(B) Horizontal structures
Due to the nature of SLA printing technology, horizontal structures over the platform may result in drooping between supports.
Step 2: Setup below settings based on the features of your object.
Density: Large overhangs will require more support structure. However, more support structure will take longer for printing.
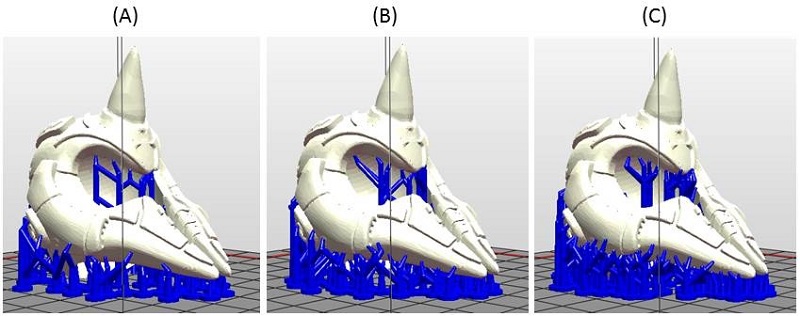
(A) Low density
(B) Medium density
(C) High density
Contact: Thicker contact point will lead to higher strength but it may require more efforts to remove them in the post-processing steps.
(A) Small contact / 0.4mm
(B) Mid contact / 0.9mm
(C) Large contact / 1.3mm
Lift: Lift the objects over the print platform is necessary for those without any flat surface or not suitable for laying on the platform. Be sure to check if the supports are enough to hold the objects on the platform before printing.
Inner Support: For objects with inner overhanging structure, supports will be added when “Inner Support” is selected. However the support at inside may not be removed easily for some structures with small openings, you may consider printing without inner support.
(A) Without inner support
(B) With inner support
Step 3: Click “Auto Generate” to add supports.
Note
» When there is more than one object on the platform, you will need to select one of the model before you can launch the support options.
» If the object is resized, rotated, or moved vertically, the support structure will be reset. Please set up the supports again.
» To change the size or location of individual support structure, please edit it in the Manual Mode.
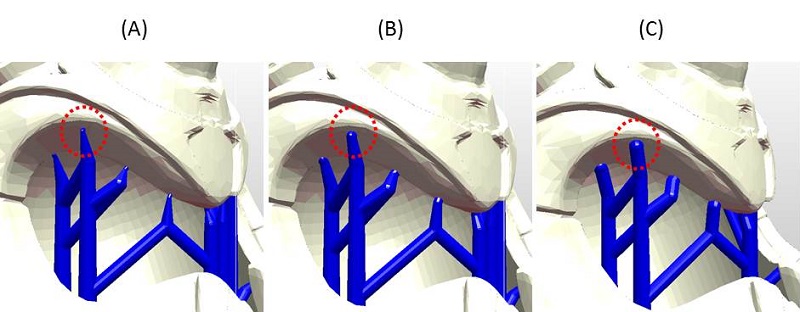
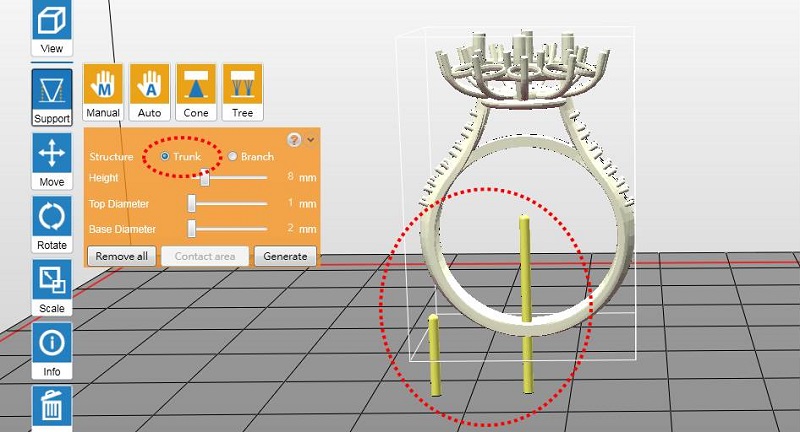
樹形支撐
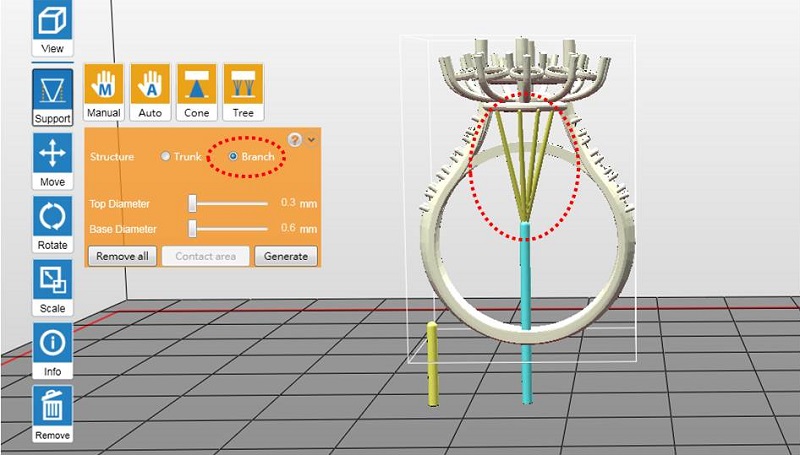
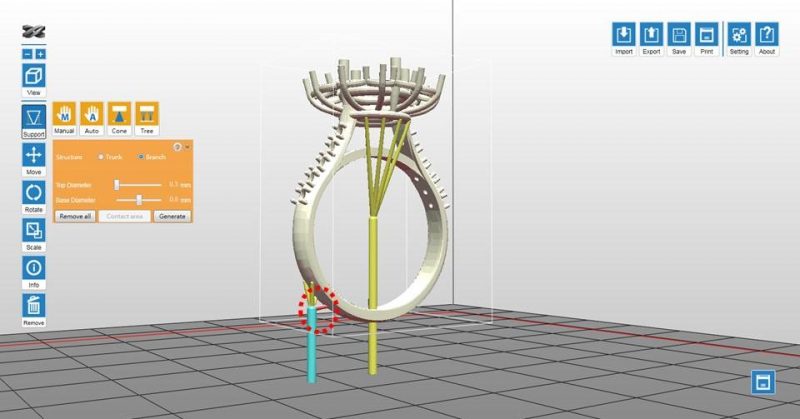
XYZware_Nobel 新增「樹形支撐」功能,更新至最新版本即可使用本功能。
樹形支撐與物件之間的接觸點極小,針對最常出現小細節的珠寶飾品設計件,使用樹形支撐能讓這些細節穩固地成型。
樹形支撐結構

(A) 接點面積:此項目是用於調整樹形支撐與物件接觸的面積,較大的物件將需要增加接觸面積來提升支撐力。
(B) 分支:分支是樹形支撐的頂層結構,細枝直接接到物件本體。
(C) 主幹:主幹是樹形支撐的底層結構。
樹形支撐設定方式
步驟 1:設定主幹
在要加入主幹的位置點一下平臺,即可增加主幹。
如要移動主幹,則請按住並拖曳主幹。
如要刪除主幹,直接點一下要刪除的主幹即可。
步驟 2:設定分支
選擇「分支」設定,然後點一下要設定分支的主幹,接著在模型的懸空處點擊滑鼠,系統就會為指定的長出分支。
如要刪除分支,請直接點擊要刪除的分支即可。
步驟 3:設定完成樹枝支撐記號後,按一下「生成」
步驟 4:視需要調整分支的接點面積大小
如要調整分支的接點大小,請重新開啟「支撐」>「樹形」選單,然後按一下「接點大小」按鈕。
點一下要調整的分支 (所選分支將顯示為藍色),然後拖曳滑桿來調整接點面積。
調整所有分支的接點大小後,請按一下「完成」。
訣竅
如要同時調整同一主幹之所有分支,開啟調整接點面積功能後,點一下主幹,即可全選所有相連的分支。
注意事項
1. 設定分支時如未選取任何主幹,系統將先以黃點標記分支的位置,此時請點選任一主幹,分支記號就會與指定主幹相連接。
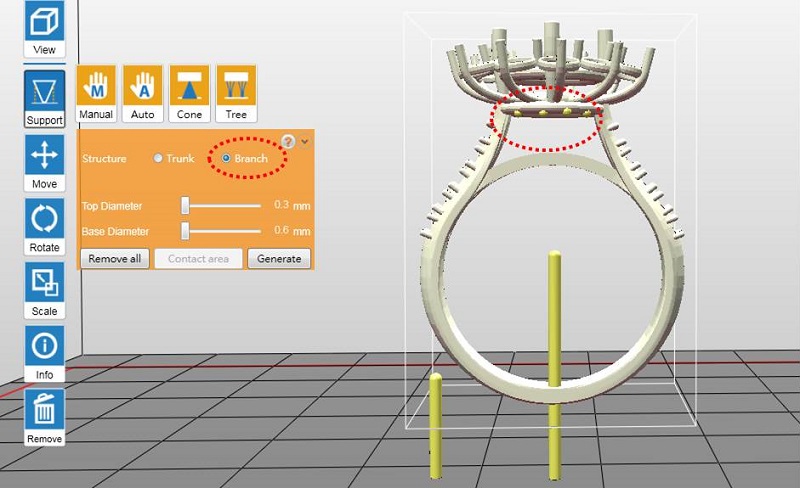
2. 分支記號只能設定高於指定主幹頂端的位置。
3. 未產生任何主幹時,無法加入分支記號,因此請先設定主幹。
4. 分支傾斜角度超過 45 度時,將以紅色顯示,此類分支很可能在列印過程中脫落。
5. 軟體計算支撐設定時,將直接刪除未設定分支的主幹。
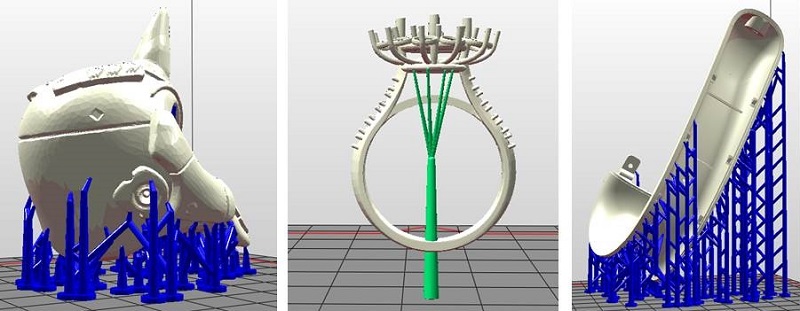
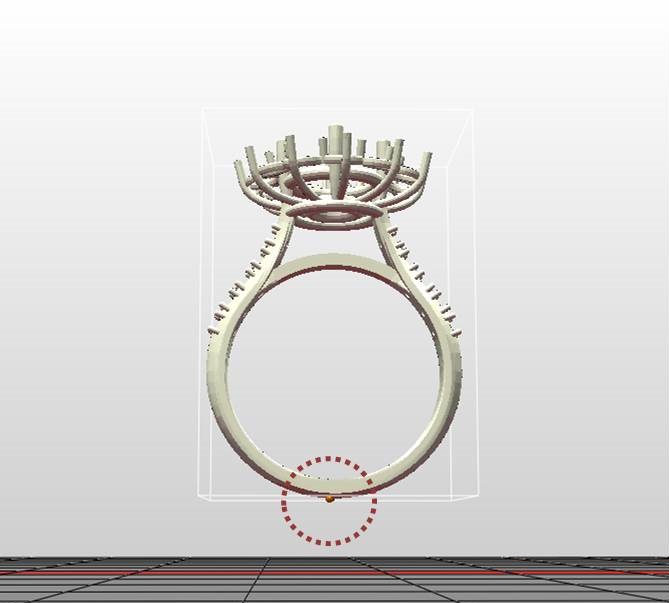
錐形支撐
XYZware_Nobel 新增「錐形支撐」功能,更新至最新版本即可使用本功能。
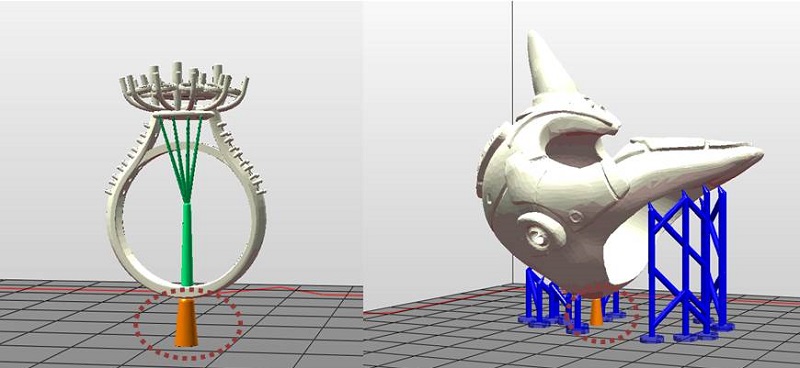
錐形支撐比原先的支撐結構來得粗,使用脫臘澆鑄樹脂列印時,於物件基底加上錐形支撐,列印完成後保留錐形支撐,可作為脫臘澆鑄的水口。
粗壯的錐形支撐能更穩固地黏在平臺上,列印重物時,亦可用錐形支撐抓住物件底部。列印完畢後,建議以砂紙或打磨工具磨掉錐形支撐,直接拔除支撐很可能會破壞物件表面。
錐形支撐結構
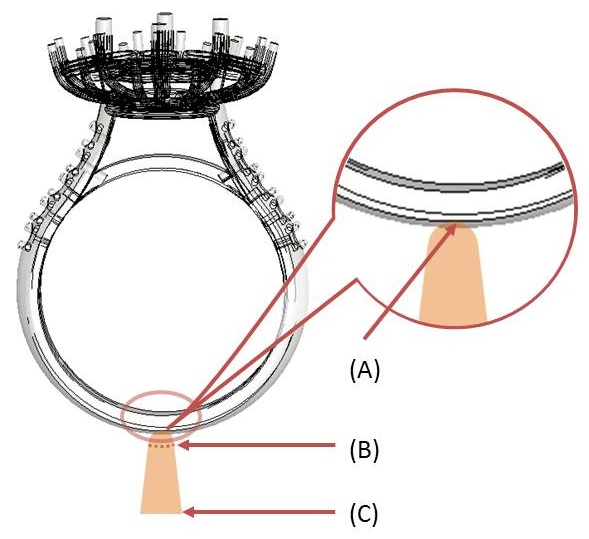
(A) 接點面積;較大的物件將需要增加接觸面積來提升支撐力。
(B) 頂面直徑:此項目最小可設為 2mm。
(C) 底面直徑:此項目最小可設為 3mm;底面直徑需大於頂面直徑至少 1mm。
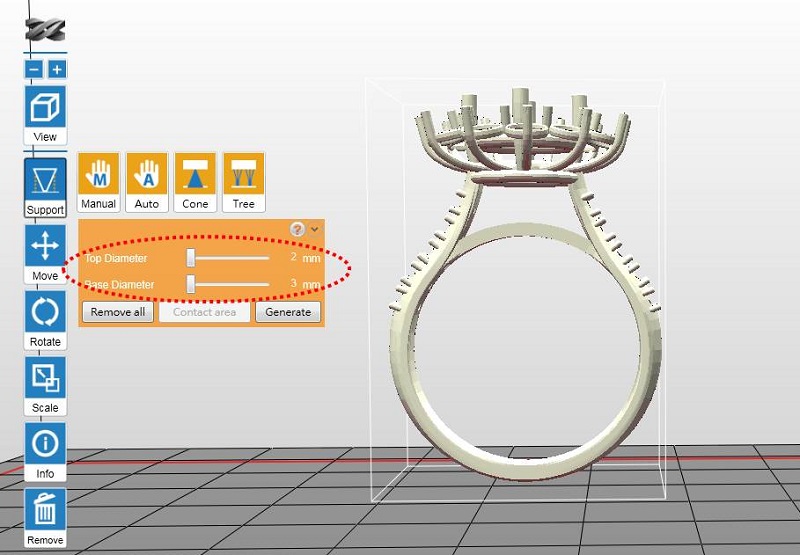
錐形支撐設定方式
步驟 1:設定錐形支撐記號 (顯示為橘點)
在模型懸空處點一下滑鼠即可加入記號,如要刪除錐形支撐記號,請點一下橘點即可。
步驟 2:產生錐形支撐
設定完成錐形支撐記號後,按一下「生成」。
步驟 3:視需要調整錐形支撐的接點面積大小
如要調整錐形支撐的接點大小,請重新開啟「支撐」>「錐形」選單,然後按一下「接點面積」按鈕。
點一下要調整的支撐 (所選分支將顯示為藍色),然後拖曳滑桿來調整接點面積。
調整所有錐形支撐的接點面積後,請按一下「完成」。
注意事項
1. 物件懸空 6mm 以上才可加入錐形支撐,如物件離平臺過近,軟體將自動抬昇物件。
2. 錐形支撐形成後,直徑將無法調整,如要調整支撐尺寸,請先刪除原先的支撐標記,調整相關直徑設定,再重新加入支撐記號。