Print Setting

Last updated on March 28th, 2018 at 04:00 pm

da Vinci Color is XYZprinting’s first FFF desktop 3D printer with true color technology achieved through the combination of inkjet and 3D printing technology, there are worldwide 40 patents pending.By using CMYK inkjet technology, droplets of ink attach itself to the color-absorbing PLA filament, allowing the da Vinci Color to create prints of various colors by combining the droplets of ink on the filament. The da Vinci Color was designed with consumer accessibility, creativity and ease-of-use in mind.


Enable Color Print

When Color Print is enabled your sliced object will retained its original color and can be print with ink installed. While disabling Color Print will not retained object’s original color and can be print without any ink installed on your da Vinci Color.

  • Import any textured object.

Import Textured

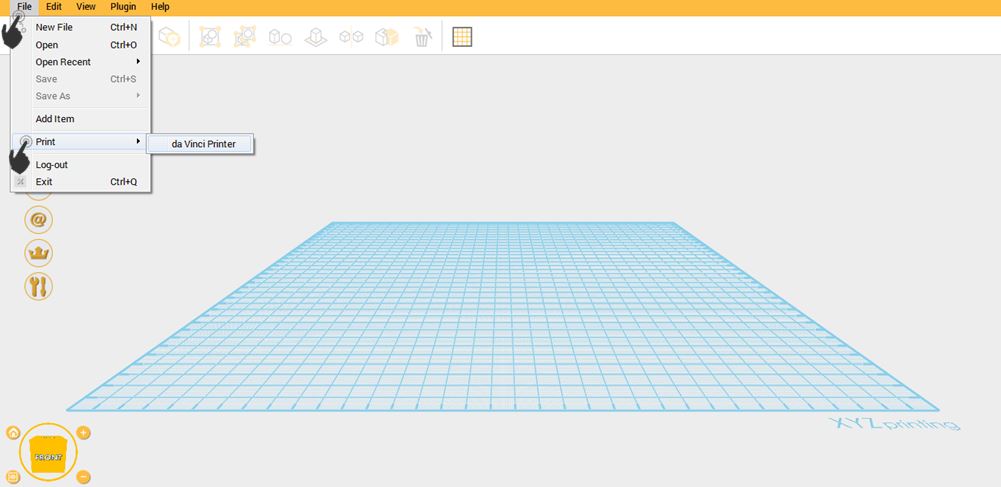
  • Click File then select Print – da Vinci Printer Plugin
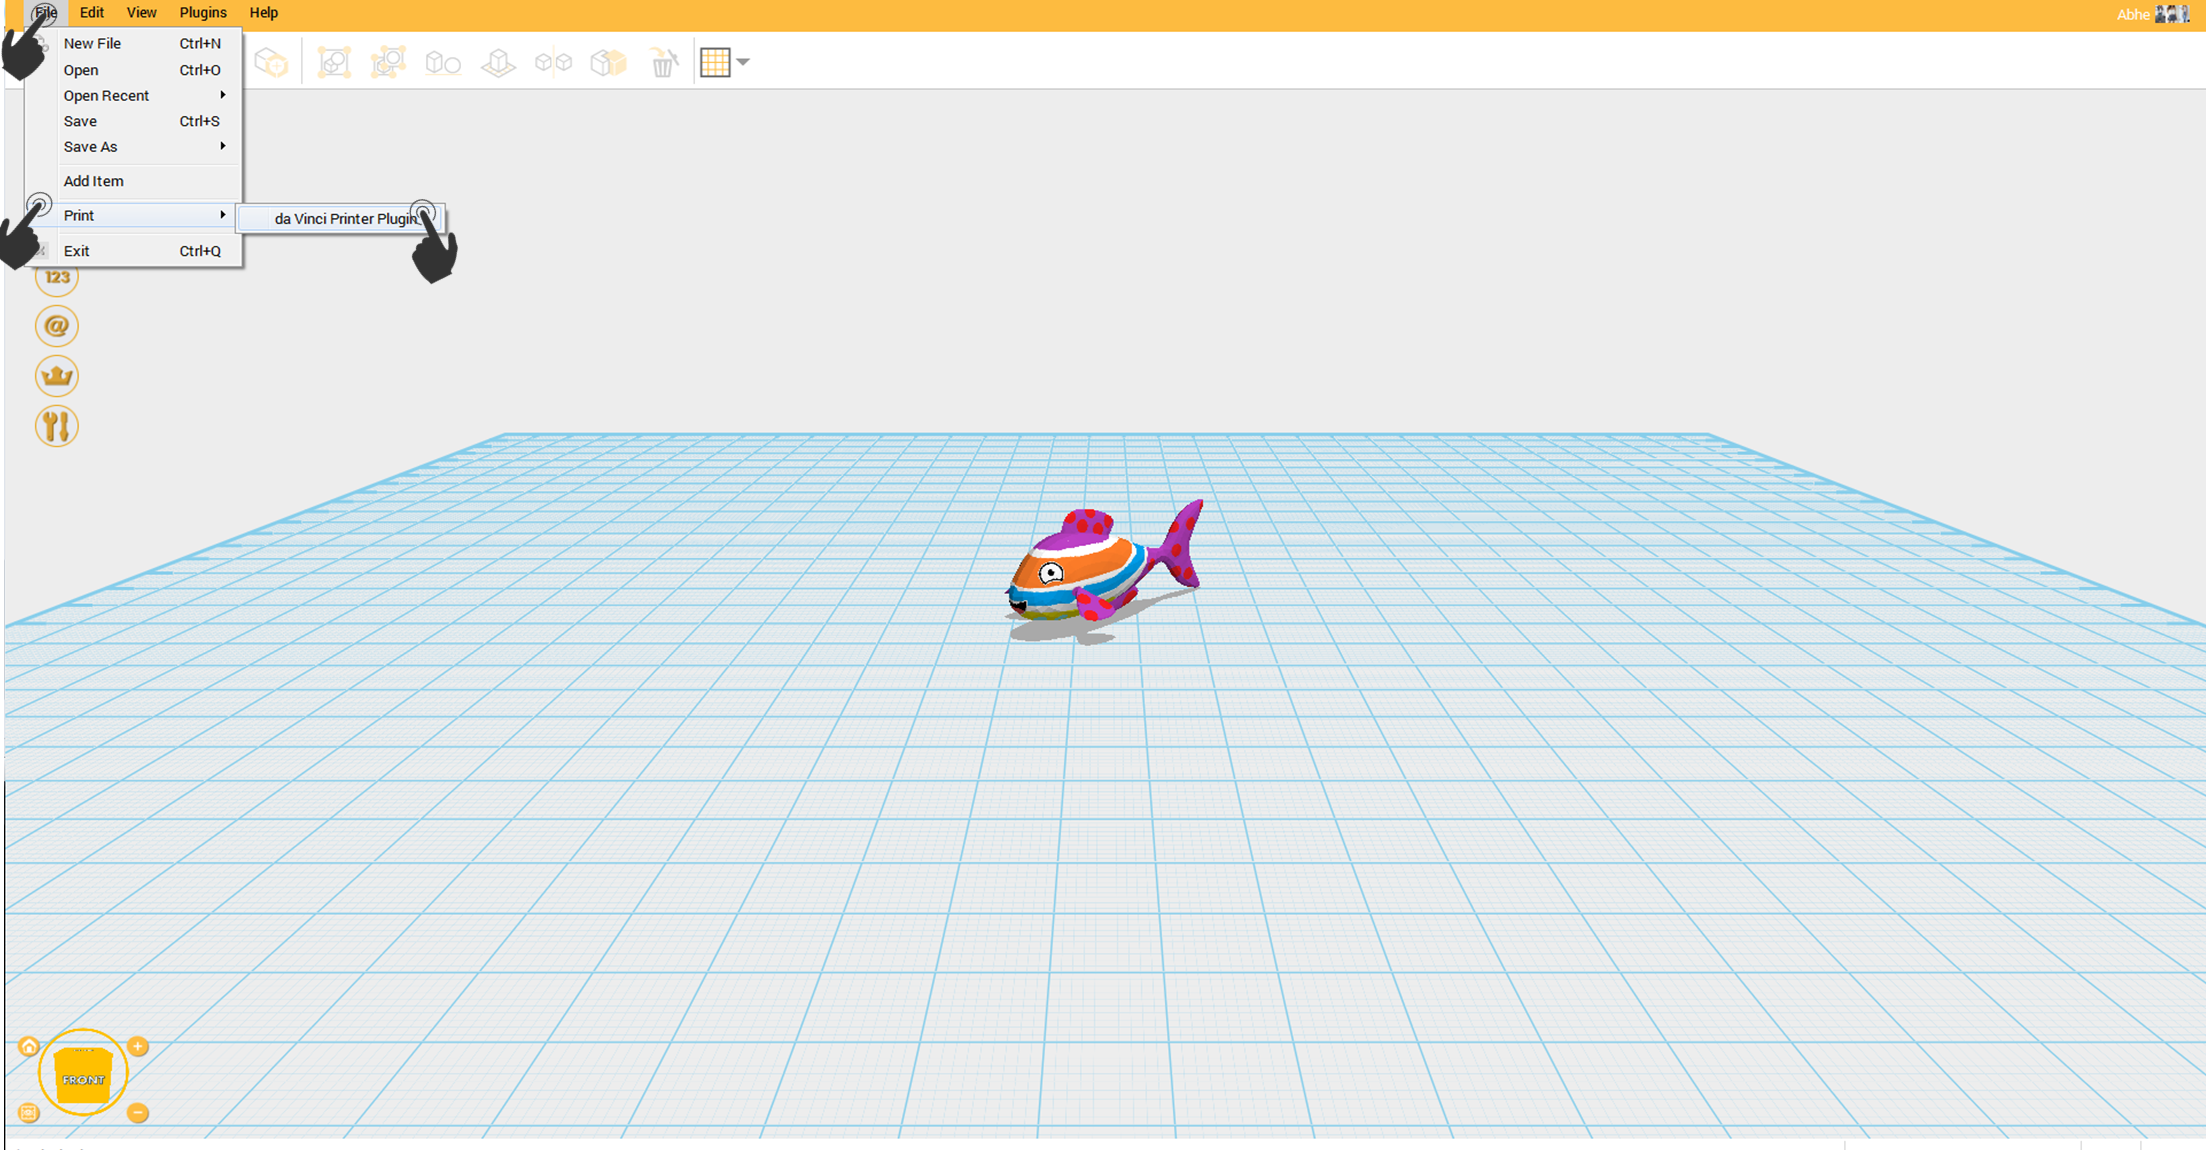
da Vinci Printer Plugin

  • To make the object color is colored, enabled the Color Print on the settings.
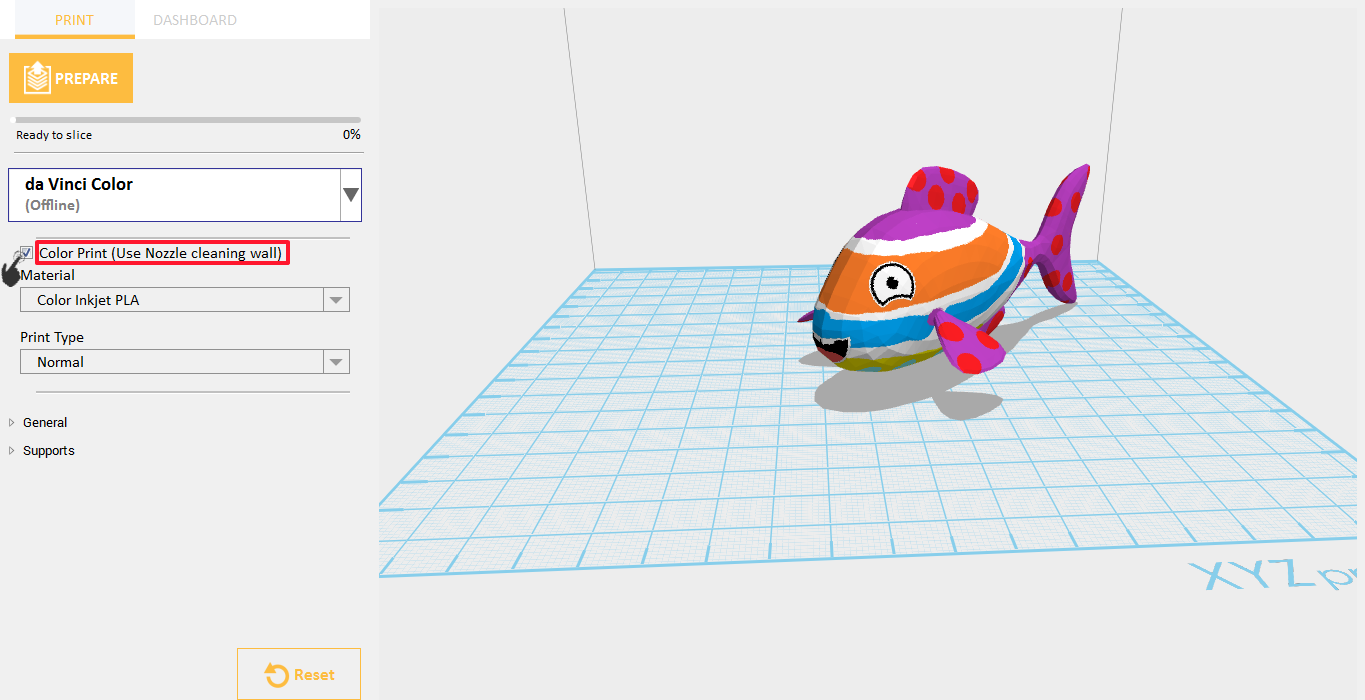
Enable Color Print

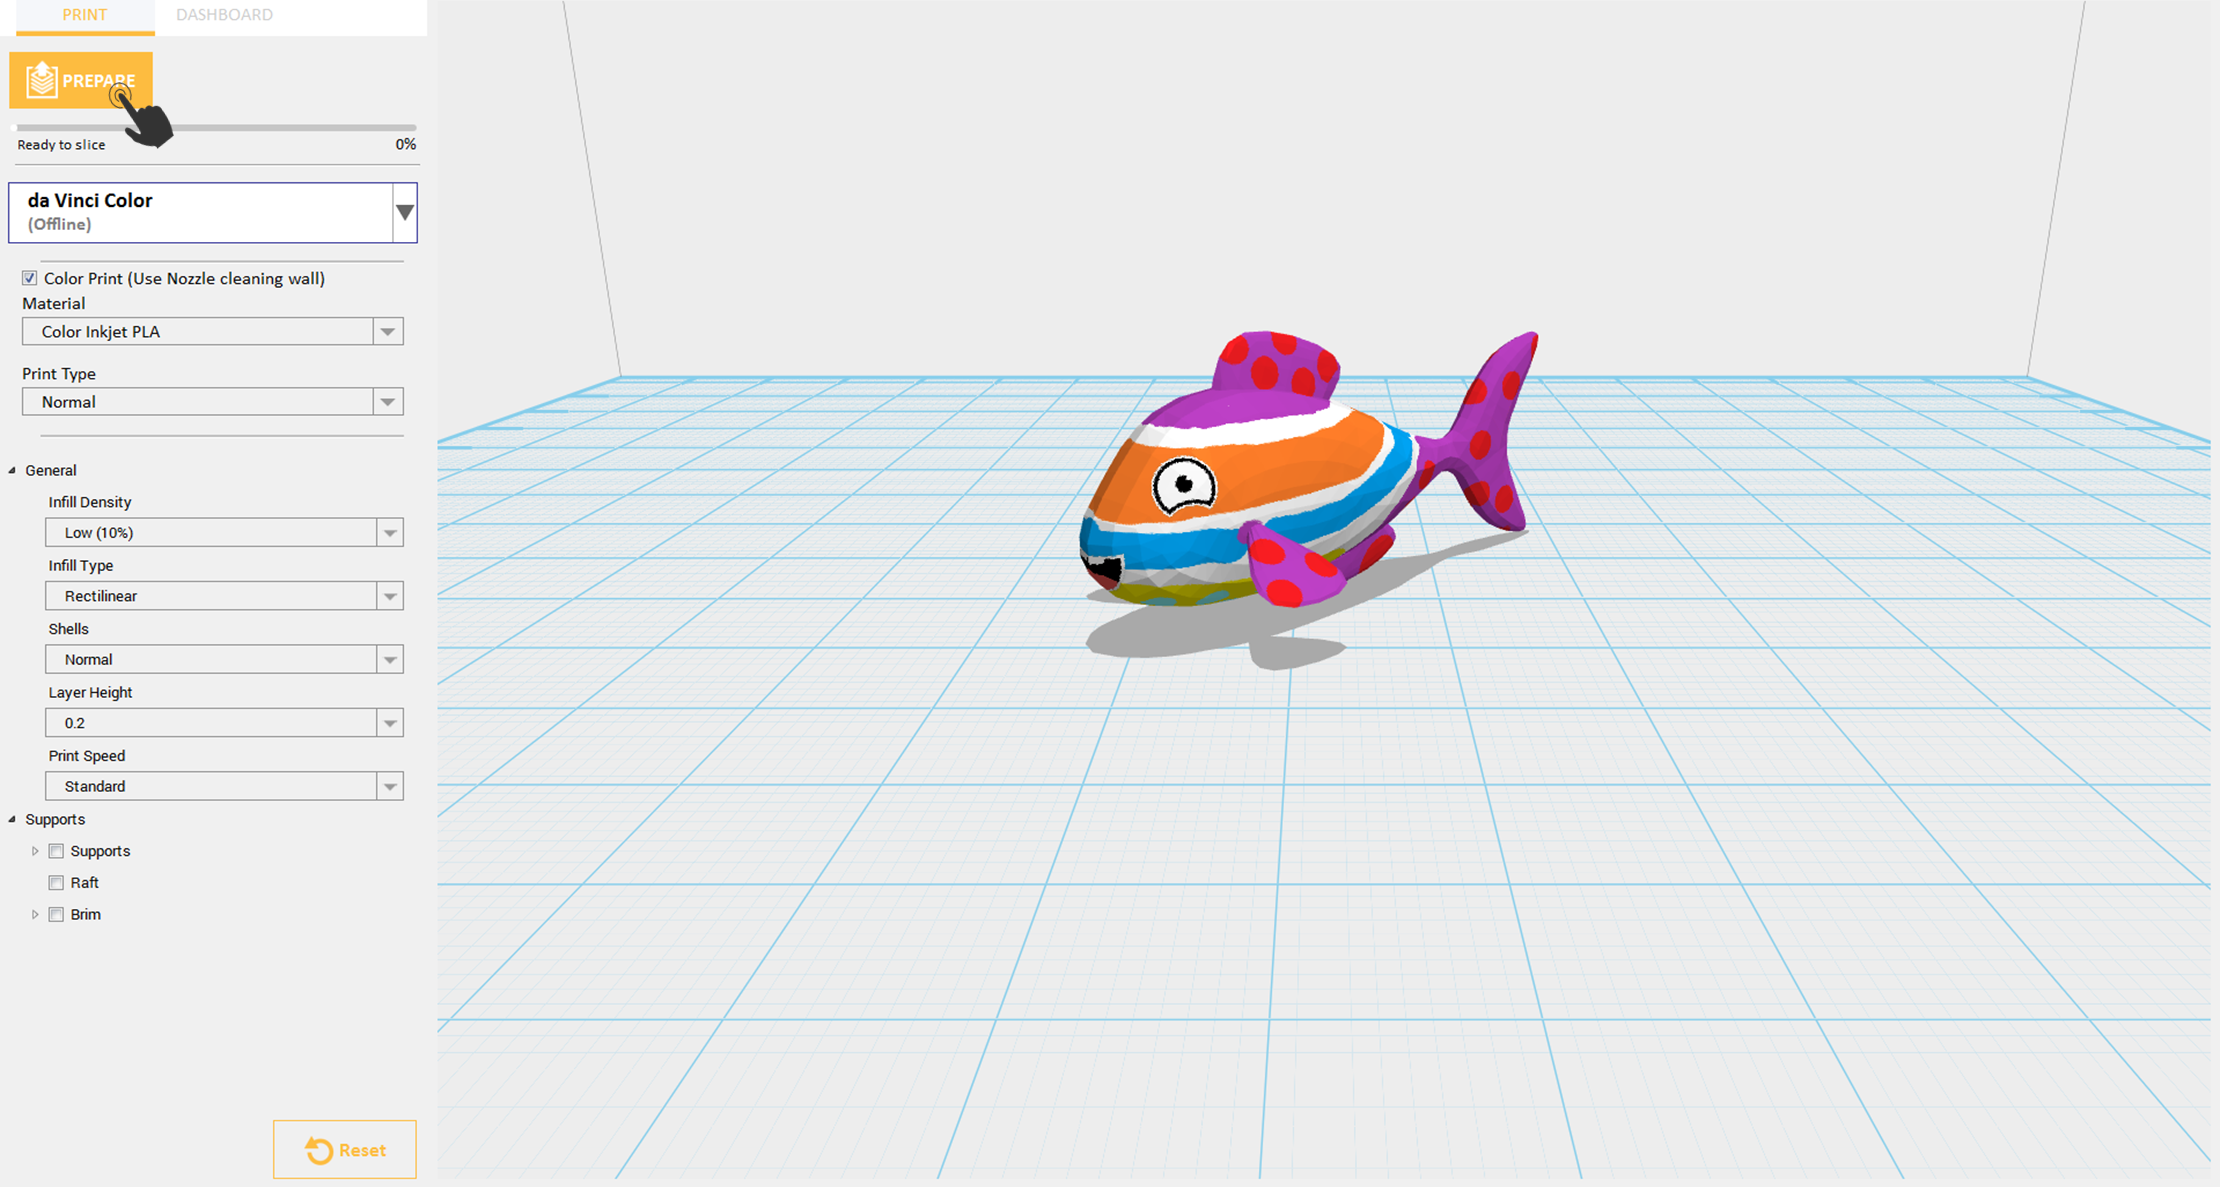
  • Click on Prepare button

Prepare

  • After slicing, user can have option to view the sliced object to G code or Color by simply clicking on the radio button.
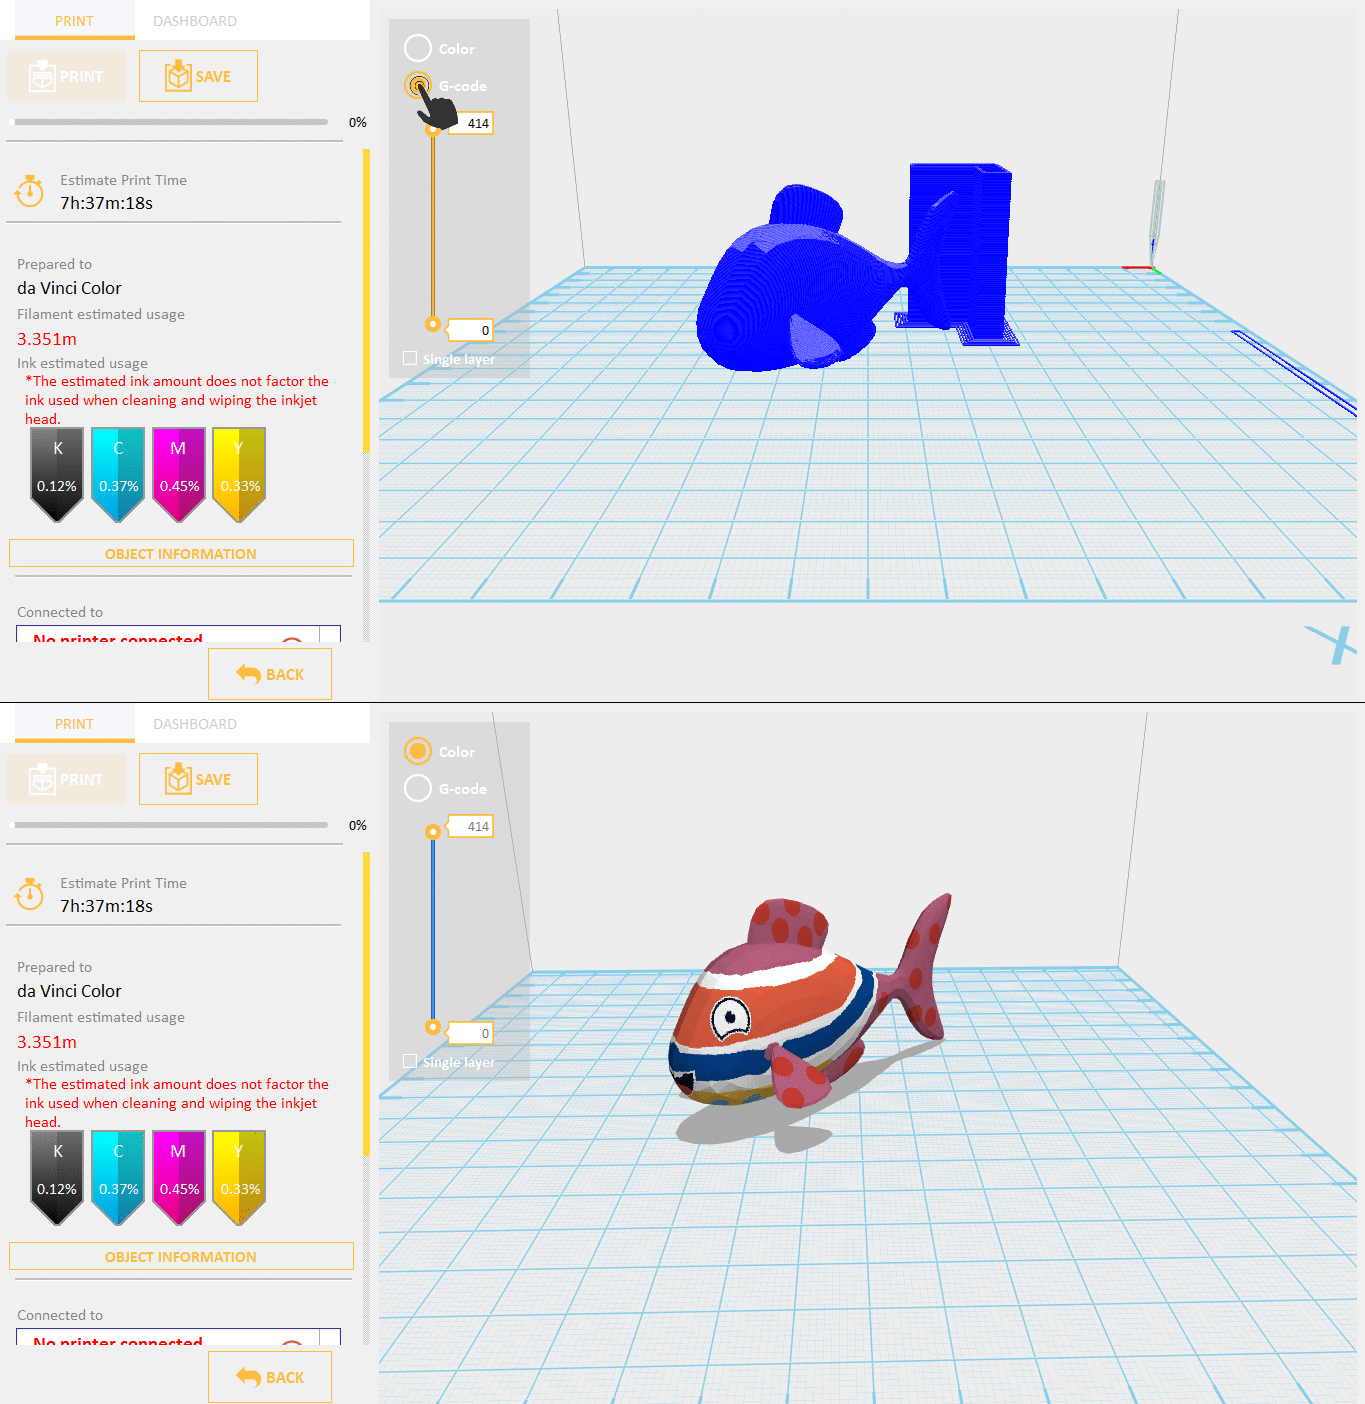
Webp.net-gifmaker (14)

Disable Color Print

  • Import any textured object.

Import Textured

  • Click File then select Print – da Vinci Printer Plugin

da Vinci Printer Plugin

  • Disable Color Print setting to print the object using filament only.
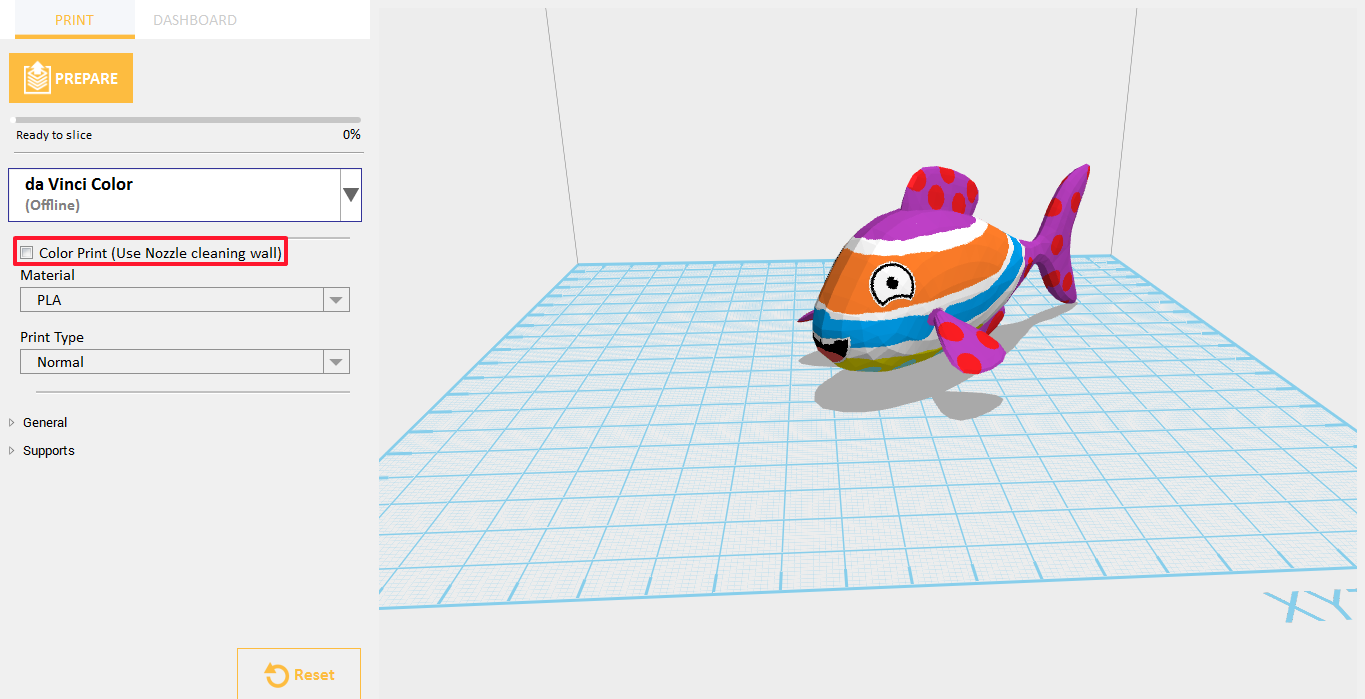
Disable Color Print

  • Click on Prepare button

Prepare

  • When color print is disabled, the only way to view the object after sliced is on G-code style.
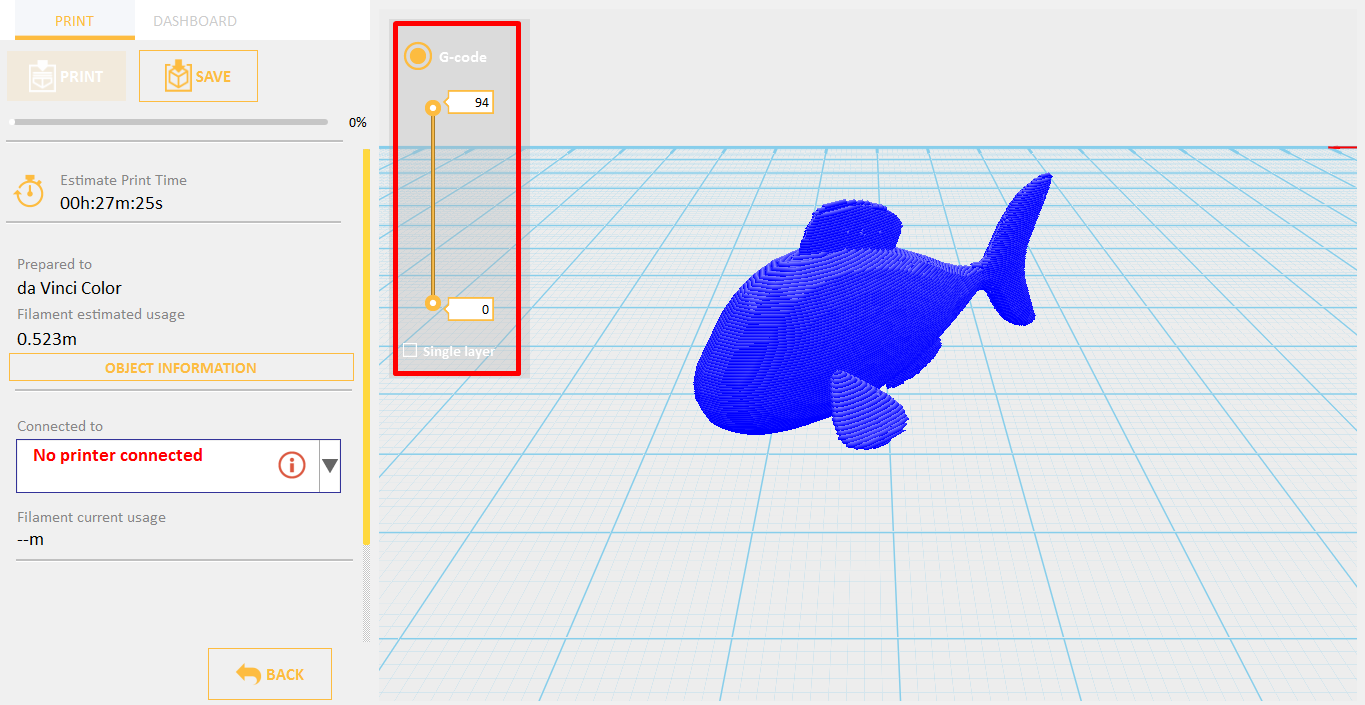
Disable

Print Type

Print type will impact the estimated time it will take for an object to print and its quality. For example, high detail prints will take longer to make than draft as each layer printed is thinner creating a more detailed finish. Hollow type will only appear when Color Print is disabled. Hollow type will make your object’s top surface open and its infill density 0%.

Print Type

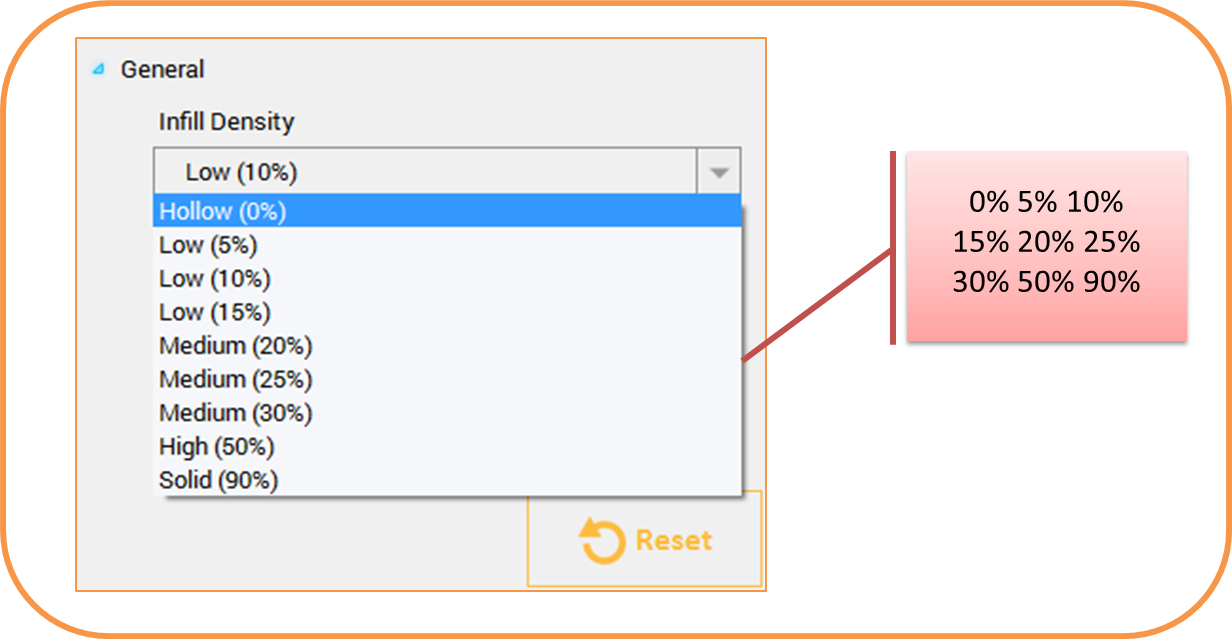
Infill Density

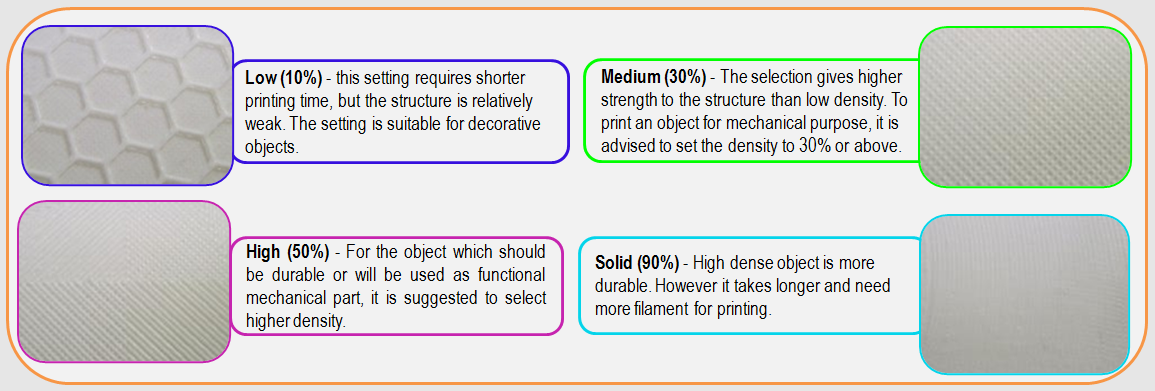
Using the Infill Density setting you can adjust the internal structure of the object(s) from hollow to solid to create desired strength requirements.
Infill Density

  • Import any textured object.

Import Textured

  • Click File then select Print – da Vinci Printer Plugin

da Vinci Printer Plugin

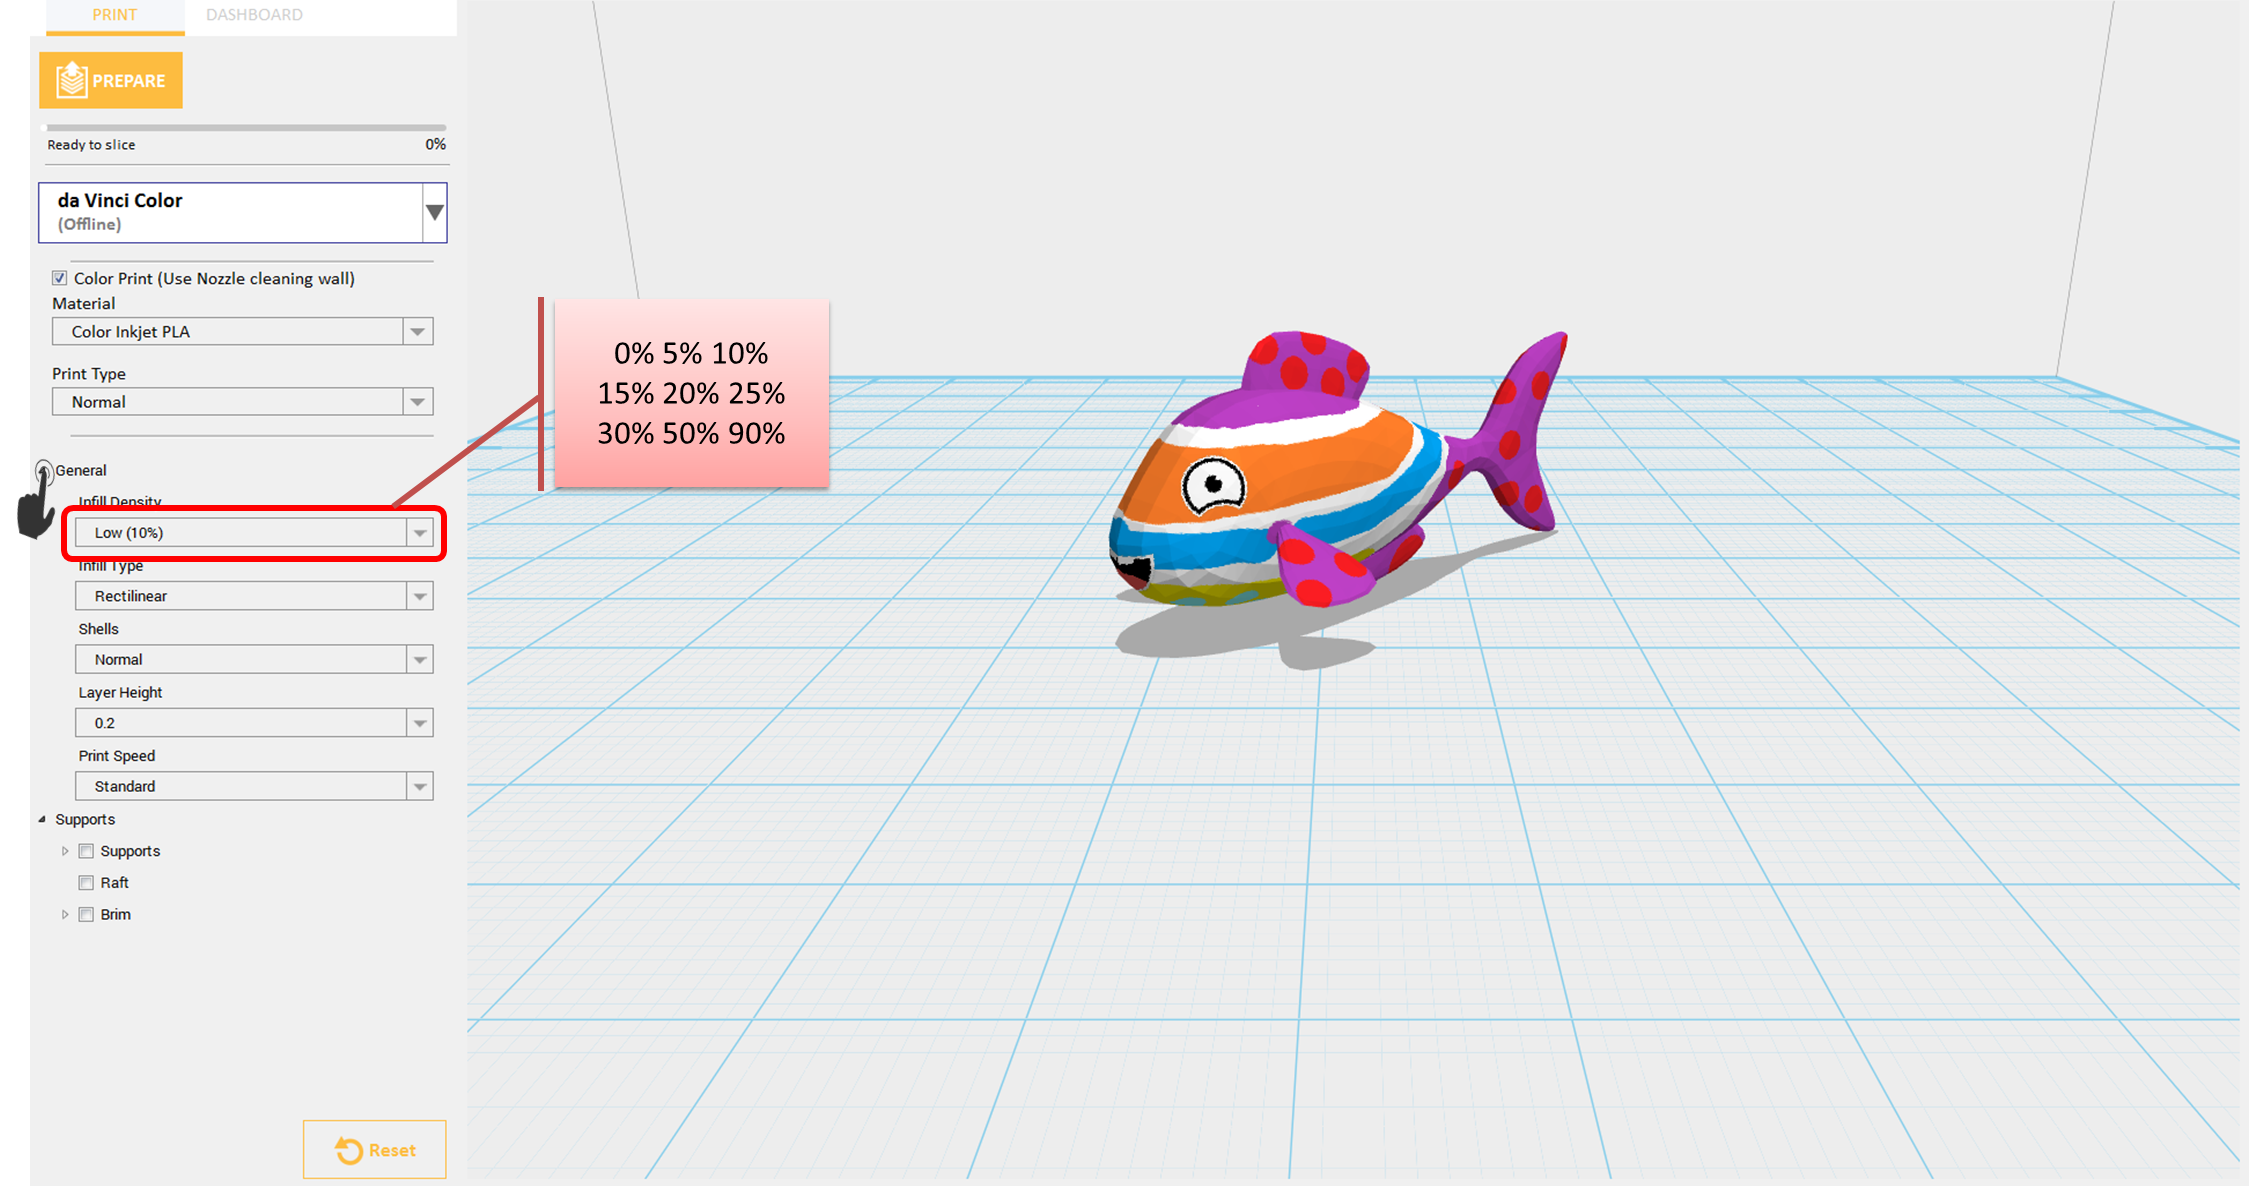
  • Click on General then select Infill Density. Infill Density ranges from 0 – 90.
Infill Density

Layer Height

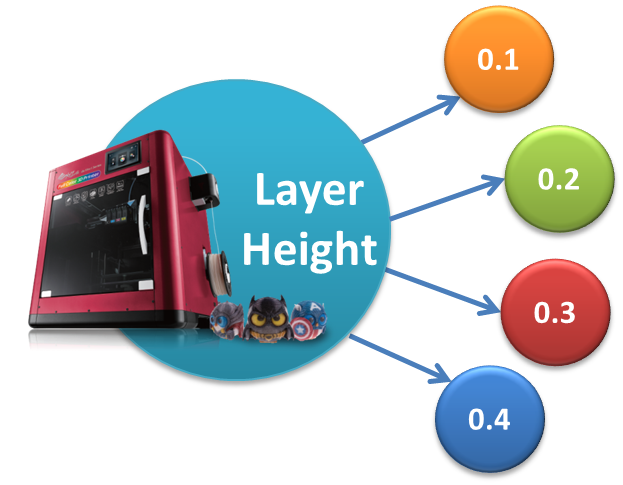
By setting different layer heights, you can alter the thickness of each layer that your printer creates. The printed layer thickness for da Vinci Color can be adjusted between 0.1mm – 0.4mm. Thinner layers give better accuracy but take more time to print.
Layer Height

Print Speed

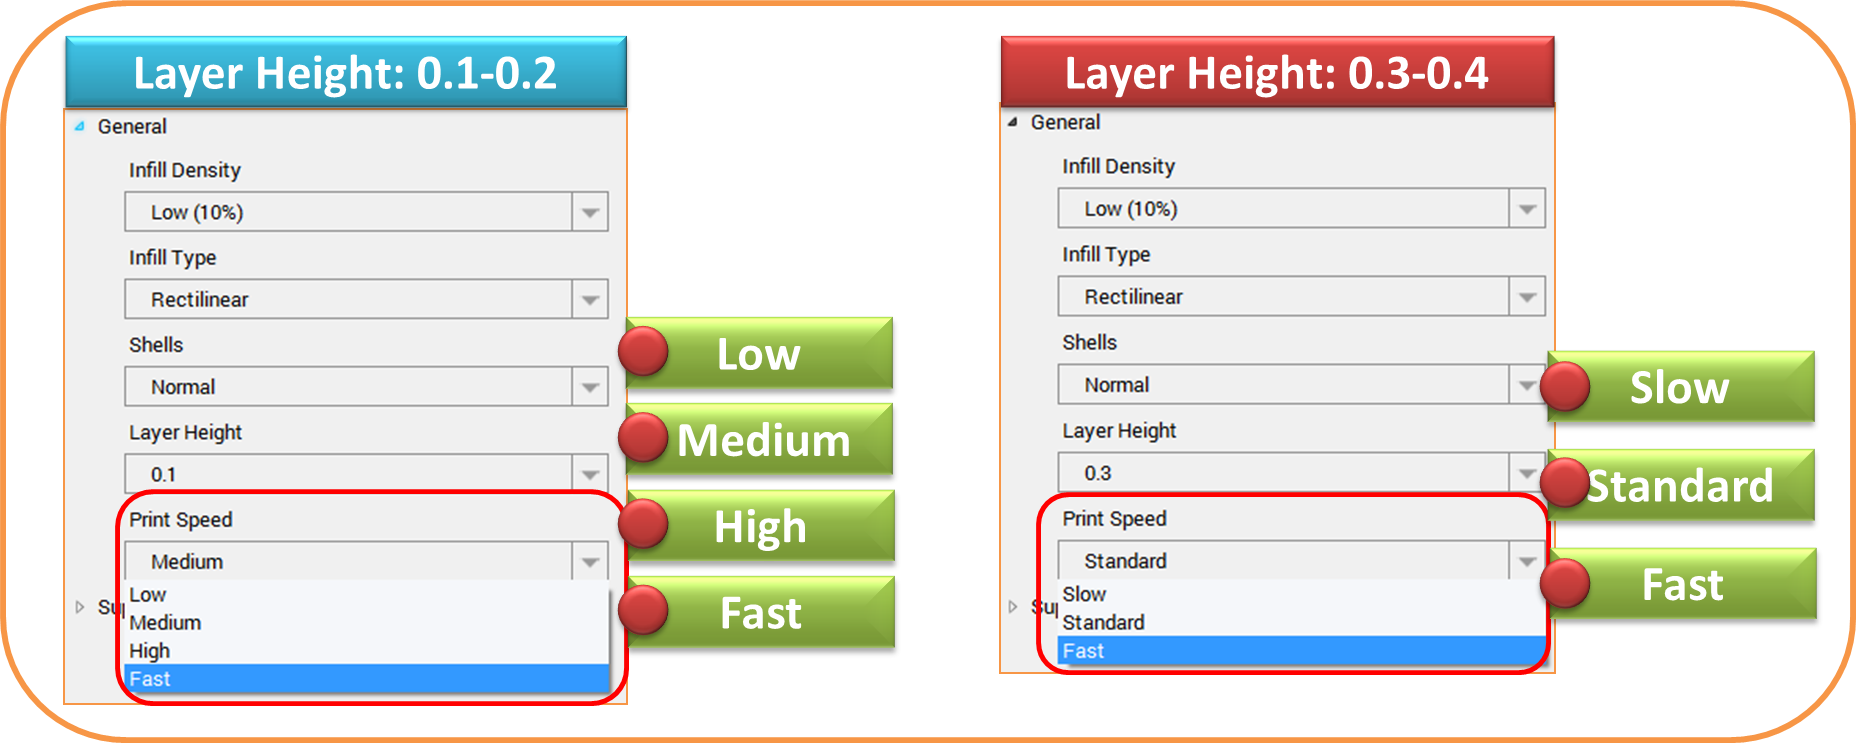
Print Speed is use to change the settings based on the size and precision of the object. In general a better object quality is accompanied with a lower printing speed. Print Speed options vary on your layer height value.
Print Speed(1)


  • Import any textured object.

Import Textured

  • Click File then select Print – da Vinci Printer Plugin

da Vinci Printer Plugin

  • Set the Printing speed by clicking General then select Print Speed.
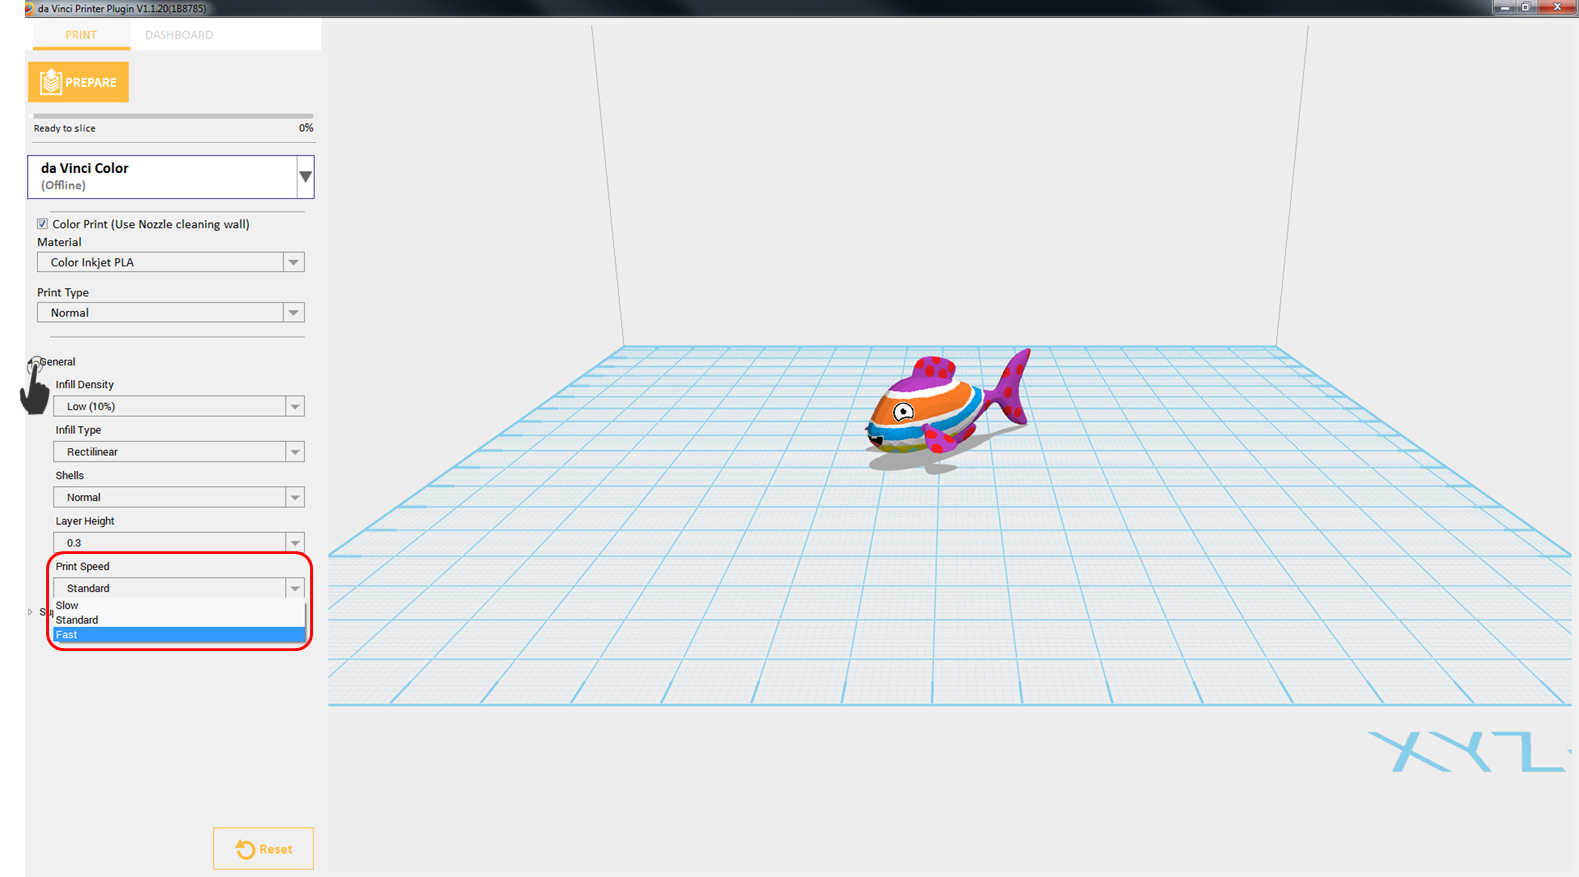
Print Speed(4)

Support

The support structures are printed according to the objects features. Support is used to create structural strength and ensure that your model does not collapse during the printing process.

  • Import object that has overhanging parts.
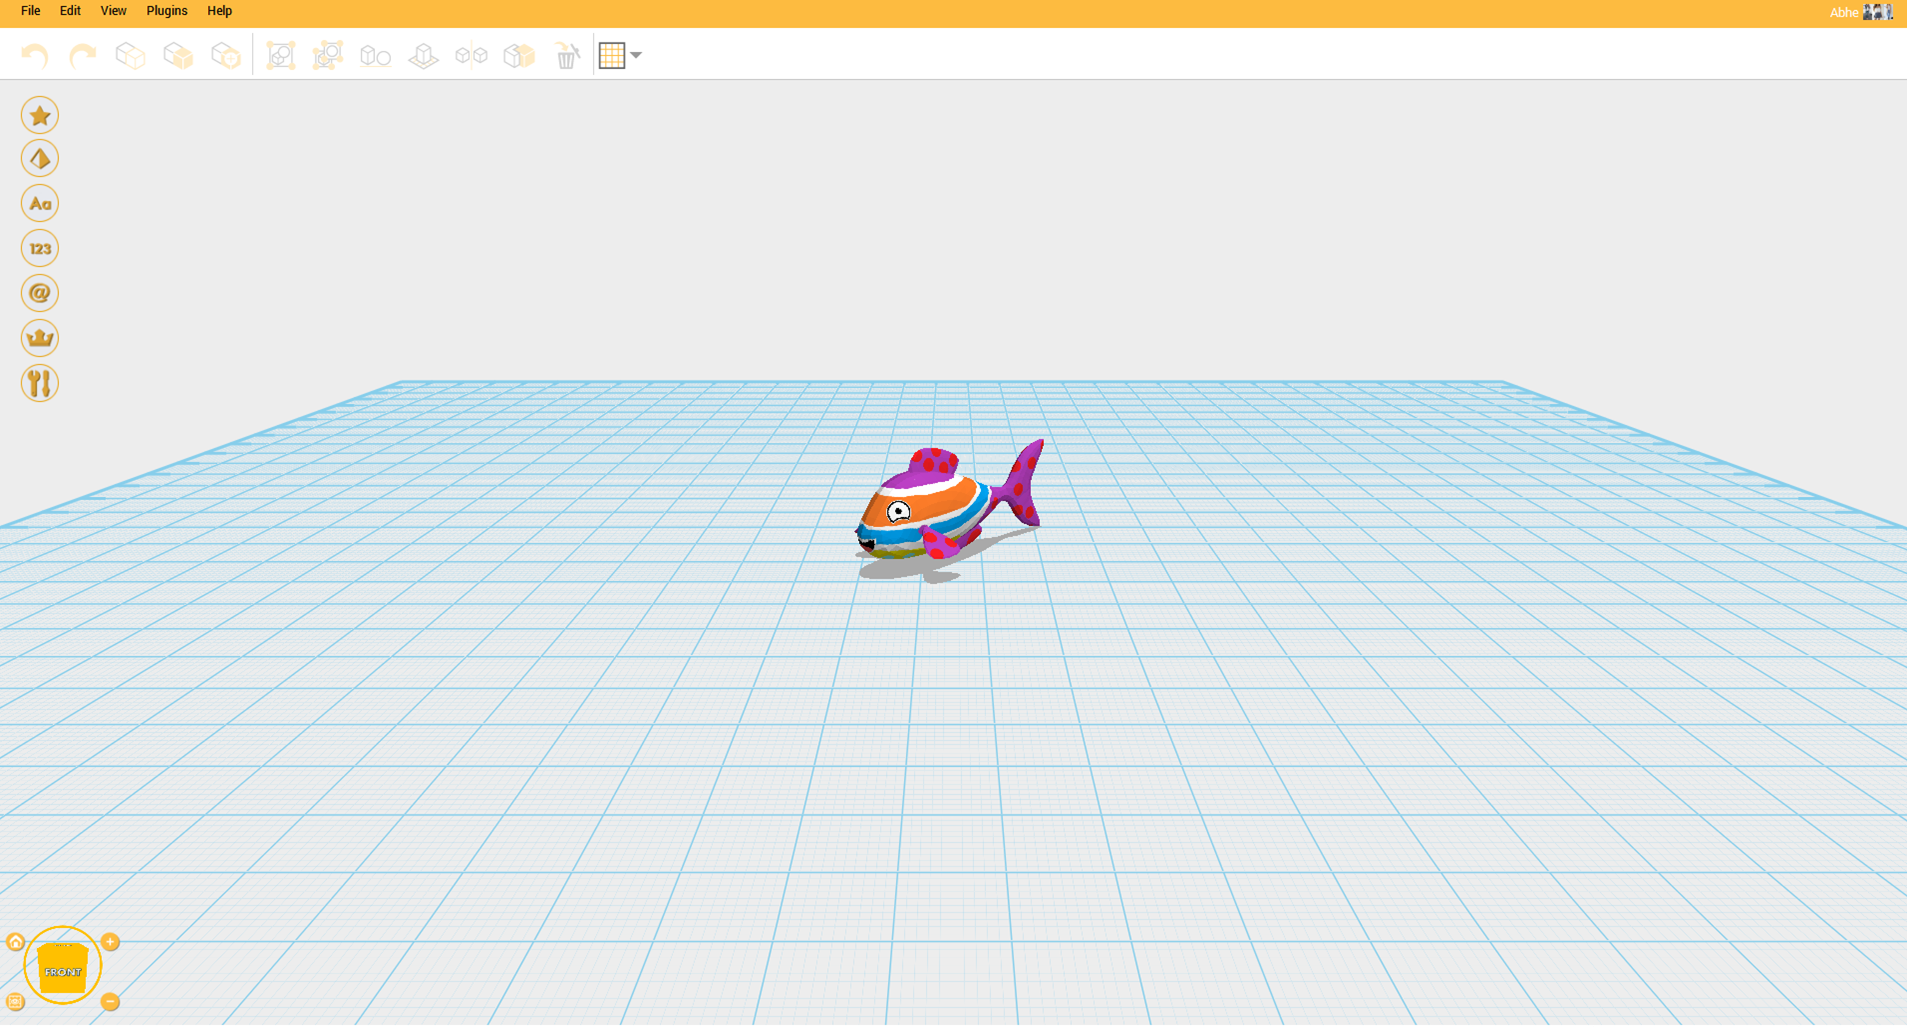
Import Textured

  • Click File then select Print – da Vinci Printer Plugin

da Vinci Printer Plugin

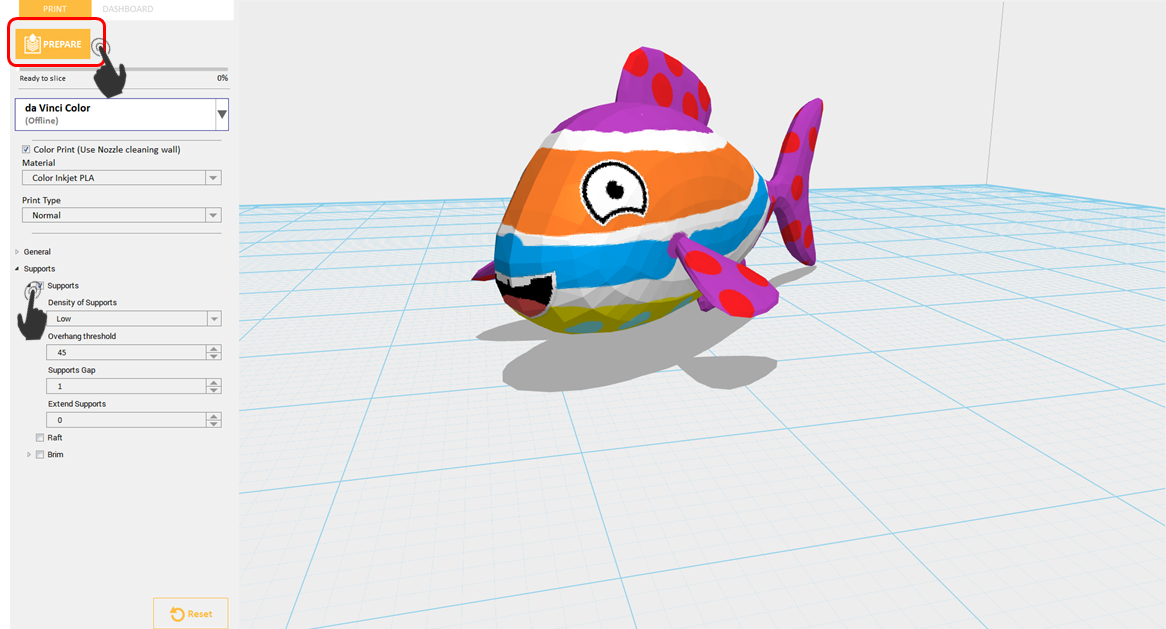
  • Enable Support, then Click Prepare

Support(1)

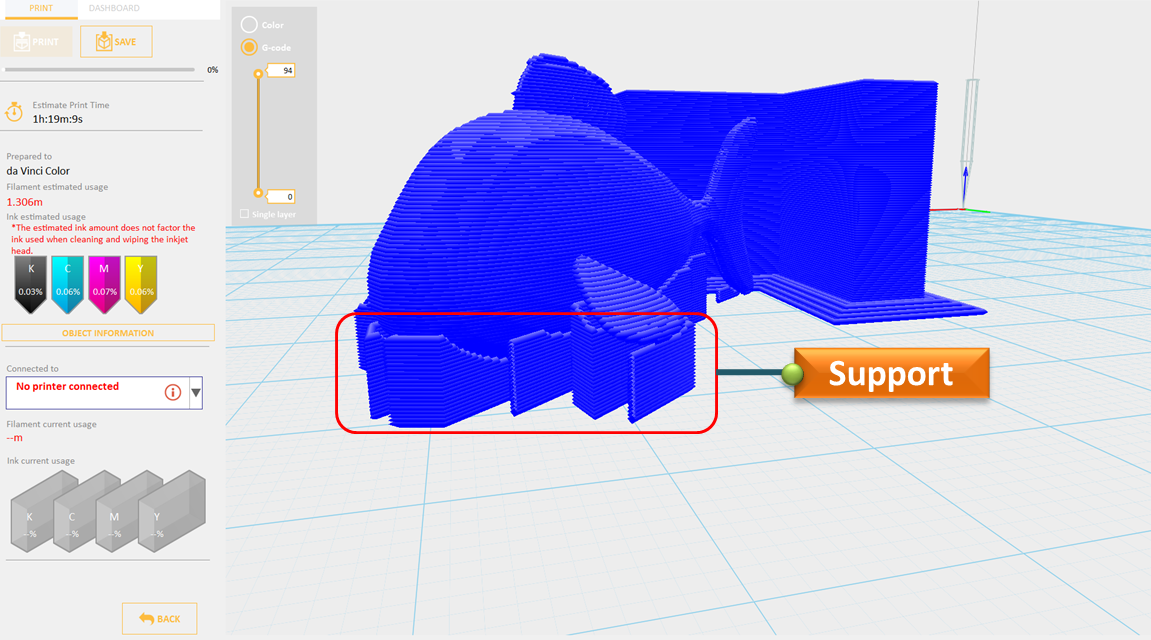
  • Overhang parts has already support.

Support(2)


Density of Supports

Density of Supports allows you to change the thickness of your support structures. Setting it to high will produced stronger support and will use more material.
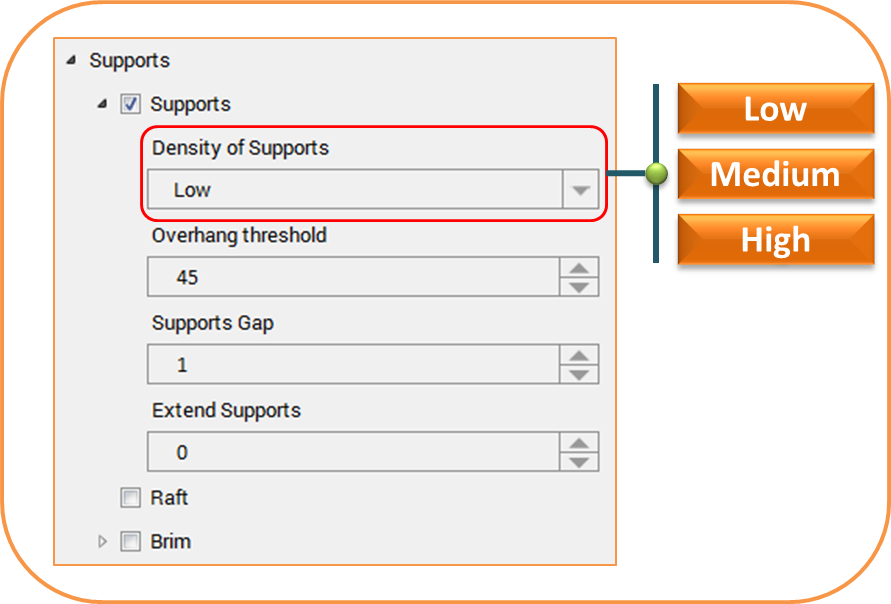
Density of Supports

Overhang Threshold

Models with overhanging parts up to the angle you set will have supports automatically generated for them.

For example you’ve set 45˚, when you slice the object those overhanging parts whose angle are 45˚ above will now have supports.
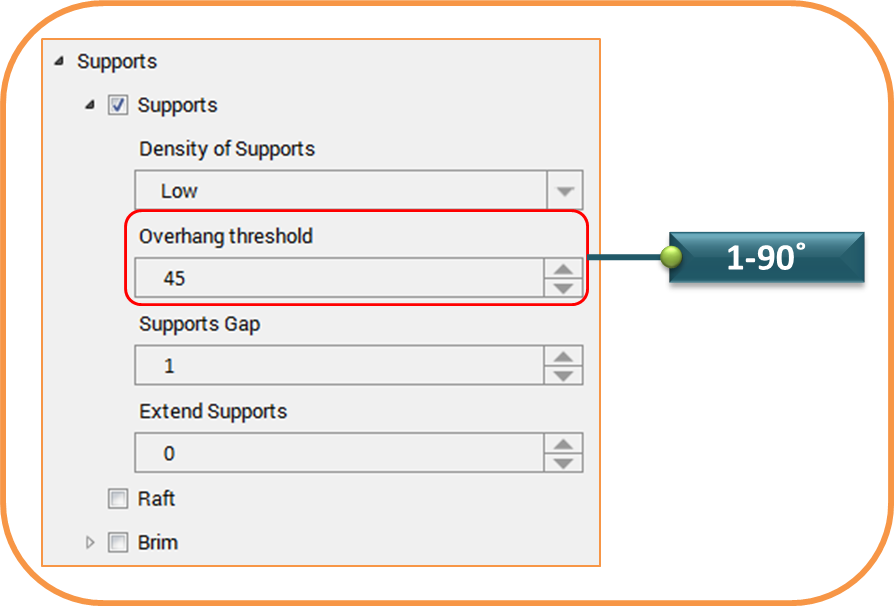
Threshold

Supports Gap

Supports Gap sets the gap between the model and its supports. This will lessen the contact of support to your model and once the printing is done, support can be easily removed.
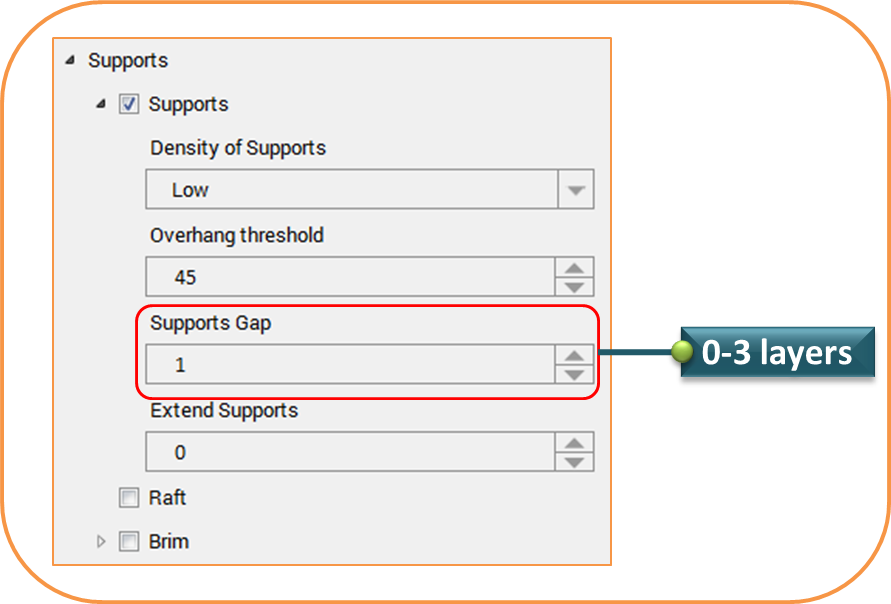
Supports Gap

Raft

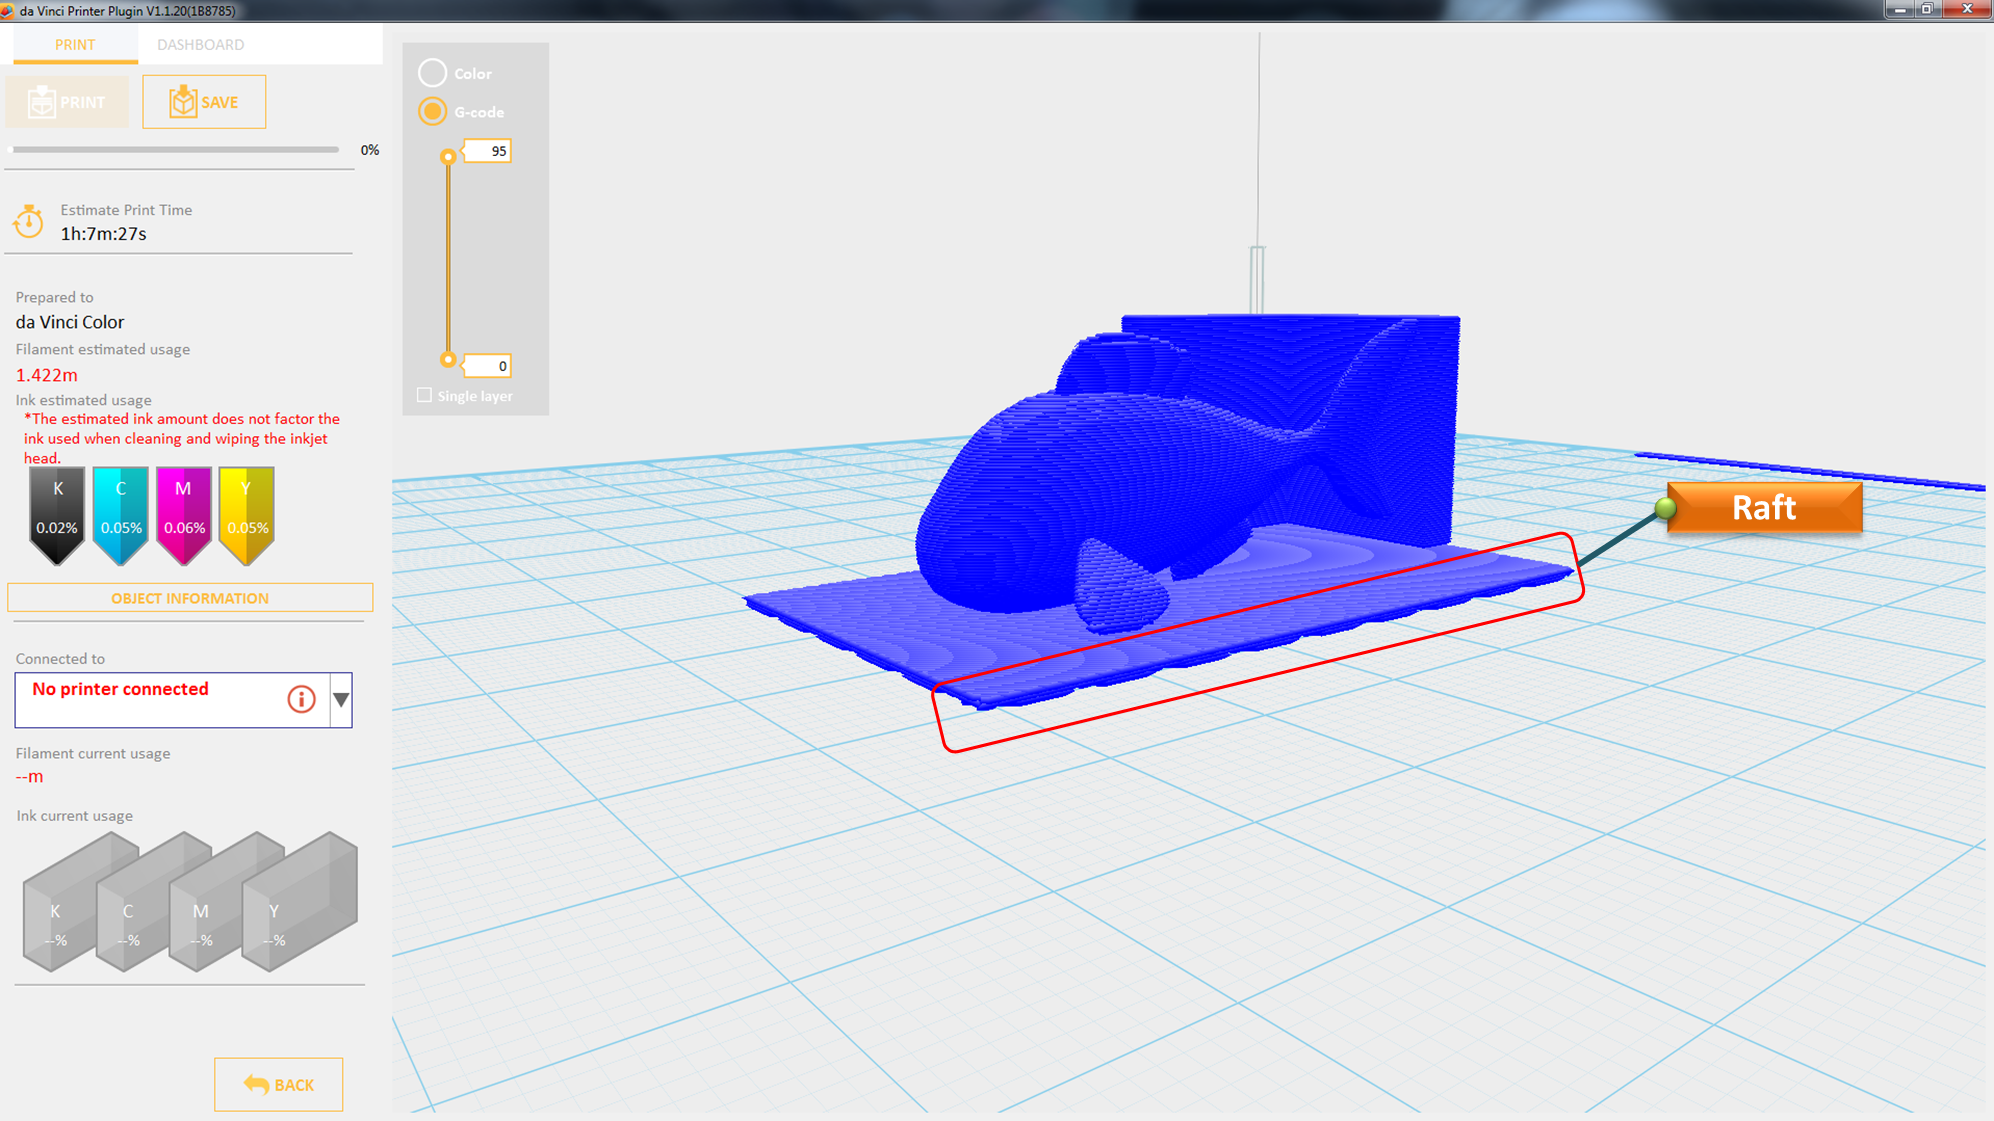
Enabling Raft will raised your object by number of layers this will increase the area of contact between your object and the print bed. Rafts create stability and can be removed after your object has been printed.

  • Import object that has overhanging parts.

Import Textured

  • Click File then select Print – da Vinci Printer Plugin

da Vinci Printer Plugin

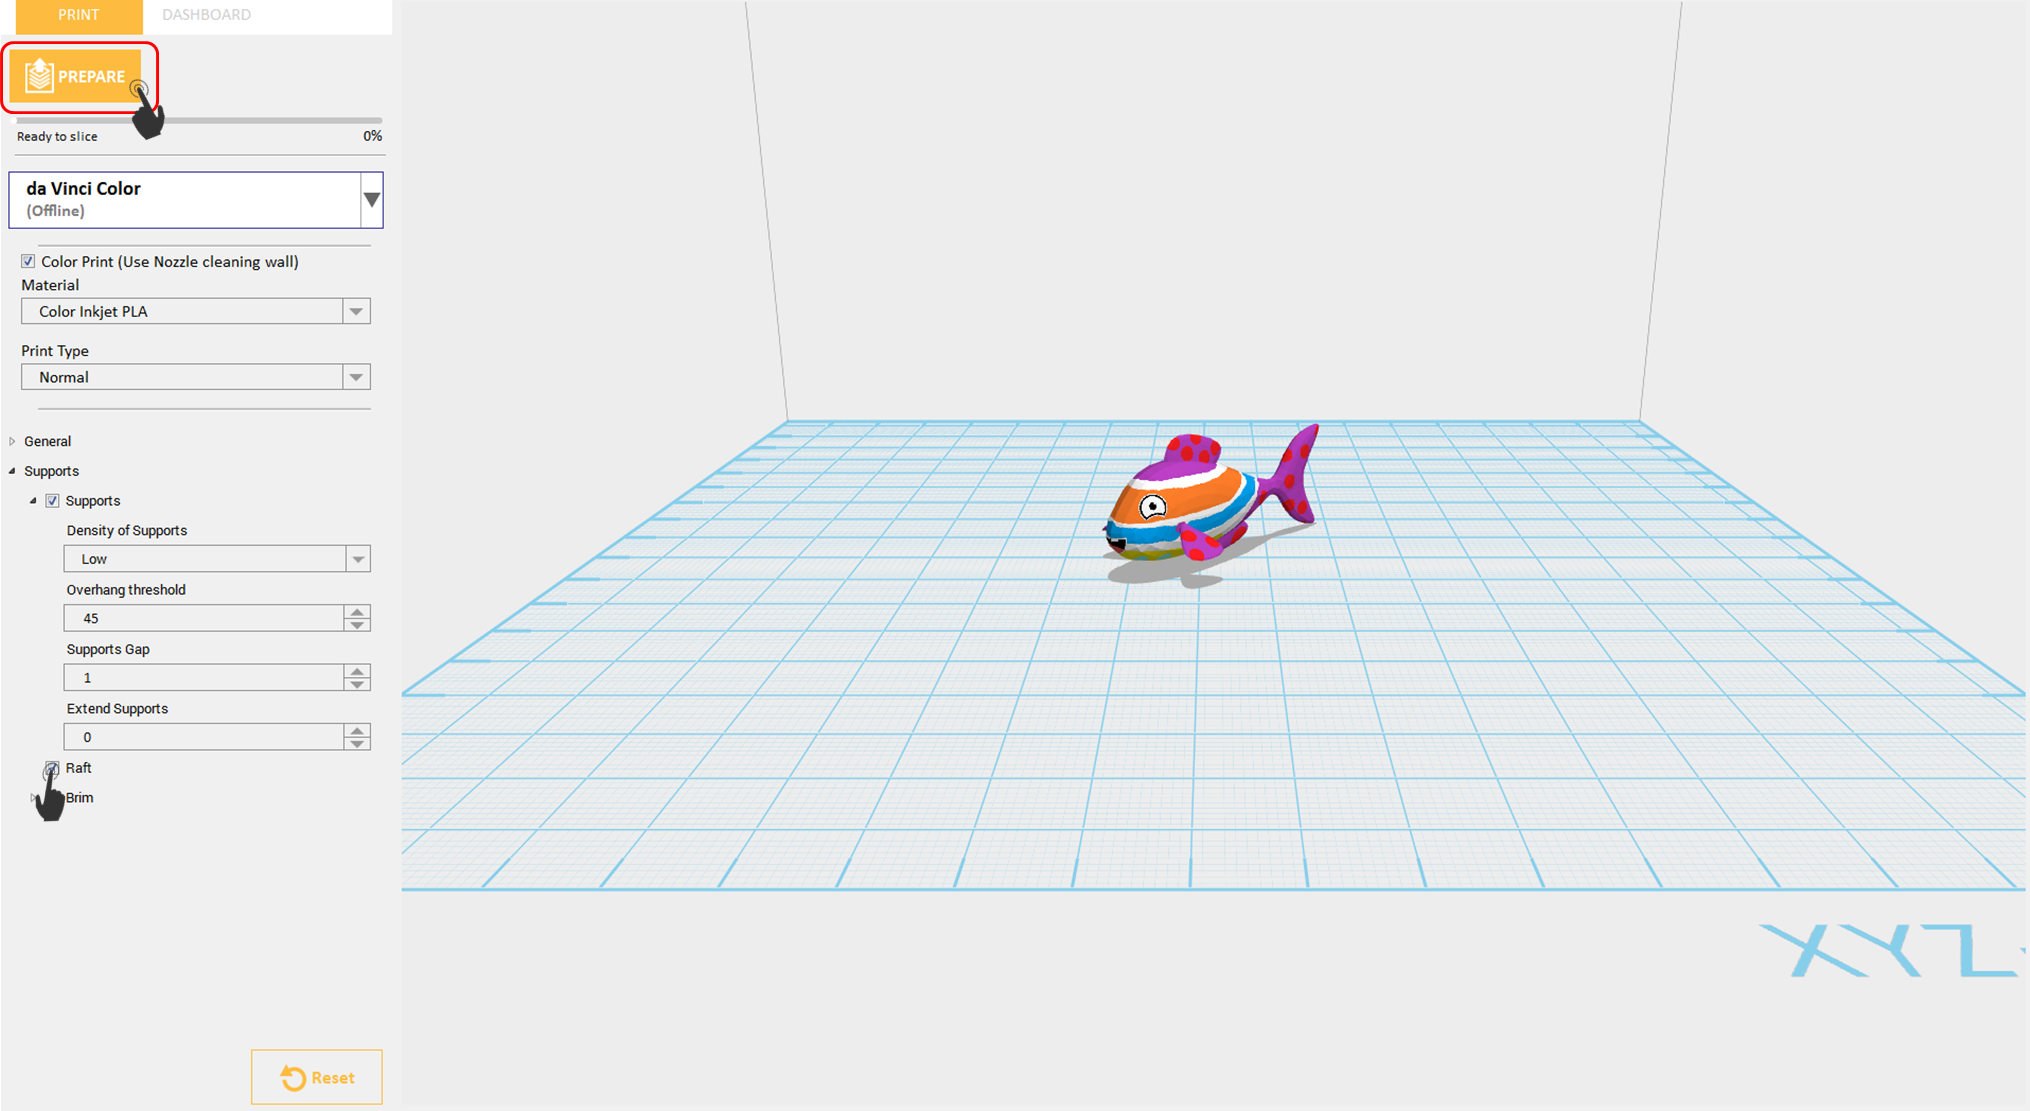
  • Enable Raft then Click PrepareRaft
  • Notice that there is an added raft on the surface.Raft(1)
Brim

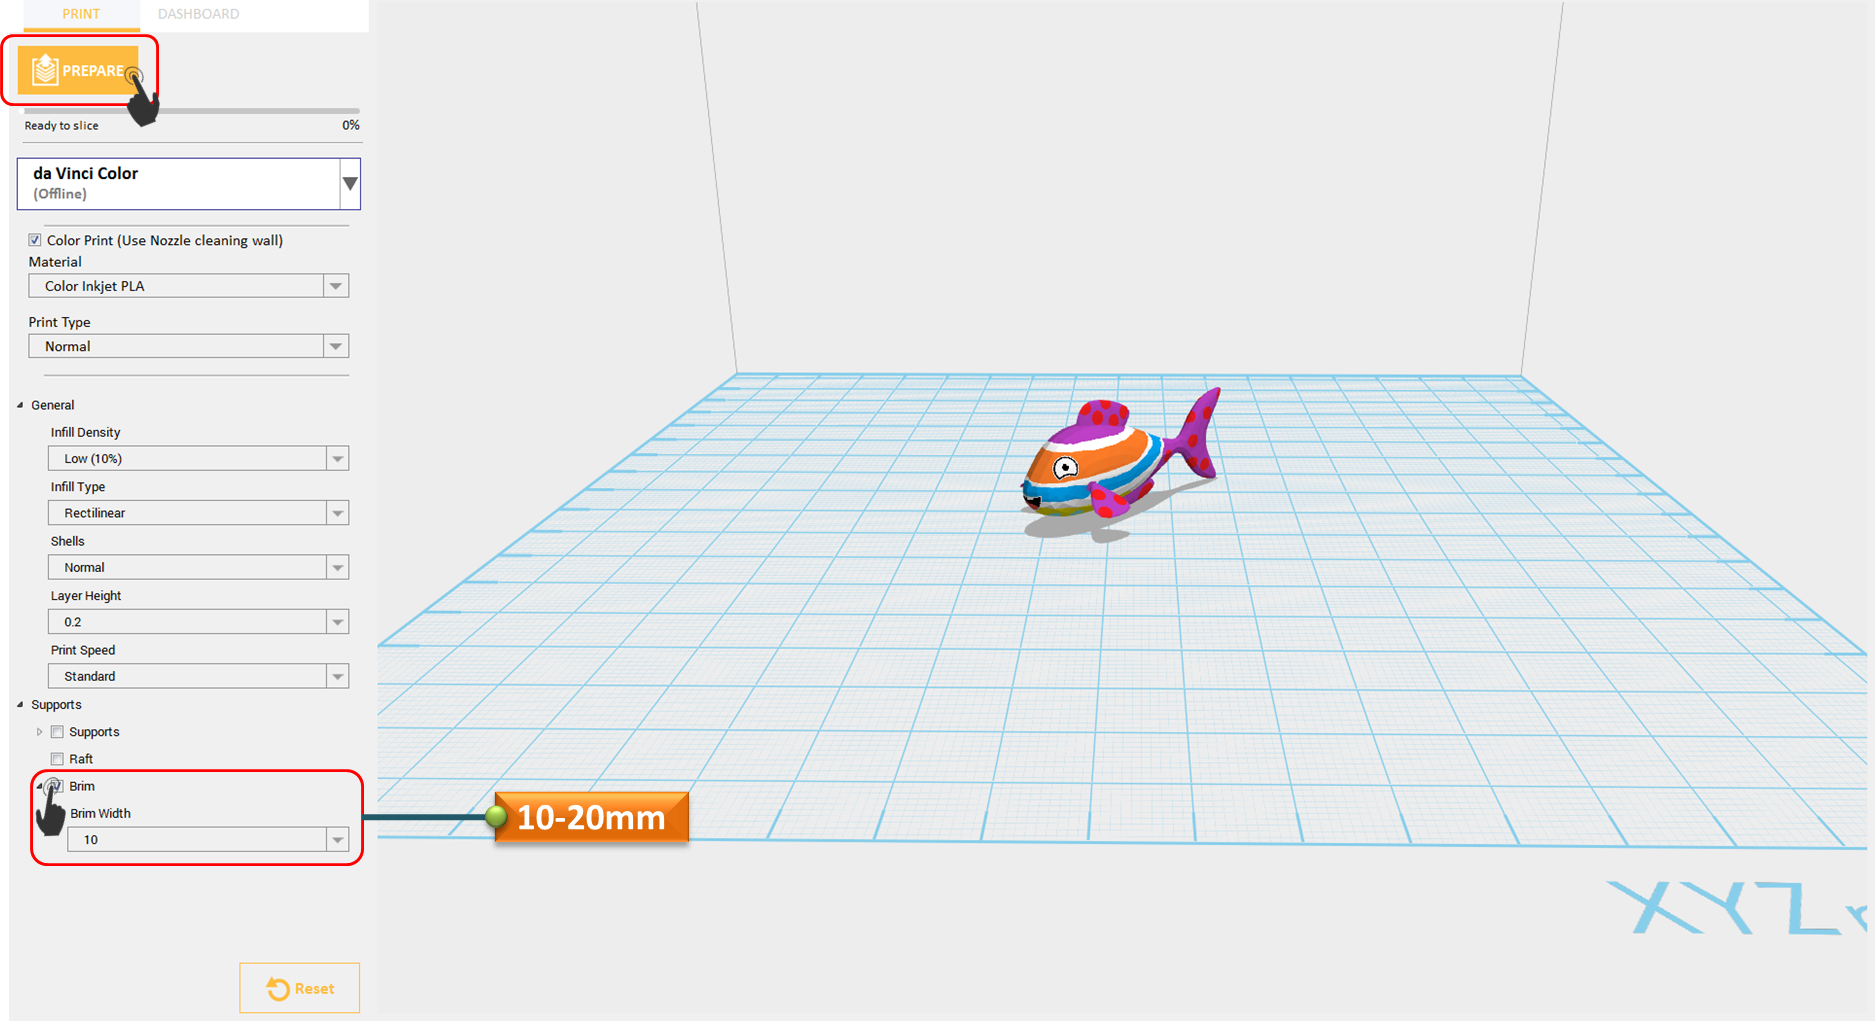
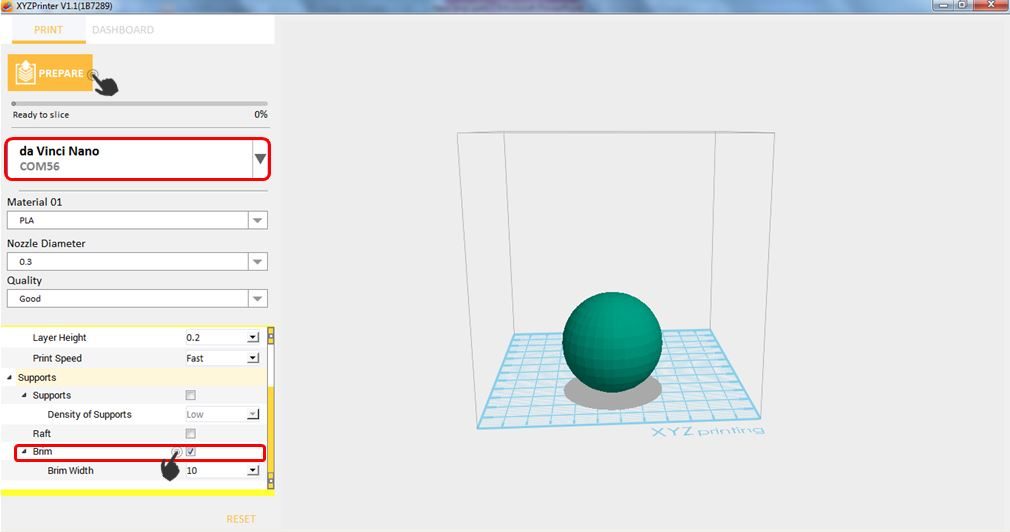
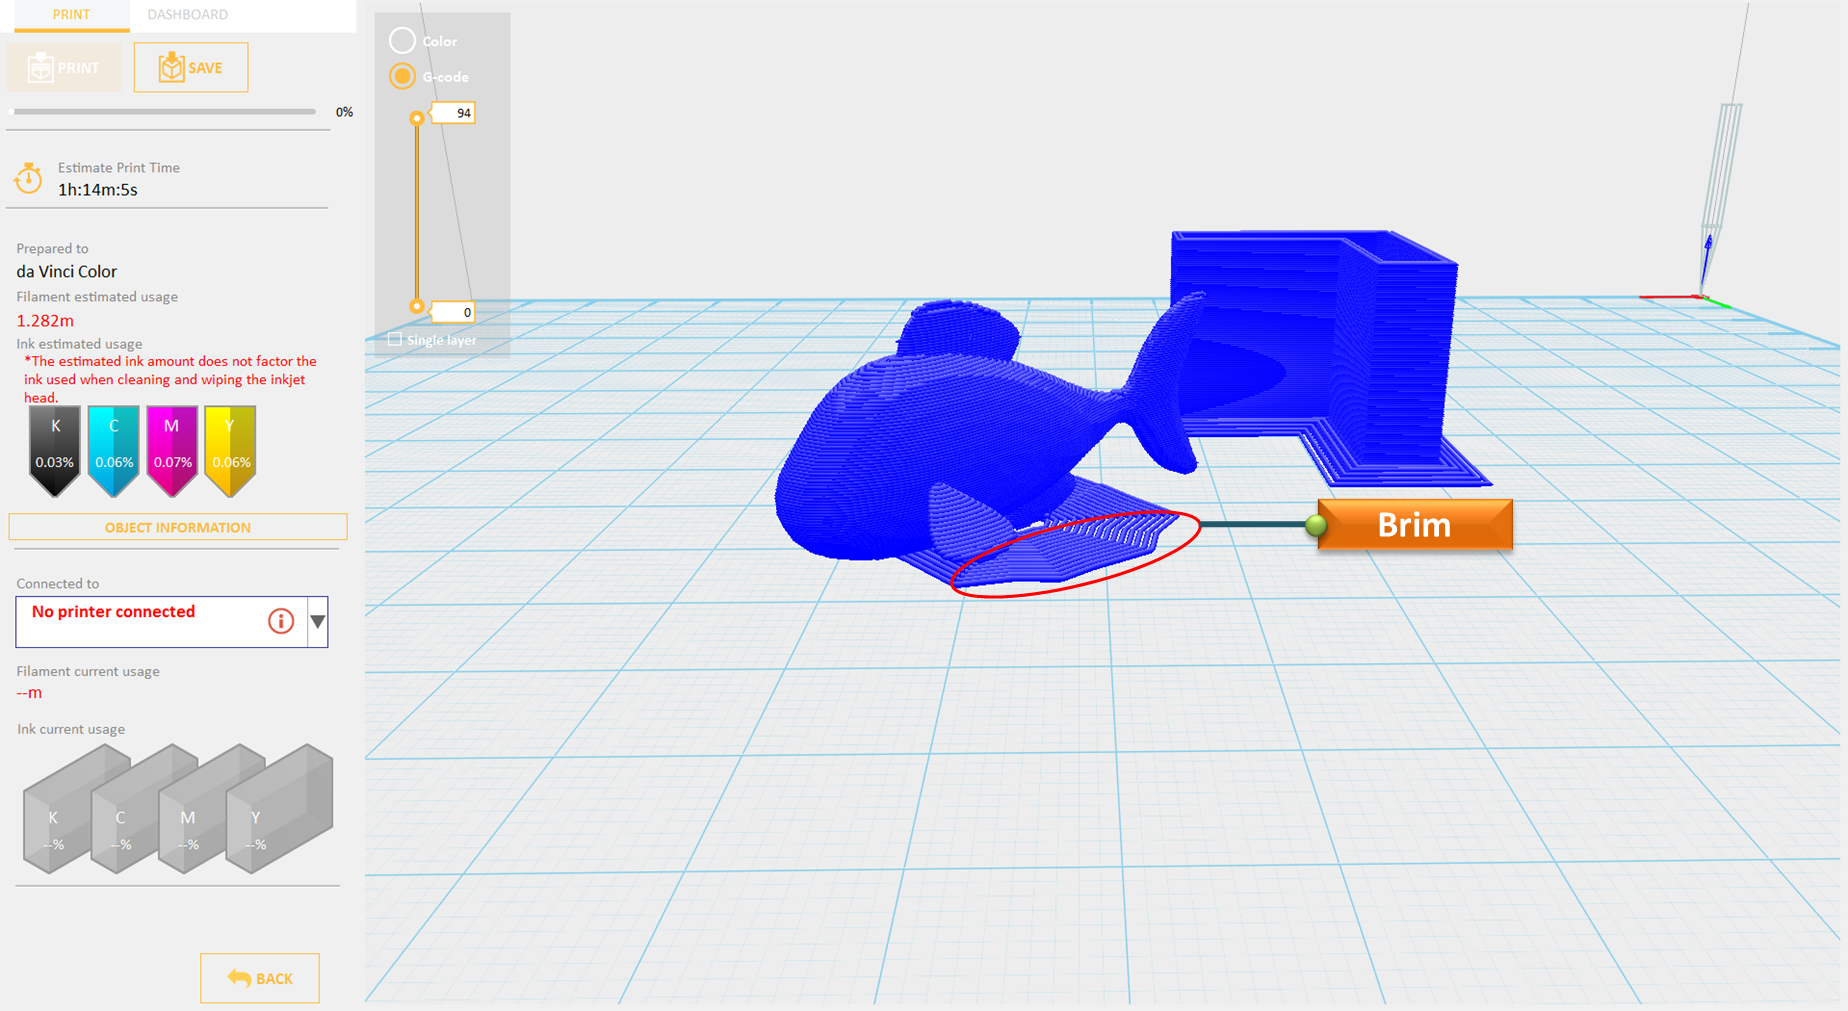
Brim function allows users to enlarge the range of contact with bottom area of print bed in printing relatively elongated object to prevent swing due to print from influencing print quality. You can set the Brim Width from 10 to 20mm.

  • Import object that has overhanging parts.

Import Textured

  • Click File then select Print – da Vinci Printer Plugin

da Vinci Printer Plugin

  • Enable Brim then Click Prepare

Brim

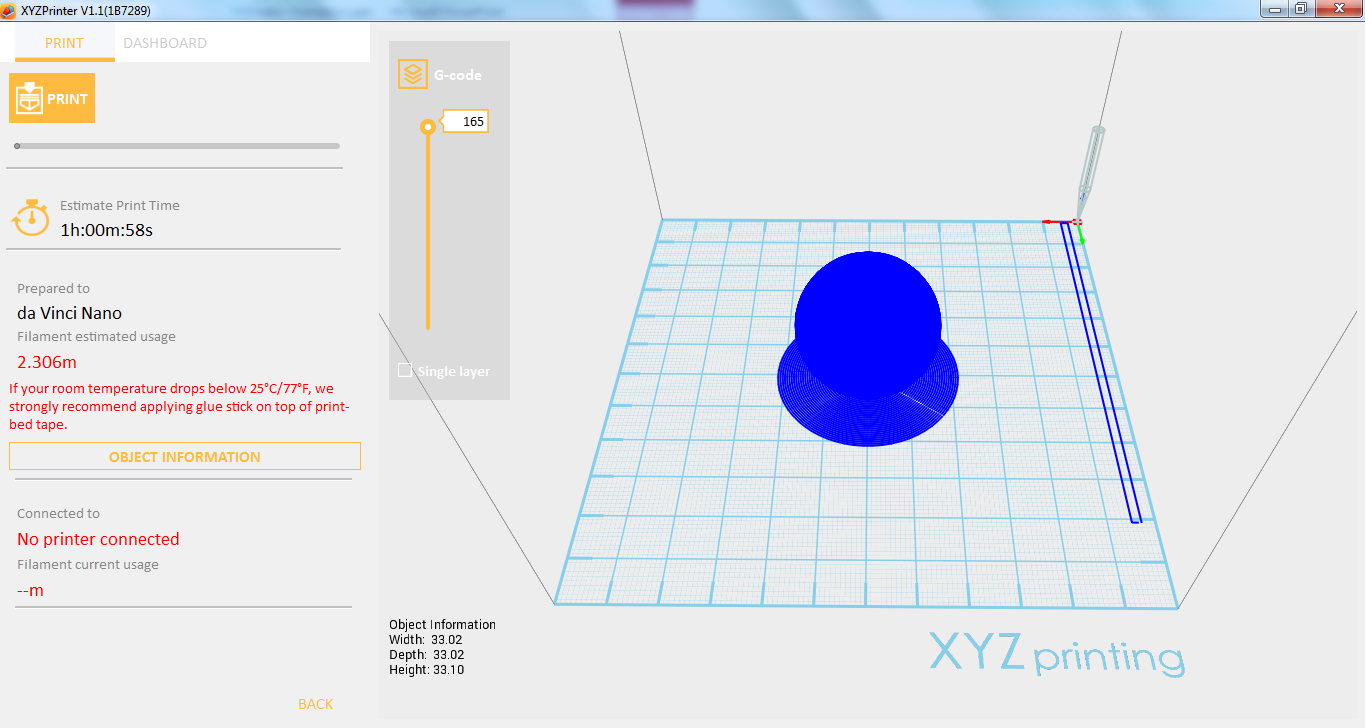
  • Notice that there is an added Brim on the surface.

Brim(1)

列印模組

Last updated on March 28th, 2018 at 03:59 pm

清潔噴頭

選擇此功能後,噴頭將自動加入,並將噴頭移至正確的位置。您可在此處輕鬆清除噴軸頭上所有殘留的線材。


1.將 PC 連接至 da Vinci nano。

22


2.按一下檔案(File),然後選擇列印(Print)-da Vinci Printer。
1

3.按一下控制面板(Dashboard)。

2

4. 按一下列印模組(Extruder),然後選擇清潔噴頭(Clean Nozzle)。

23


5. 按一下開始(Start),以開始。

24


6. 列印機將開始加熱。

25


7.加熱後,請將清潔鐵絲穿過噴頭。然後按一下完成(Finish),以完成程序。

26


8.清潔程序完成後,請點選結束(Finish)

3


列印模組資訊

這將顯示插入連接列印機的列印模組資訊。這會顯示列印模組的溫度、直徑、序號及總列印時間。

1. 將 PC 連接至 da Vinci nano 列印機。

22

2.按一下檔案(File),然後選擇列印(Print)-da Vinci Printer。

1

3.按一下控制面板(Dashboard)。

2

4.按一下列印模組(Extruder),然後選擇資訊(Info)。

27

5.將會顯示列印模組資訊。此包括溫度(Temperature)、噴頭直徑(Nozzle Diameter)、總列印時間(Total Print Time)及序號(Serial Number)。

28


線材

Last updated on March 28th, 2018 at 03:59 pm

即使 da Vinci nano 未如任何其他列印機一樣具有 LCD 面板,但您仍可透過一個非常簡單的步驟,使用XYZmaker 載入與卸載線材。只要依照以下說明,並等候出料程序進行。

載入線材

1. 將 PC 連接至 da Vinci nano。

22

2.按一下檔案(File),然後選擇列印(Print)-da Vinci Printer。

1-10

3.按一下控制面板(Dashboard)。

2

4. 按一下線材(Filament),然後選擇載入線材(Load Filament)。

1

5.按一下開始(Start),以開始。

3

6. 加熱程序將開始,並等候線材出料。

25

7.擠出線材後,按一下完成(Finish)。

3

Unload Filament

與載入線材相同,只需一個簡單步驟,就能在迷你系列列印機輕鬆卸載。只須依照圖中的程序,即可輕鬆卸載線材。

1.將 PC 連接至 da Vinci nano。

22

2.按一下檔案(File),然後選擇列印(Print)-da Vinci Printer。

1-10

3. 按一下控制面板(Dashboard)。

23

4.與載入線材相同,只需一個簡單步驟,就能在迷你系列列印機輕鬆卸載。只須依照圖中的程序,即可輕鬆卸載線材。

14

5. 按一下開始(Start),以開始加熱。

4

6. 等候加熱完成。

25

7. 卸載線材後,按一下完成(Finish),以完成程序。

3

設定

Last updated on March 28th, 2018 at 03:59 pm

控制面板是為非 LCD 列印機(da Vinci miniMaker、da Vinci miniWifi 及 da Vinci nano)設計的特殊功能。此將作為非 LCD 列印機的標題面板使用。如載入/卸載線材/清潔噴頭等操作,以及列印模組和列印機上的其他相關操作,都可透過 XYZmaker 控制面板的協助輕鬆完成。

Webp.net-gifmaker (6)

線材

Last updated on March 28th, 2018 at 03:59 pm

使用 XYZmaker 可將線材更輕鬆載入非 LCD 列印機。只需依照以下程序,就能在一分鐘內載入線材。請確定您連接列印機的線軸,已將線材放到線材軸架上。

載入線材

1.連接至列印機。

8

2.按一下檔案(File),然後選擇列印(Print)-da Vinci Printer。

1

3.按一下控制面板(Dashboard)。

2

4. 按一下線材(Filament),然後選擇載入線材(Load Filament)。

2

5. 按一下開始(Start),以開始。

3

6. 加熱程序將開始,並等候線材出料。

5

7. 擠出線材後,按一下完成(Finish)。

5

卸載線材

與載入線材相同,只需一個簡單步驟,就能在迷你系列列印機輕鬆卸載。只須依照圖中的程序,即可輕鬆卸載線材。

1.連接至列印機。

8

2. 按一下檔案(File),然後選擇列印(Print)-da Vinci Printer。

1

3. 按一下控制面板(Dashboard)。

2

4. 按一下線材(Filament),然後選擇卸載線材(Unload Filament)。

6

5. 按一下開始(Start),以開始加熱。

3

6. 等候加熱完成。

9

7. 卸載線材後,按一下完成(Finish),以完成程序。

10

列印設定

Last updated on March 28th, 2018 at 03:59 pm

品質

列印品質將影響物件列印的預估時間。例如,高品質列印將比低品質列印花更久的時間,這是因為每一層的列印得更細,以達到更細部的表面處理。Quality

內部填充密度

列印前,使用者可使用此功能調整物件的列印密度。da Vinci 3D 印表機上的預設印表機設定將根據蜂巢結構,建立物件的內部結構。您可以使用 3D 密度下拉式選單,從中空到高密度調整蜂巢結構密度,以建立所需的強度需求。

1. 匯入物件或建立任何設計。

1

2.按一下檔案(File),然後選擇列印(Print)-da Vinci Printer。

2

3.按一下一般(General),然後選擇內部填充密度(Infill Density)。內部填充密度從 10 到 100。

16

層厚

您可以設定不同的列印厚度,改變印表機建立的每一層厚度。da Vinci nano 的列印層厚,可在 0.1mm – 0.3mm 之間調整。為獲得最佳結果,我們建議 0.2-0.3mm 層厚列印。

19

列印速度

列印速度(Print Speed)用於根據物件的尺寸與精度變更設定。一般而言,較佳的物件品質通常伴隨著緩慢的列印速度。速度僅可以是慢(Slow)、標準(Standard)或快(Fast)。

20

1. 匯入物件或建立任何設計。

1

2.按一下檔案(File),然後選擇列印(Print)-da Vinci Printer。

2

3. 按一下一般(General),然後選擇列印速度(Print Speed),設定列印速度。

21

支撐

支撐結構會根據物件特性列印。支撐結構用於建立結構強度,並確保您的模型不會在列印程序中倒塌。


1.匯入任何具有懸掛部位的物件。

1

2.按一下檔案(File),然後按一下列印(Print)-da Vinci Printer。

2

3.列印機視窗顯示時,啟用支撐(Support),然後按一下準備(Prepare)。

13

4.懸掛部位已有支撐。

14

底座

列印更細、更長的物件需要更多注意,這是因為形狀物理不穩定的關係;物件可能因本身的重量而鼓起或扭轉。列印細長物件時,應勾選「底座」方塊,考慮增加物體與列印平台之間的接觸面積。底座可增加穩定性,並在您的物件列印後移除。


1.匯入您要列印的長形或纖細物件。按一下檔案(File),然後選擇列印(Print) – da Vinci Printer。

10

2. 選擇印表機清單中的 da Vinci nano。啟用底座(Raft),然後按一下準備(Prepare)。

11

3. 物件已有底座。

12

底邊

底邊功能可讓使用者在列印較長的物件時,放大與列印平台底部區域的接觸範圍,以免因列印擺動而影響列印品質。


1. 匯入任何物件。

1

2.按一下檔案(File),然後選擇列印(Print)-da Vinci Printer。

2

3. 啟用底邊(Brim)並設定底邊寬度(Brim Width)。

15

4.請注意平台上已新增底邊。

^8F154020D52A5439B233AE3F33D3086484BFB899FD8DCDF2A3^pimgpsh_fullsize_distr

一般設定

Last updated on March 28th, 2018 at 03:59 pm

此功能支援物件列印結構的調整,並使用結構密度與外殼列印的設定選項,以產生不同的效果。


溫度

調整列印平台(Print Bed)與列印模組(Print Module)的操作溫度。溫度資訊儲存在物件切層資訊中。Temp

1. 匯入任何物件。

1

2. 按一下檔案(File),然後選擇列印(Print)-da Vinci Printer。

2

3. 選擇印表機,然後按一下一般(General),然後設定溫度(Temperature)。

3

外殼厚度標準

就物件本體的外殼列印層數而言,會從外到內列印兩層(層數 = 3),以取得堅固的外殼層,並修復因第一層列印產生的瑕疵,避免在表面上產生空洞。

1


1.匯入任何物件。

1

2.按一下檔案(File),然後選擇列印(Print)-da Vinci Printer。

2

3.按一下一般(General),然後選擇外殼厚度標準(Shell Thickness Normal),並設定所需數值。

2

外殼厚度頂層

頂層通常是列印程序中物件的最後一部分。使用者可以調整要在頂層列印的層數。若使用,較大的列印層數會產生更密、更紮實的封頂結構。

Top Surface


1.匯入任何物件,然後按一下檔案(File),並選擇列印(Print)-da Vinci Printer。

11

2.按一下一般(General),然後選擇外殼厚度頂層外殼(Shell Thickness Top Surface)。數值從 1 到 10。

10

外殼厚度底層

在列印物件底部的內部填充結構之前,會先列印物件完整的實心底層外殼。完美無空洞的底層外殼通常可透過三層列印(層數 = 3)達成。除了封底效果外,也會在列印時達到較佳的物件穩定性。

12

若您習慣設定不支援第三方線材(及外殼厚度的樣式選擇)的列印機,請參閱以下資訊設定。

  • 薄:1 層
  • 標準:2 層
  • 厚:3 層

若頂層與實心層(填充)設為 0,就會產生中空的物件。

1.匯入任何物件或建立任何設計。

1

2.按一下檔案(File),然後選擇列印(Print)-da Vinci Printer。

2

3. 選擇任何 Professional 印表機。按一下一般(General),並在外殼厚度底層外殼(Shell Thickness Bottom Surface)上設定所需的數值。

13

匯出設定

Last updated on September 19th, 2018 at 11:25 am

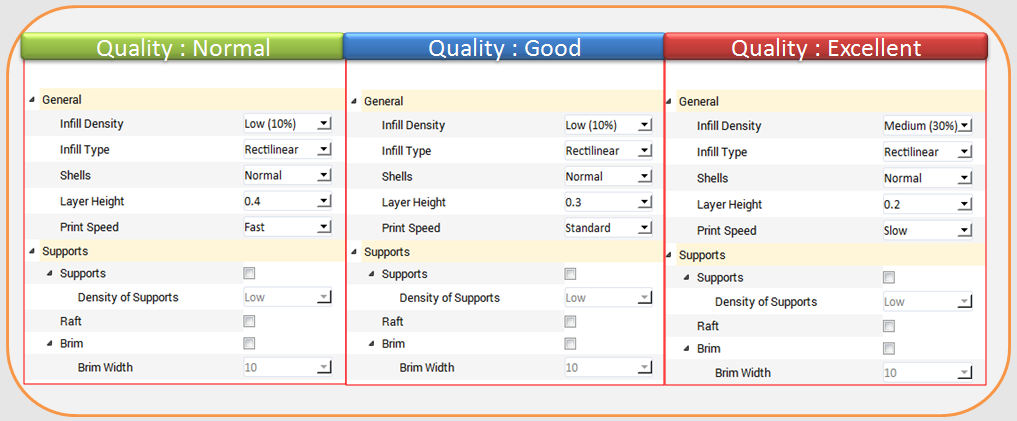
品質

列印品質將影響物件列印的預估時間。例如,高品質列印將比低品質列印花更久的時間,這是因為每一層的列印得更細,以達到更細部的表面處理。

Quality

列印厚度

您可以設定不同的列印厚度,改變印表機建立的每一層厚度。列印的層厚可以在 0.1mm – 0.4mm 之間調整。為獲得最佳結果,我們建議 0.2-0.3mm 層厚列印。

LH

內部填充密度

列印前,使用者可使用此功能調整物件的列印密度。da Vinci 3D 列印機上的預設列印機設定將根據蜂巢結構,建立物件的內部結構。您可以使用 3D 密度下拉式選單,從中空到高密度調整蜂巢結構密度,以建立所需的強度需求。

Infill Density
1. 匯入物件或建立任何設計。

1

2.按一下檔案(File),然後選擇列印(Print)-da Vinci Printer。

2

3.按一下檔案(File),然後選擇列印(Print)-da Vinci Printer。

5

外殼

外殼為物件的外層。厚外殼的列印品質較佳,但列印時間較長。薄外殼會縮短列印時間,但可能易碎。

物件強度受到 3D 密度與外殼設定的影響。為確保不同大小、形狀及目的物件的永續性,將需要不同密度與外殼設定。

18


1. 匯入物件或建立任何設計。

1

2.按一下檔案(File),然後選擇列印(Print)-da Vinci Printer。

2

3. 按一下一般(General),然後設定外殼(Shells)。這可以是標準(Normal)、薄印(Thin)或厚實(Thick)。

17

Print Speed

Printing Speed is use to change the settings based on the size and precision of the object. In general a better object quality is accompanied with a lower printing speed. It can be Slow, Standard or Fast; while if the Layer Height set is 0.2mm, the Printing Speed options are Low, Medium, High and Fast.


1


1.Import any object or create any design.

1

2.Click File then select Print – da Vinci Printer.

2

3.Click on General then Select Layer Height and input the desired value.

7

Support

The supportive structures are printed according to the objects features. Support is used to create structural strength and ensure that your model does not collapse during the printing process. You can set the Support Density to Low, Medium and High if the material set is ABS.

1.Import any object that has overhang parts.

1

2.Click File then Print – da Vinci Printer.

2

3.When Printer Window display, enable Support then click Prepare.

3

4.Notice that the overhang parts has already support structure.

4

Raft

Printing thinner and longer objects require more attention due to the shapes physical instability; the object may buckle or twist under its own weight. When printing long thin objects, you should consider increasing the area of contact between your object and the print bed by checking the “Raft” box. Rafts create stability and can be removed after your object has been printed.

1.Import a long or thin object that you want to print.

1

2.Click on File then select Print – da Vinci Printer

4

3. Select the printer that you want to use. Then enable Raft. 

2

4.Notice that there is an added raft on the surface.
3

Brim

Brim function allows users to enlarge the range of contact with bottom area of print bed in printing relatively elongated object to prevent swing due to print from influencing print quality.

1. Import any object.

1

2.Click File then select Print – da Vinci Printer

2

3. Enable Brim and set the Brim Width.

3

4.Notice that there is an added Brim on the surface.
4

列印模組

Last updated on March 28th, 2018 at 03:59 pm

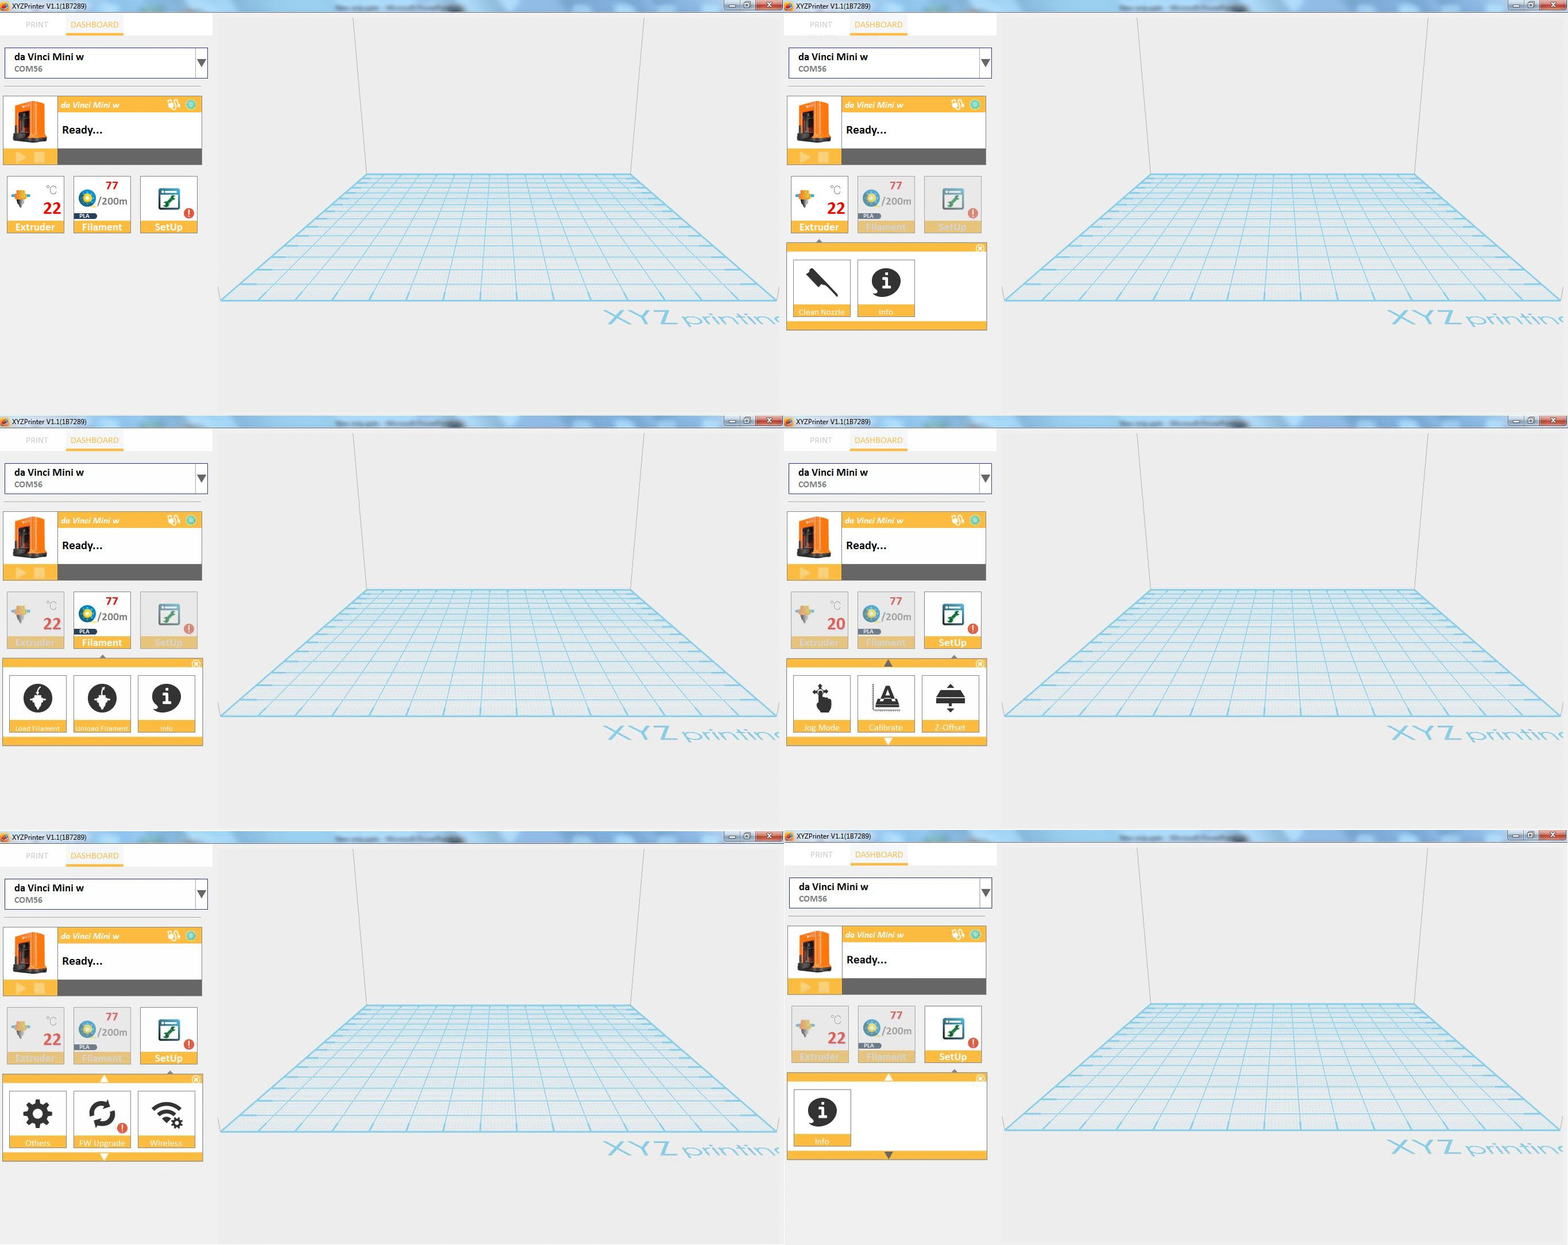
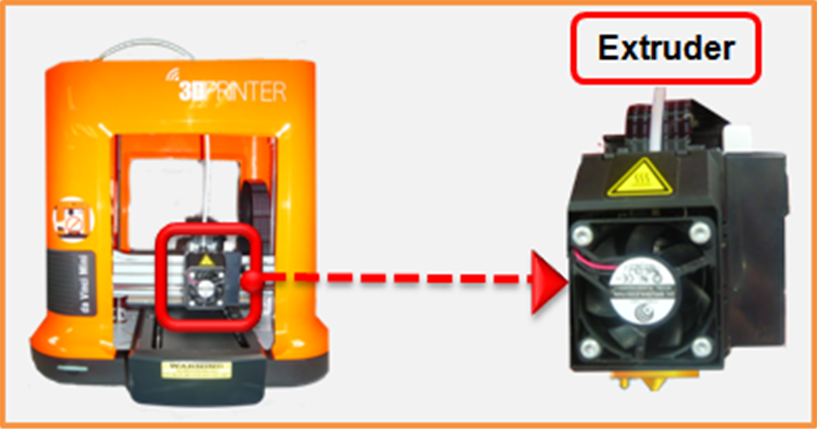
在此功能中列有兩個選項,一是清潔噴頭,而另一個則是列印模組資訊。這項操作只能使用在XYZprinting出產的mini系列。

extruder

清潔噴頭

選擇此功能後,噴頭將自動加入,並將噴頭移至正確的位置。您可在此處輕鬆清除噴軸頭上所有殘留的線材。

1.連接至列印機。

8

2.按一下檔案(File),然後選擇列印(Print)-da Vinci Printer。
1

3.按一下控制面板(Dashboard)。

2

4. 按一下列印模組(Extruder),然後選擇清潔噴頭(Clean Nozzle)。

3

5. 按一下開始(Start),以開始。

4

6. 列印機將開始加熱。

5

7.加熱後,請將清潔鐵絲穿過噴頭。

6

8.清潔後,按一下完成(Finish)。

7

列印模組資訊

這將顯示插入連接列印機的列印模組資訊。這會顯示列印模組的溫度、直徑、序號及總列印時間。

1. 連接至列印機。
8

2.按一下檔案(File),然後選擇列印(Print)-da Vinci Printer。

1

3.按一下檔案(File),然後選擇列印(Print)-da Vinci Printer。

2

4.按一下列印模組(Extruder),然後選擇資訊(Info)。9

5.列印模組資訊即會出現,包含了溫度,噴頭直徑,列印總時間預估以及列印機序號。

10

設定

Last updated on March 28th, 2018 at 03:58 pm

您能在XYZmaker上設定您的列印機校正、步進模式、無線通訊、Z-Offset、自動較平,和其他列印機資訊。在這個章節,您將會學到如何使用不同的設定來幫助您維持您的列印機表現。

SetUp

步進模式

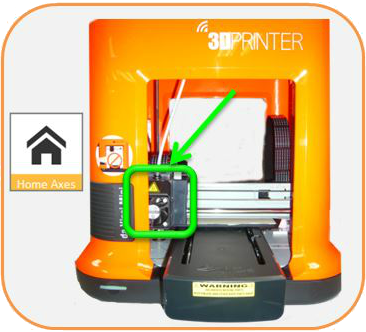
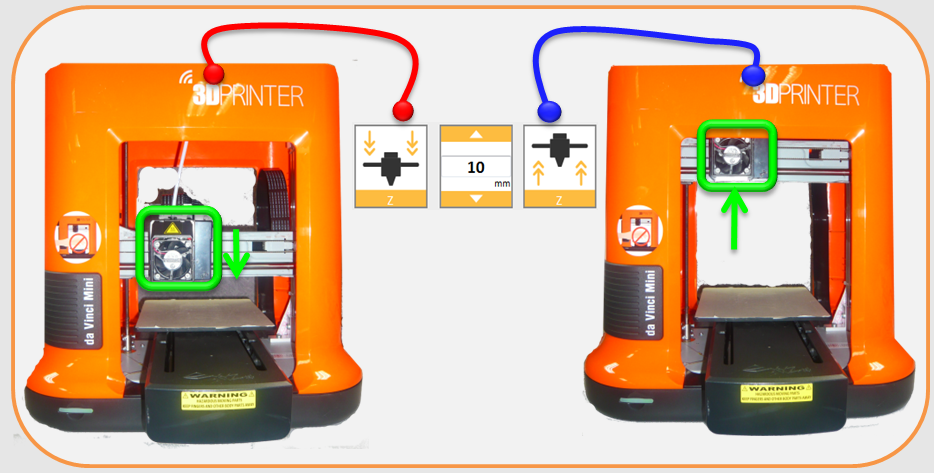
步進模式可讓您將列印模組任意沿著 X、Y 及Z 軸移動。這對於維護與維修工作非常實用。此會手動調整 X/Y/Z 軸的移動,以進行列印機維護。

按一下 [起始軸]。列印裝置將會回到列印區域左下角的起始軸位置。然後調整列印模組(X 軸)、列印平台(Y 軸)及列印軸(Z 軸)的位置。選擇「X 軸」時,將會左右移動列印模組;選擇「Y 軸」時,列印平台將會前後移動,而您選擇「Z 軸」時,列印軸(Z 軸)將會上下移動。

1.連接至列印機。
8

2.按一下檔案(File),然後選擇列印(Print)-da Vinci Printer。

1

3.按一下控制面板(Dashboard)。

2

4.按一下設定(SetUp),然後選擇步進模式(Jog Mode)。

1

5.若要啟動步進模式,列印模組應在起始軸位置,因此請按一下起始軸(Home Axes)。

2

6. 您現在可以使用步進模式功能。

3


按一下起始軸(Home Axes)時,列印模組將移至起始軸位置。

4

選擇 X 軸,列印模組將向左或向右移動。

5

選擇 Y 軸時,列印平台將前後移動。

6

選擇 Z 軸時,列印模組將上下移動。Jog Mode Z

校正

進行列印程序前,可能要進行平台校正。列印裝置可移至列印區域的左下角。請參閱軟體隨附的平台校正說明。

校正前,請按下列印模組的按鈕 A。校正後,按下列印模組的按鈕 B,以縮回感應器裝置。若校正失敗,請確定已在重新啟動校正程序之前,按下按鈕 A(偵測器)。

1.請確定您已連接至列印機。8

2.按一下檔案(File),然後選擇列印(Print)-da Vinci Printer。

1

3.按一下控制面板(Dashboard)。

2

4.按一下設定(SetUp),然後選擇校正(Calibrate)。

6

5.按一下開始(Start),以開始。

1

6.列印模組移至起始軸位置。這可能要花數分鐘的時間。

2

7. 如圖所示按下列印模組的偵測模組。然後按一下下一步(Next)。

3

8. 校正將開始。這可能要花數分鐘的時間。

4

9. 校正完成時,您需要按下圖中所示的按鈕,停用偵測模組。按一下完成(Finish),以完成程序。

5

Z offset

此功能將協助您調整平台與列印模組之間的列印距離。每次調整的間距為 0.05 mm。若第一層太高(太大)或太低(太近),我們建議您使用 z-offset 調整列印距離。

1.連接至列印機。請確定列印機已就緒。8

2.按一下檔案(File),然後選擇列印(Print)-da Vinci Printer。

1

3.按一下控制面板(Dashboard)。

2

4.按一下設定(SetUp),然後選擇 Z offset。

1

5. 選擇是否要減少或增加 Z-Offset。在範例中,選擇增加列印平台與列印模組之間的距離。

3

6.變更值後,若您要套用變更,請按一下接受(Accept),或若要回復預設值,請按一下預設(Default)。

4

<strong>其他</strong>

在其他中,您可以啟用或停用蜂鳴器、自動校平及還原預設值指令。自動水平校正可能是 ON 或 OFF。預設值:ON。軟體會自動執行水平校正並依此補償。若自動水平校正已切換至 OFF,可能會改善列印速度。然而,這可能會影響列印品質。

蜂鳴器預設值為開啟;您可以選擇「OFF」,變更設定。蜂鳴器開啟時,將會在按下按鈕、接收資料、完成列印工作、或偵測到問題時輸出聲響信號。使用「還原預設值」時,所有設定將重設回原廠預設值。


1.連接至韌體版本較低的任何列印機。8

2.按一下檔案(File),然後選擇列印(Print)-da Vinci Printer。

1

3.按一下控制面板(Dashboard)。

2

4.按一下設定(SetUp),然後按一下其他(Others)。

1

5. 您可以開啟蜂鳴器(Buzzer)與自動校平(Auto Level)。按一下確定(OK)接受變更,按一下預設值(Default)可回復成預設值。若您不想要套用變更,請按一下取消(Cancel)。

2

<strong>韌體升級</strong>

為獲得最佳 3D 列印體驗,請持續更新軟體及/或韌體。更新過程很簡單:只要連接列印機,然後按一下檔案(File) à 列印(Print) à da Vinci Printer à 列印機外掛程式(Printer Plugin) à 選擇下拉式清單上的列印機 à 按一下控制面板(Dashboard) à 設定(SetUp) à 韌體升級(FW Upgrade)。

註:請確定您在升級韌體或 XYZmaker 軟體前,PC 已連線到網際網路。


1.連接至韌體版本較低的任何列印機。8

2.按一下檔案(File),然後選擇列印(Print)-da Vinci Printer。1

3.按一下控制面板(Dashboard)。

2

4.按一下設定(SetUp),然後選擇韌體升級(FW Upgrade)。

1

5.按一下立即升級(Upgrade Now),以開始進行。請勿在升級時關閉電源或干擾列印機。

2

6.升級後,將顯示已升級的韌體版本。

3

無線通訊

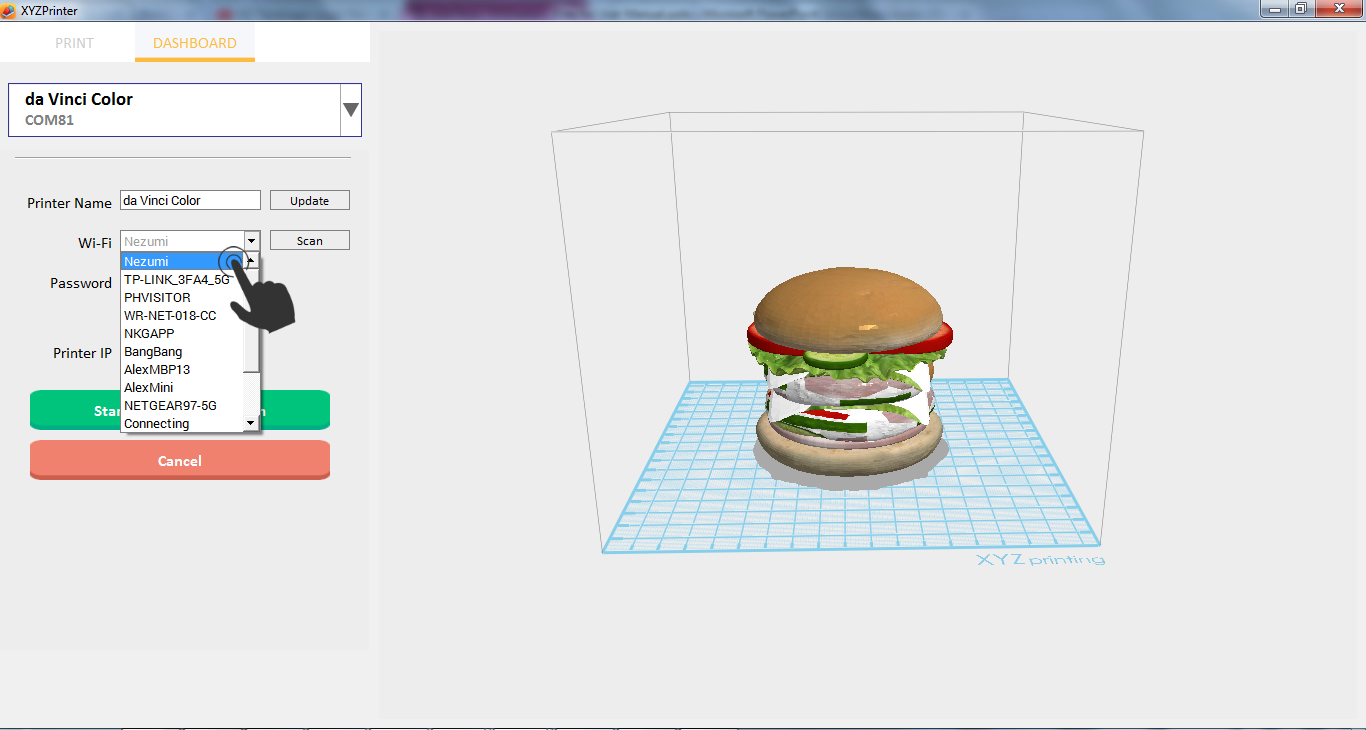
網路列印功能只有在列印機與電腦,均連接至相同的無線網路時可以使用。

1. 請在 PC 上設定無線網路,然後連接至支援無線傳送工作的任何印表機。

1

2. 按一下 檔案(File)->列印(Print)->da Vinci Printer。

1-10

3. 按一下設定(SetUp)->無線(Wireless)。

4

4.選擇 PC 連接的無線網路。

6

5. 輸入密碼(Password),然後按一下啟動 Wi-Fi (Start Wi-Fi)。

7

6. 開始嘗試連線。

8

7.已連線時,啟動 Wi-Fi 按鈕將變成停止無線連線/變更設定(Stop Wireless Connection/ Change Setting)。

9

<strong>資訊</strong>

印表機資訊可在設定(SetUp) à 資訊(Info)下方檢視。這將顯示所有列印機資訊、連線資訊及校正資訊。所有這些資訊將在此頁面上摘要顯示。

1.連接至任何列印機。8

2.按一下檔案(File),然後選擇列印(Print)-da Vinci Printer。

1

3.按一下控制面板(Dashboard)。

2

4.按一下設定(SetUp),然後選擇資訊(Info)。

1

5.您可以檢視列印機資訊、連線資訊及校正資訊。

2