Interface Introduction
Clean Nozzle
Once this function is selected, the nozzle will heat up automatically and move the nozzle to a proper location where you can easily clear away all residual plastic on the nozzle.
Info

The extruder module information, including Temperature, Nozzle Diameter, Total Print Time, and Serial Number.
Load Filament
Please follow the on-screen instructions.
The extruder module will automatically move to the working position. The nozzle will then heat up and begin the filament loading process. After this is complete, verify that plastic has been extruded. If not, please repeat the filament loading process.
Unload Filament
Please follow the on-screen instructions.
The printing module will automatically move to the working position. The nozzle will then heat up and begin the filament unloading process.
Info

Information related to filament use.
Jog Mode
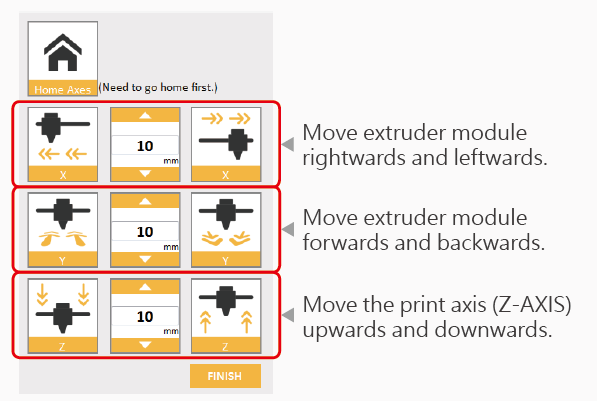
Manually adjust the movement of X/Y/Z Axis for printer maintenance.
NOTE:
1. First click on Home Axes. The extruder module will be returned to the initial axis position.
2. You may manually enter the adjustment value: Range: 1 to 150; step: 1 mm
Calibrate
Please follow the on-screen instructions.
Print bed calibration may be implemented before the printing process.
Move the extruder module to the lower left corner of the printing area. Please refer to the calibrate instructions provided by the software.
Z-Offset
Z-Offset function will help you to adjust the printing distance between the print bed and extruder module.
Each adjustment has a step of 0.05 mm.

Others
Automatic horizontal calibration
Automatic horizontal calibration may either be ON or OFF. Default: ON.
The printer would automatically implement horizontal calibration and compensation accordingly.
Printing speed will be improved if automatic horizontal calibration has been switched to OFF. However, this may affect printing quality.
Buzzer
Buzzer may either be ON or OFF. Default: ON.
When the buzzer is turned on, the printer will output an audible signal when a button is pressed, receiving data, print job is finished, or issue is detected.
Restore Default
Click Restore Default to reset to default setting.
Firmware upgrade
Please upgrade the latest firmware version for the best printing quality of the printer.
Info

Information related to printer setting.


