To print with Nobel printers, please first install XYZware_Nobel on your device. “XYZware_Nobel” Installer can be found in the bundled USB drive in the package of the printer or at XYZprinting website.
Note
Login in XYZprinting member is required to download the software.
Compatible printer model
XYZprinting Nobel 1.0
XYZprinting Nobel 1.0A
XYZprinting Nobel Superfine
System requirements
Windows version
Mac Version
Supported operating systems:
Windows 7, 8, 10
Mac OS X v10.9, 10.10, 10.11, 10.12, 10.13
Minimum system requirement:
32-bit operating system
System RAM: 4GB
Graphics RAM: 1GB (OpenGL 2.1+ compatible)
Hard disk space: 300MB and more
Recommended system requirement:
64-bit operating system
System RAM: 8GB
Graphics RAM: 4GB (OpenGL 2.1+ compatible)
Hard disk space: 1GB and more
System RAM: 8GB
Graphics RAM: OpenGL 2.1+ compatible
Hard disk space: 1GB and more
Supported file type
File Type
Description
.stl
The file format is native to 3D CAD software. It is widely used for 3D printing.
.3ws
After adding supports to the object in XYZware_Nobel, you can save the file in this format. The support layout can be re-adjusted.
.3wn
The XYZware_Nobel proprietary file format contains detailed instructions for the printer to follow for each layer. The file is unadjustable. The file type also contains the data of the targeted printer type. When exporting objects to “3wn” format, be sure to select the corresponding printer model in the settings.
Most operations of the printer are activated with the LCM menus. Below is the description on the function of each item in the menus.
(A) Page 1
(B) Page 2. Press to go to page 2 on the printer screen.
UTILITIES
“Utilities” menu provides the control of the printer. You can instruct to fill the resin tank manually, and calibrate the printer when necessary.
Below is the list of functions under the Utilities menu:
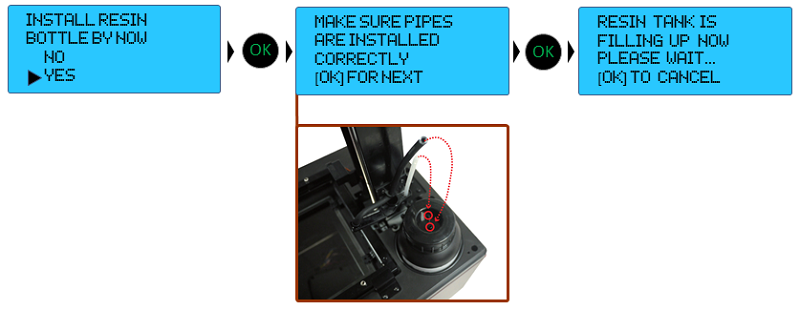
INSTALL RESIN
Resin auto filling function is enabled by default. The tank will be refilled automatically when resin level low or empty is detected. You may still activate resin-filling function manually.
Before doing so, make sure the resin bottle, resin tank and the lid are installed correctly.
Select “Yes” and press to begin:
Note
» “Auto Fill” function is enabled by default. You may skip loading resin manually when auto-fill is enabled.
» Shake the resin bottle well before use to ensure an even color.
» The printer detects the tank level after "Install Resin" is activated. Resin will be filled only when the tank level is low.
HORIZON CALIB
HORIZON CALIBRATION is for calibrate the print platform. Platform calibration ensures the platform is parallel with the resin tank for more stable printing performance. If the platform is not calibrated, objects may fall during printing.
Note» Click here to read step-by-step instructions on platform calibration.
» Always calibrate the platform after changing to a new tank or a tank or a platform different the one used for last print.
MOVE PLATFORM
Activate the function when you need to move the platform manually.
Simple select move the platform “to top” or “to bottom” to proceed:
When the platform has moved to the bottom or top as indicated, press to exit the function.
[collapse]
SETTINGS
The Settings menu allows you to adjust printer settings, including below items:
(A) Page 1
(B) Page 2. Press the down key to go to page 2 on the printer screen.
BUZZER
When the buzzer is turned on, the printer will output an audible signal when a button is pressed. Buzzer is turned on by default.
To switch off the buzzer: Select “OFF” and press to change the setting.
[collapse]
AUTO-FILL
When “Auto Fill” is enabled, the printer will fill the resin tank before printing and when low tank level is detected. With the auto-fill function, you no longer need to manually refill the resin during printing. This is especially useful when printing large objects. “Auto Fill” is enabled by default.
To disable the function: Select “OFF” and press to change the setting.
Note
» Be sure to place the printer on a leveled surface, or tank level detection may be inaccurate.
» Auto-fill will be switched off when the timeout expires. Timeout may be caused by an empty resin bottle or the tank level sensor soaked by resin. Please replace the resin bottle or clean up the level sensor before enabling the function.
[collapse]
LANGUAGE
You may switch the display language on the printer. The default language is English.
To switch to other language: Select a language and press to change the setting.
[collapse]
ENERGY SAVE
LED back-light of the LCM enhances the readability of the content of the display.
To save energy consumed, the back-light will go off after the printer idles for 3 minutes (shown as 03M on the display) by default. To set a longer time interval: Select “OFF” and press to change the setting.
A. Backlight will never go off.
B. Backlight will go off after the printer idles 3 minutes.
C. Backlight will go off after the printer idles 6 minutes. Select an option, and press to change the setting.
[collapse]
RESTORE DEFAULT
All settings can be reset to factory default with a few clicks.
To reset all settings at once: Simply select “YES” and press to reset.
[collapse]
INFO
Under “Info” menu, you can check the statistics and firmware version of the printer, status of resin bottle installed, and information on XYZprinting.
(A) Page 1
(B) Page 2. Press to go to page 2 on the printer screen.
STATISTICS
In “Statistics”, you can check the accumulated print time. The accumulated working time for the printer is shown in hours.
[collapse]
SYSTEM VERSION
Firmware version is shown here. To ensure optimal printing performance, it is advised to keep the firmware up to date. To check for firmware updates, please go to XYZware_Nobel.
[collapse]
RESIN STATUS
“Resin Status” provides the information on resin level, and the capacity, color and material of the resin. Press on the printer to read the second page.
A. Original amount of resin in the cartridge.
B. Resin level in the resin cartridge
C. The color or material type of the resin cartridge installed.
D. Resin Model indicates the resin version. While setting up printing preference in XYZware_Nobel, please select the correct resin model. The info is also printed on the serial number label on the resin bottle. For resin bottles without the info of resin model, the resin model is A1.
[collapse]
SENSOR STATUS
When you encounter exceptional status during the operation of the printer, you may check the status of each sensor here. The information is especially helpful for troubleshooting.
The content may look like this:
How to read the status:
C: 1 – Lid (Top cover) covered; 0 – Lid not covered Z-T: 1 – Platform at top; 0 – Platform away from top Z-B: 1 –Platform at bottom; 0 – Platform away from bottom T: 1- Tank motor in action (Right side of the tank sinks slightly); 0 – Tank motor idling (Tank is leveled) L: 1 – Tank level low; 0 – Tank full or tank not installed Y: 1 – laser engine in action; 0 – laser engine idling
[collapse]
HELP
The URL to XYZprinting website can be found here. You may go to the website for the latest information, product documents, tutorial video and more.
[collapse]
PRINT FROM USB
Insert USB flash drive to the USB drive port at the back of the printer, and select “PRINT FROM USB” on the printer.
Press on the printer to browse the menu, and press to select a file to print.
Note:
» Please slice the 3D model with XYZware_Nobel and save it in .3wn format. Files in other format or not sliced with XYZware_Nobel will not be shown. (Read more)
» For correct file name display, please name the file with English and Japanese (Katakana preferred) alphabets and numbers.
» Sample files are provided in the bundled USB drive. To print the sample, please slice the stl files with XYZware_Nobel before printing, or selected the sliced .3wn files.
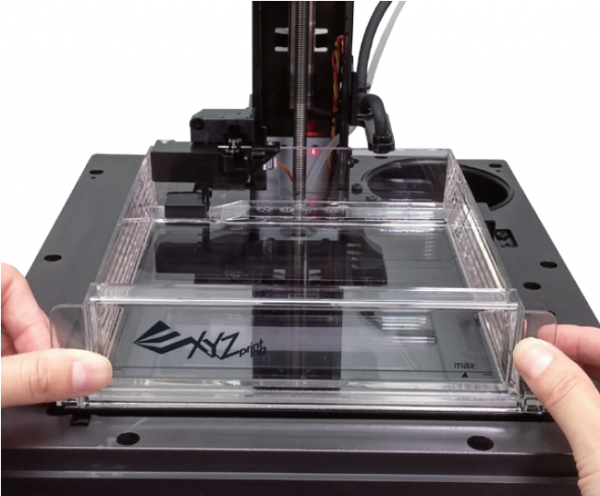
Install the resin tank by pushing the tank all the way into its slot.
Calibration
Platform calibration ensures the platform is parallel with the resin tank for more stable printing performance. If the platform is not calibrated, objects may fall during printing.
Note
•Click here to read step-by-step instructions on platform calibration.
•Always perform platform calibration after changing to a new tank or a tank or a platform different the one used for last print.
Resin Bottle Installation
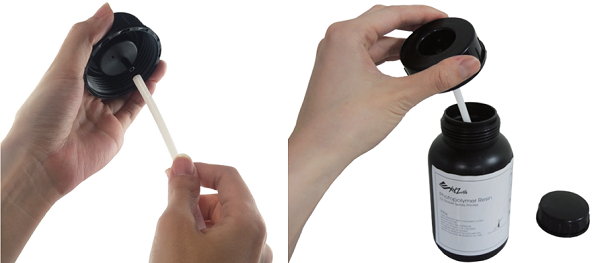
Shake the resin cartridge for about 10 seconds.
Assemble the nozzle cap and the inner tube and replace the bottle cap with the assembled nozzle cap.
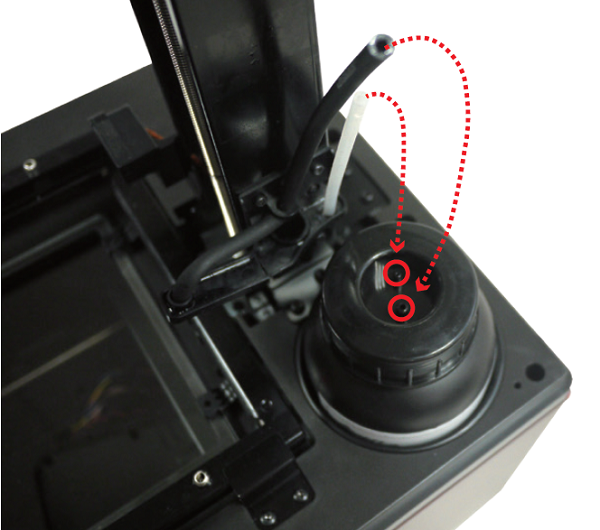
Insert the resin bottle into the cartridge slot and install the filling tubes by first connecting the black tube to the thick nozzle. Then attach the transparent tube to the thin nozzle and push the tube all the way down.
Note
“AUTO FILL” is enabled by default. The resin tank is auto-filled before printing and when resin low is detected. You don’t need to fill the tank manually.
Before changing the resin bottle, please detach the transparent tube from the cap and then the black tube.
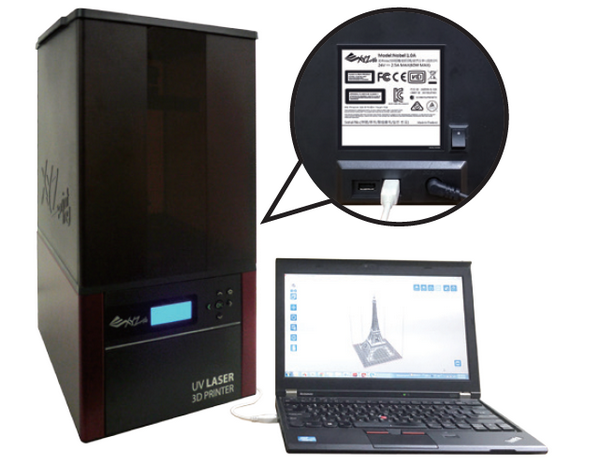
Connect to PC
Connect the printer to your PC via USB wire.
Note
USB wire port is at the back of the printer.
Software Setup
The printing software, XYZware_Nobel, is essential when printing with the Nobel printers.
“XYZware_Nobel” Installer can be found in the bundled USB drive in the package or at XYZprinting website:
Note
Login in XYZprinting member is required to download the software.
Apply printer firmware and XYZware_Nobel updates when prompted by the software for stable printing performance.
Note
Keep original packaging material in the event of sending your unit back for repair.
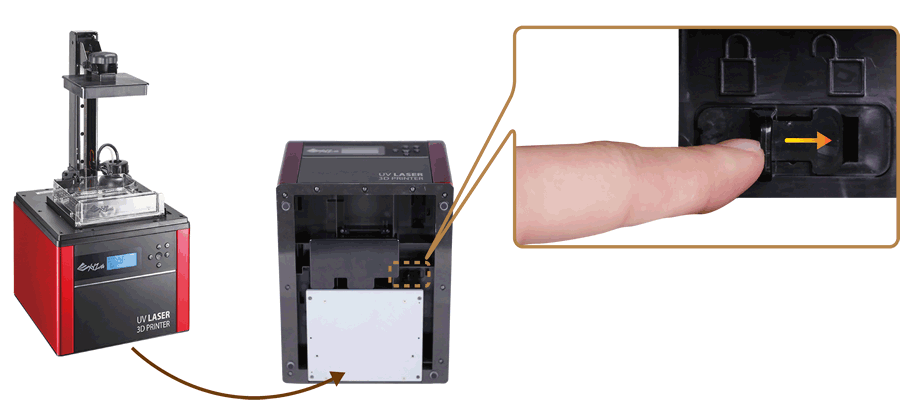
Unlock the printer
Lay down the printer, and release the printing module locker by pushing it to the right.
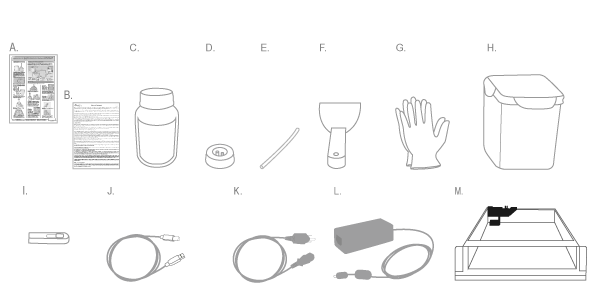
Accessories
Nobel 1.0A is shipped with the following parts and accessories.
A.
User quick guide
B.
Warranty card
C.
Starter Resin
D.
Nozzle cap
E.
Inner Tube
F.
Scraper
G.
Gloves
H.
Rinse Basket
I.
USB Flash Drive
J.
USB Wire
K.
Power Cable
L.
Power Adapter
M.
Resin Tank
Note
After unpacking, please inspect the interior and exterior of the printer and accessories for damage. Please contact support for any missing or defective parts and accessories.
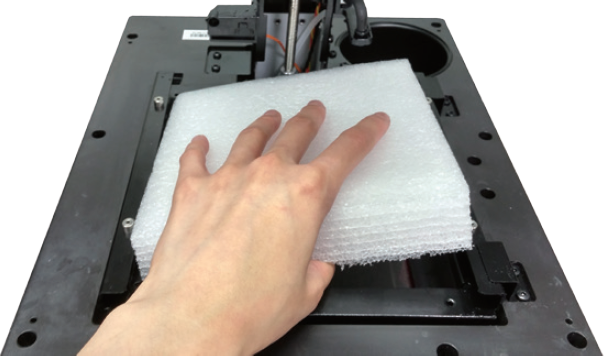
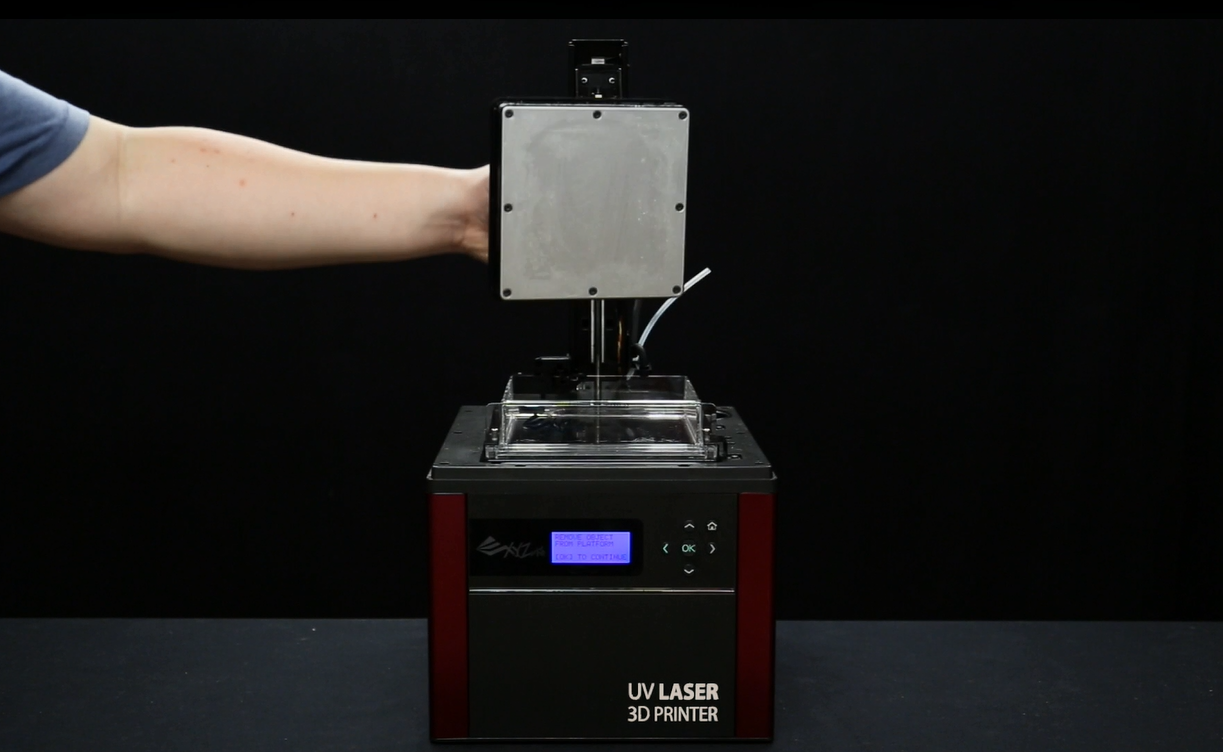
Remove the protective foam under the platform
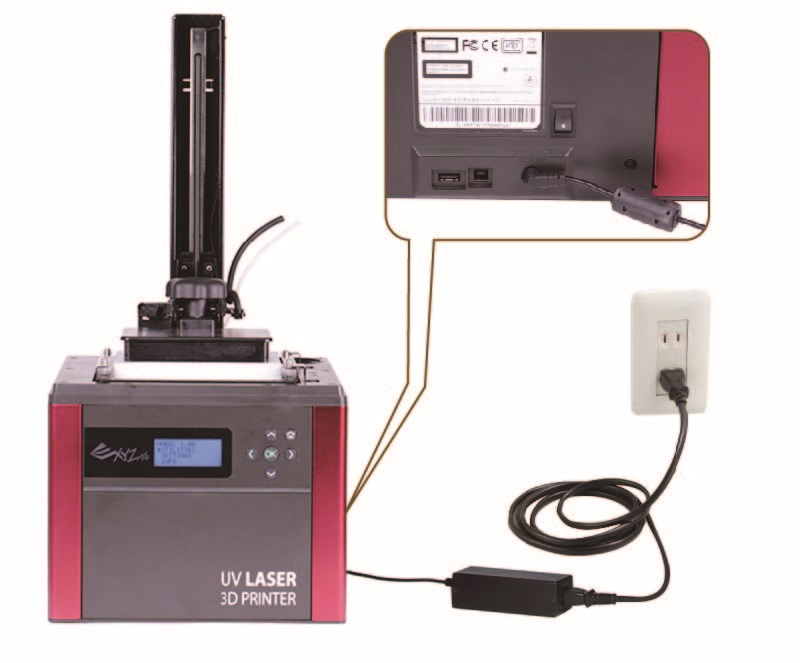
Connect the power source to the printer and power on the printer.
On the printer, select “UTILITIES” > “MOVE PLATFORM”>“TO TOP”>“YES” to raise the platform.
Remove the protective foam from the tank slot.
Assemble the lid
Assemble the top case by following the instructions in the box and the video below.
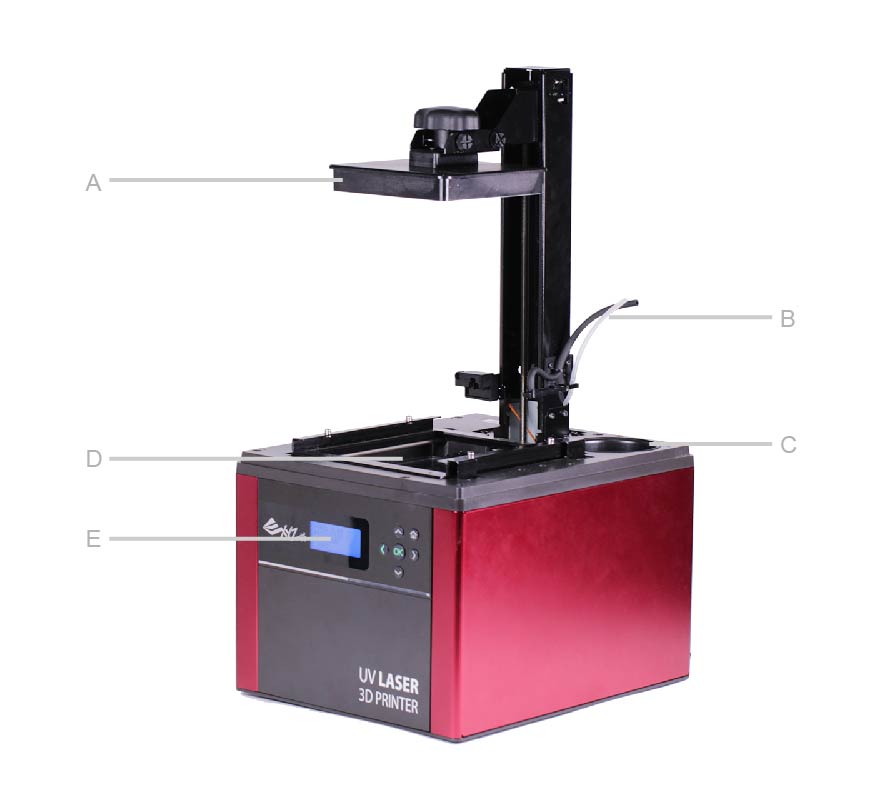
Printer overviews
Below is the list of the main components on the printer.
A.
Platform
The print bed of the printer.
B.
Filling Tubes
To be attached to the cap of the resin bottle for filling resin to the tank.
C.
Cartridge Slot
For holding the resin bottle on the printer.
D.
Tank Slot
For holding the resin tank.
E.
Operation Panel
For displaying messages and setting up the printer.
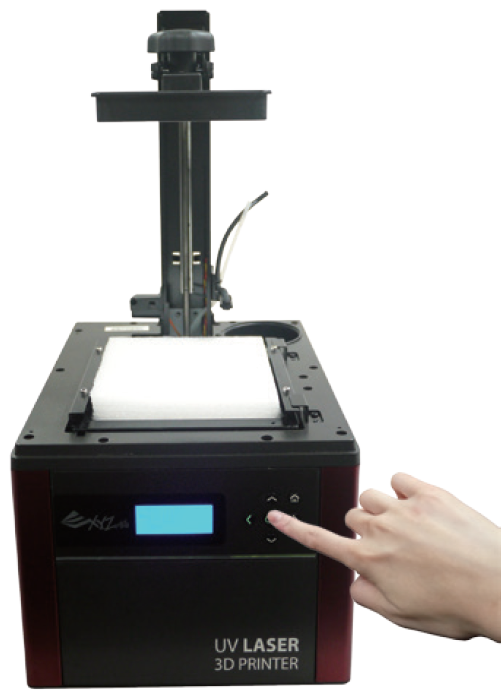
Use the operation panel
To control and maintain the printer, you will need to operate certain functions with buttons on the control panel. Here is the map of the buttons:
A.
Move up along the menu
B.
Back, cancel selection
C.
Move down along the menu
D.
Confirm selection and settings, save the settings and exit


 “Utilities” menu provides the control of the printer. You can instruct to fill the resin tank manually, and calibrate the printer when necessary.