Print Setting

Last updated on March 28th, 2018 at 04:00 pm

da Vinci Color is XYZprinting’s first FFF desktop 3D printer with true color technology achieved through the combination of inkjet and 3D printing technology, there are worldwide 40 patents pending.By using CMYK inkjet technology, droplets of ink attach itself to the color-absorbing PLA filament, allowing the da Vinci Color to create prints of various colors by combining the droplets of ink on the filament. The da Vinci Color was designed with consumer accessibility, creativity and ease-of-use in mind.


Enable Color Print

When Color Print is enabled your sliced object will retained its original color and can be print with ink installed. While disabling Color Print will not retained object’s original color and can be print without any ink installed on your da Vinci Color.

  • Import any textured object.

Import Textured

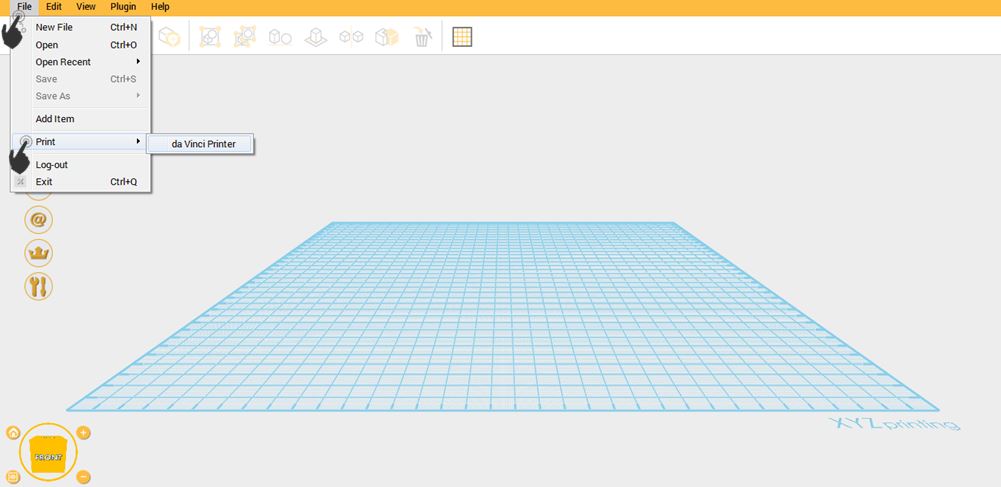
  • Click File then select Print – da Vinci Printer Plugin
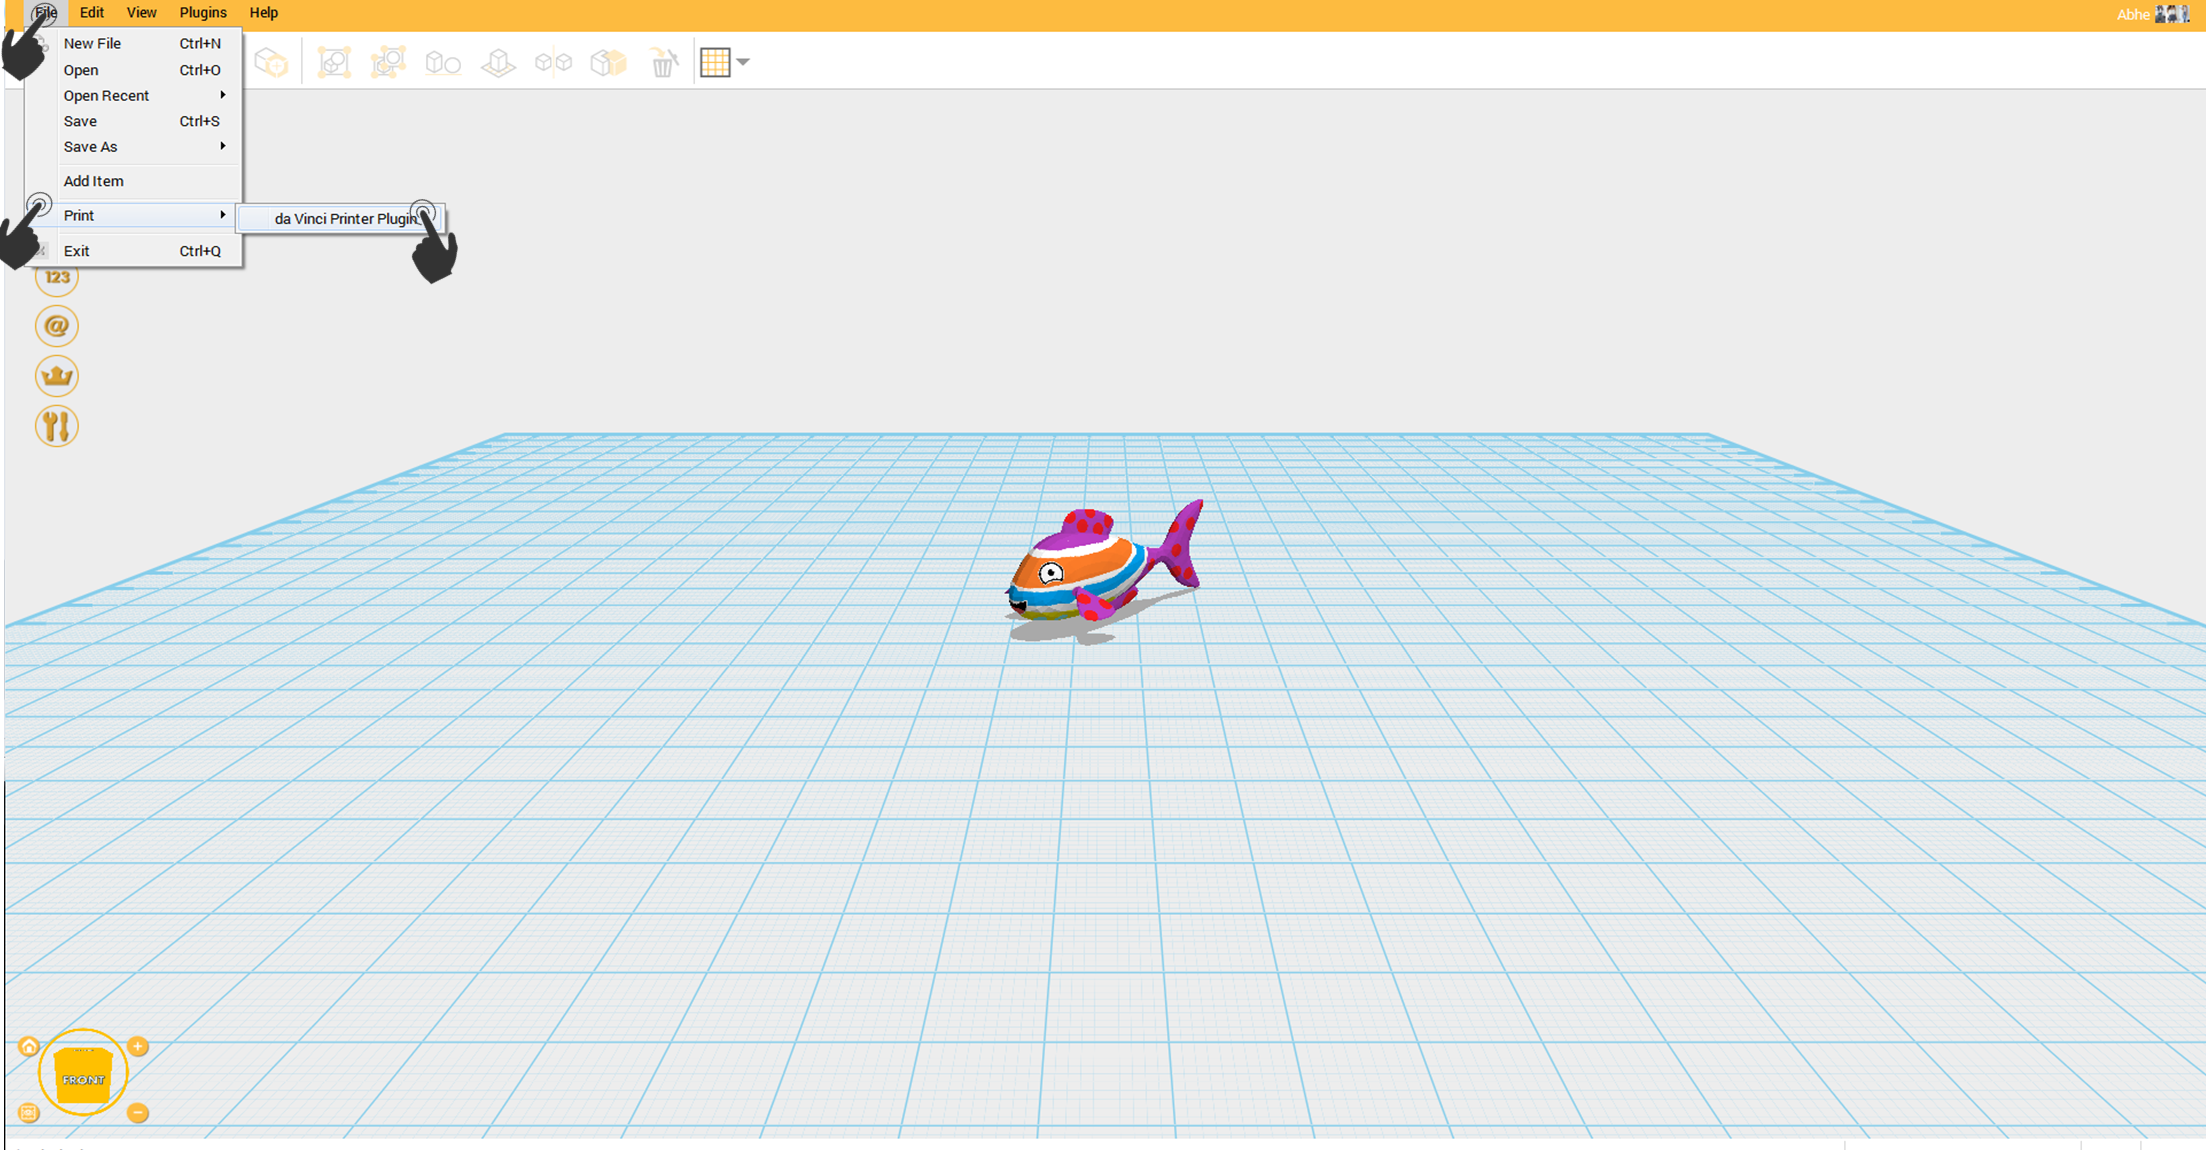
da Vinci Printer Plugin

  • To make the object color is colored, enabled the Color Print on the settings.
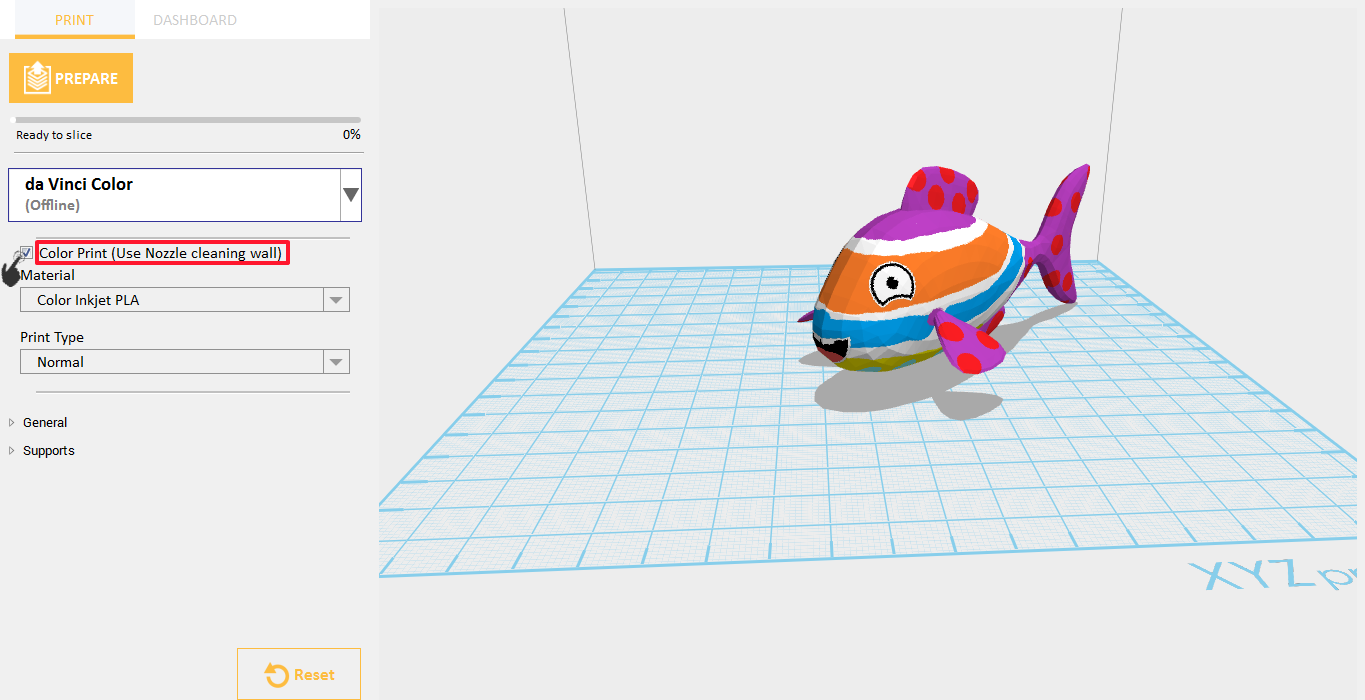
Enable Color Print

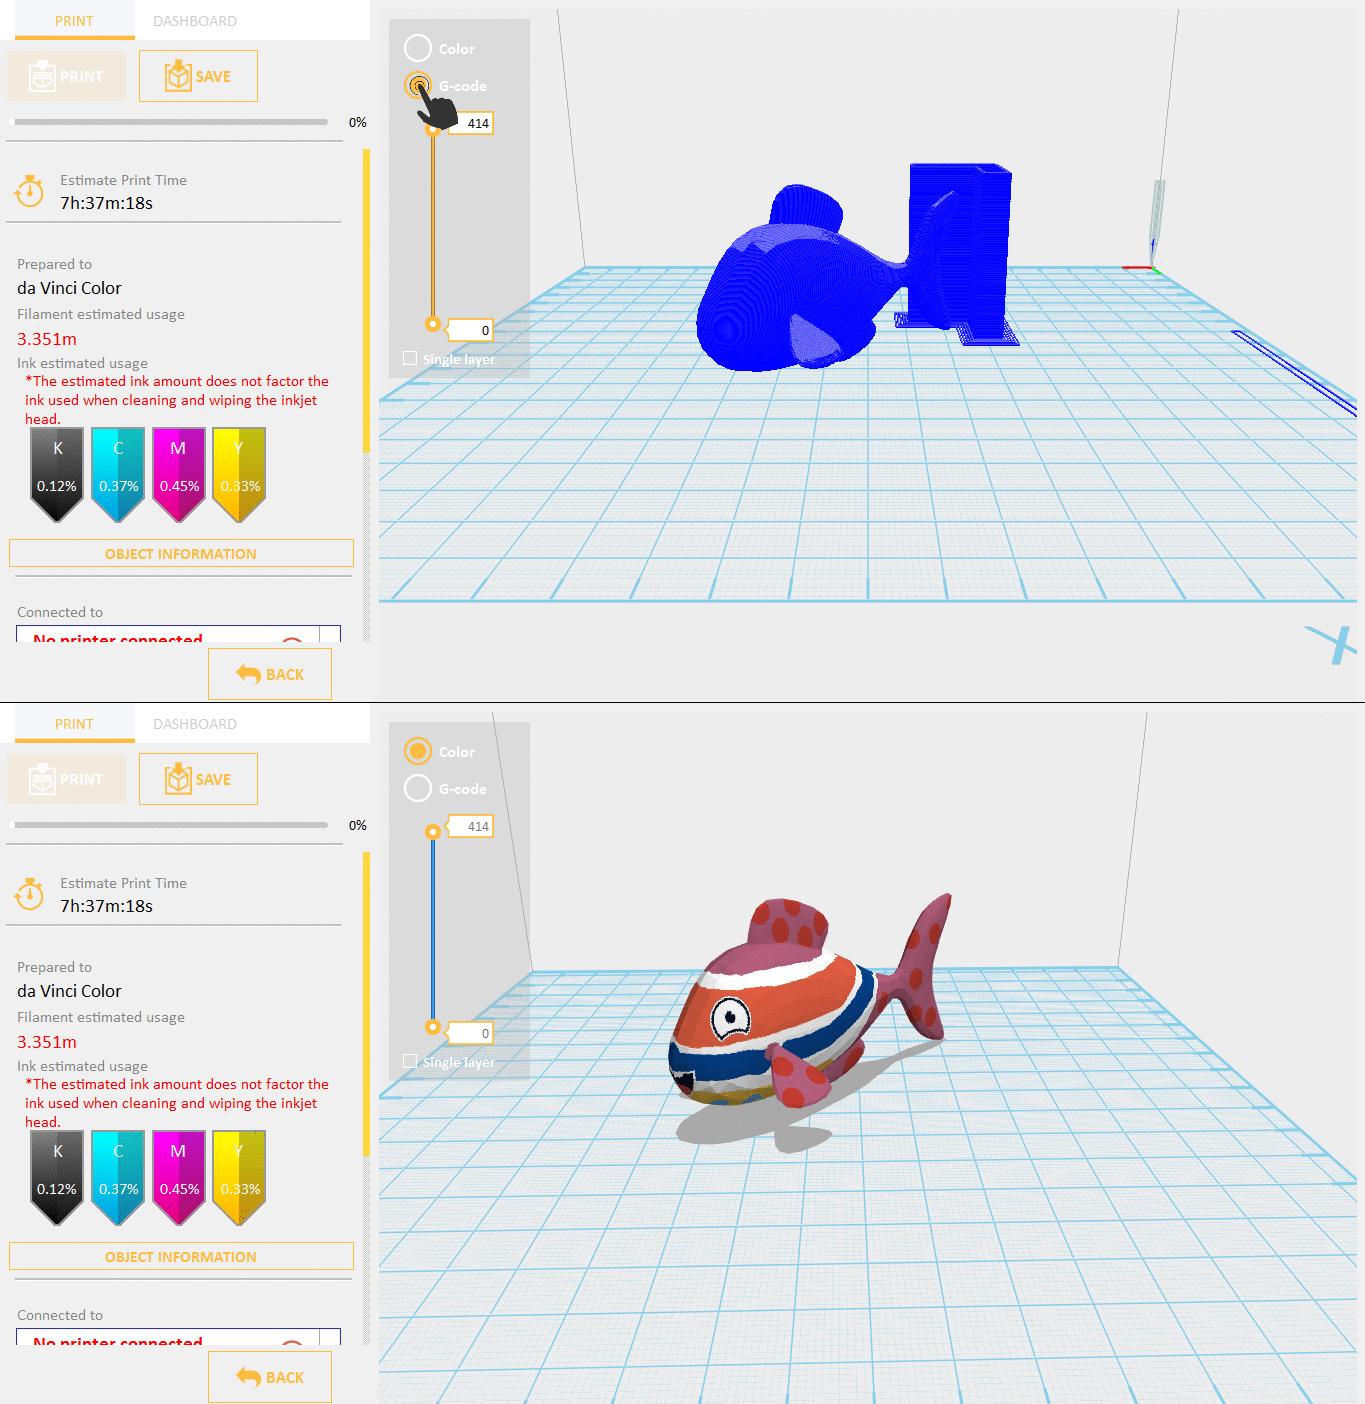
  • Click on Prepare button

Prepare

  • After slicing, user can have option to view the sliced object to G code or Color by simply clicking on the radio button.
Webp.net-gifmaker (14)

Disable Color Print

  • Import any textured object.

Import Textured

  • Click File then select Print – da Vinci Printer Plugin

da Vinci Printer Plugin

  • Disable Color Print setting to print the object using filament only.
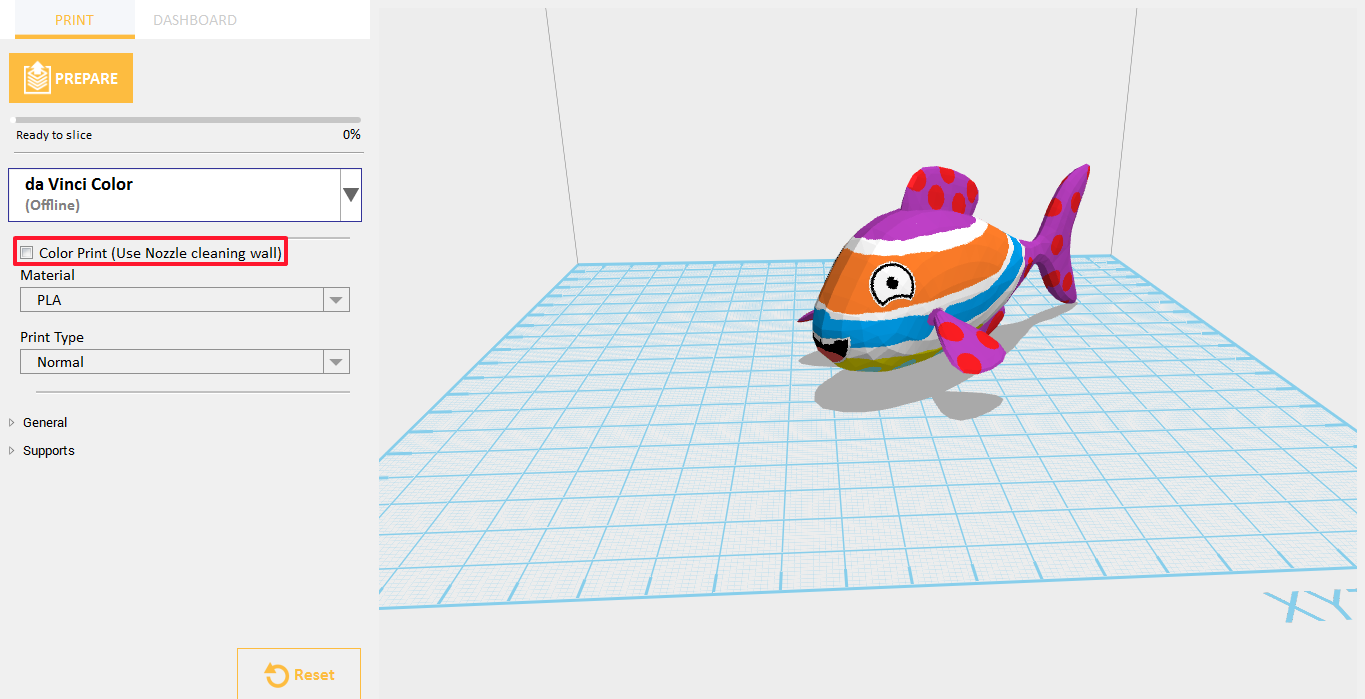
Disable Color Print

  • Click on Prepare button

Prepare

  • When color print is disabled, the only way to view the object after sliced is on G-code style.
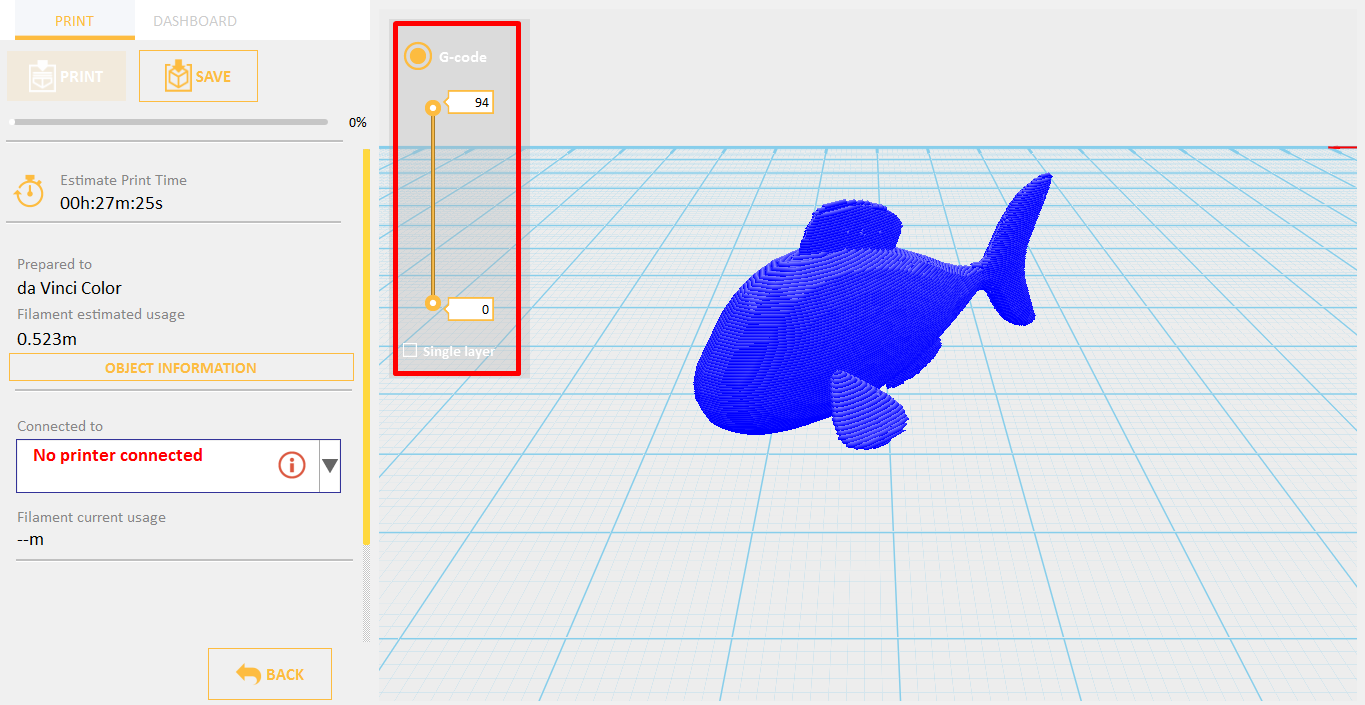
Disable

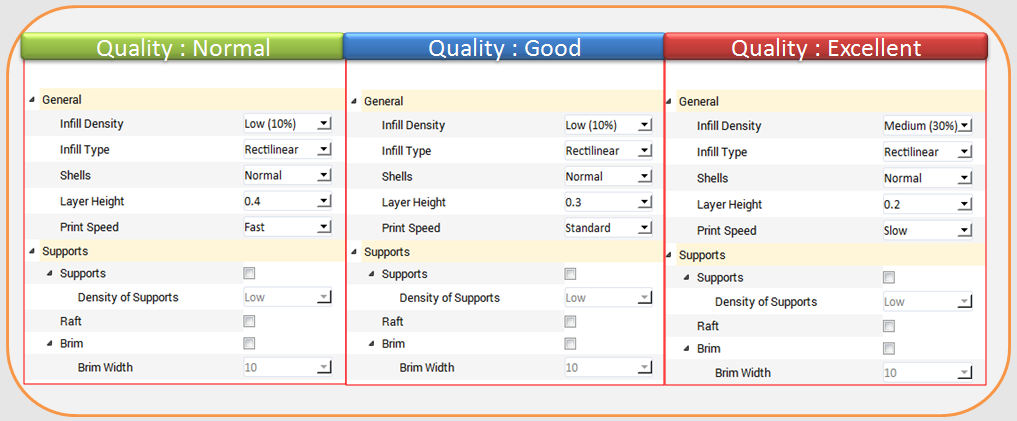
Print Type

Print type will impact the estimated time it will take for an object to print and its quality. For example, high detail prints will take longer to make than draft as each layer printed is thinner creating a more detailed finish. Hollow type will only appear when Color Print is disabled. Hollow type will make your object’s top surface open and its infill density 0%.

Print Type

Infill Density

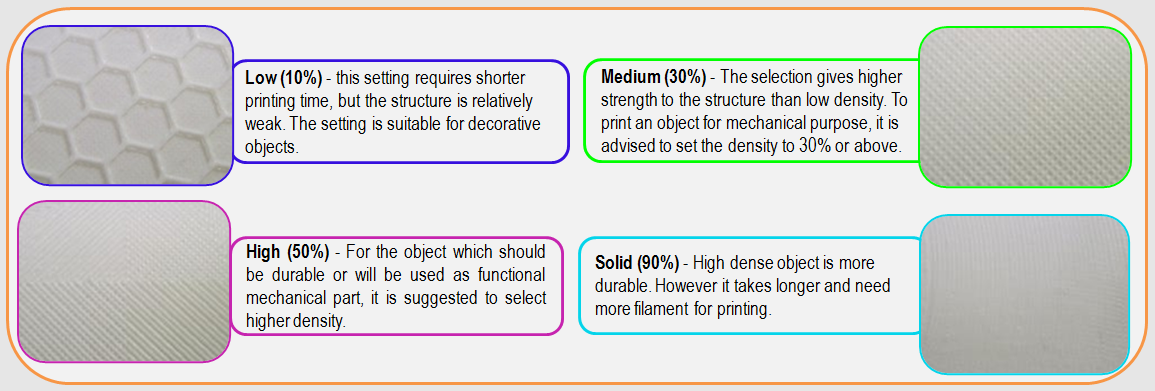
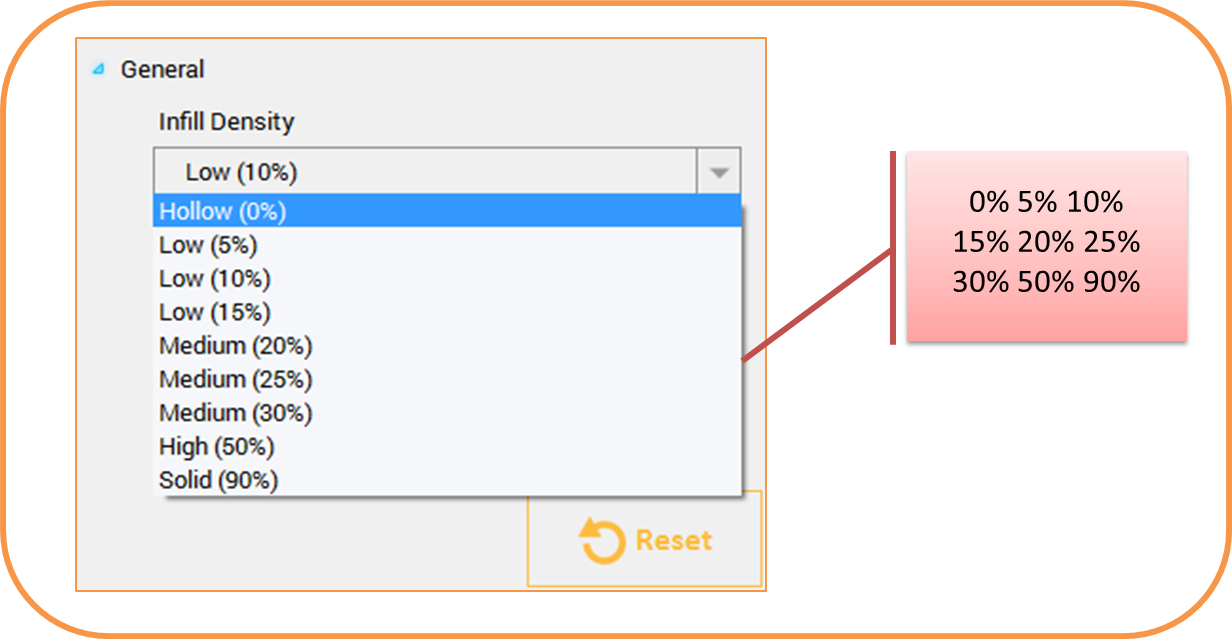
Using the Infill Density setting you can adjust the internal structure of the object(s) from hollow to solid to create desired strength requirements.
Infill Density

  • Import any textured object.

Import Textured

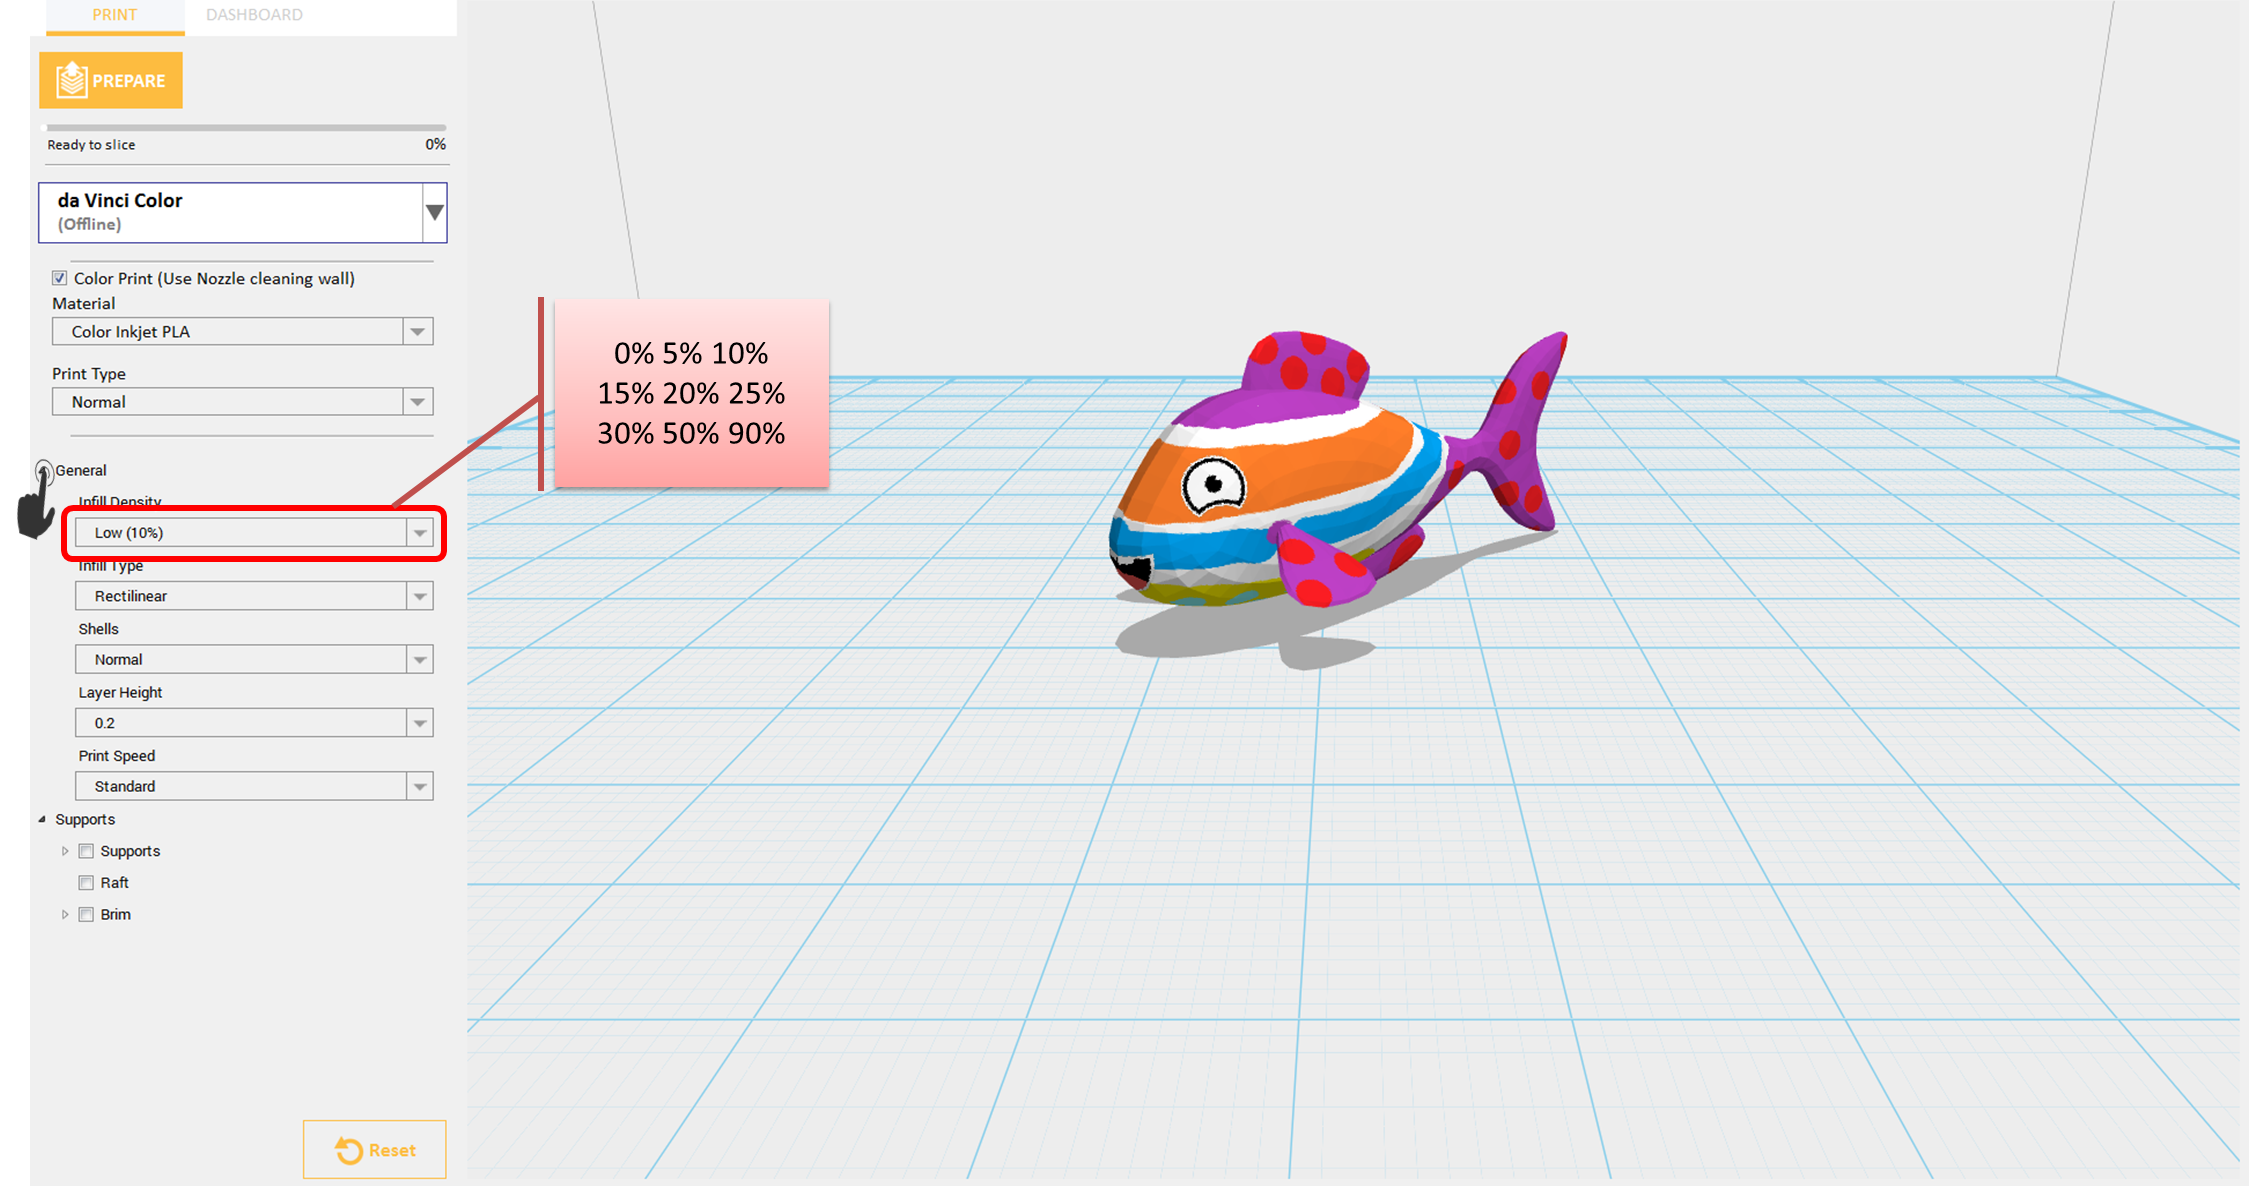
  • Click File then select Print – da Vinci Printer Plugin

da Vinci Printer Plugin

  • Click on General then select Infill Density. Infill Density ranges from 0 – 90.
Infill Density

Layer Height

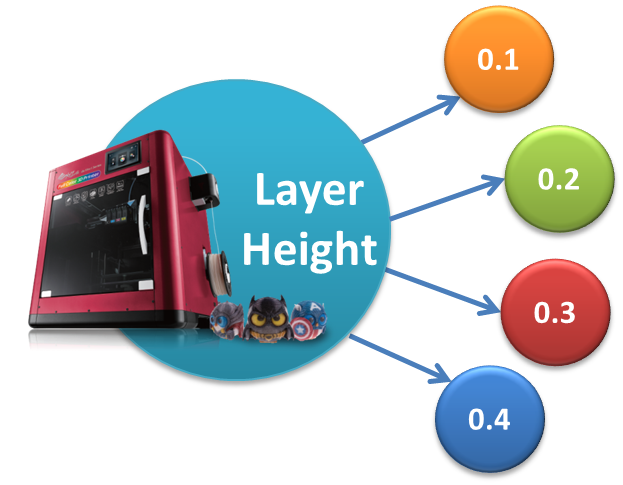
By setting different layer heights, you can alter the thickness of each layer that your printer creates. The printed layer thickness for da Vinci Color can be adjusted between 0.1mm – 0.4mm. Thinner layers give better accuracy but take more time to print.
Layer Height

Print Speed

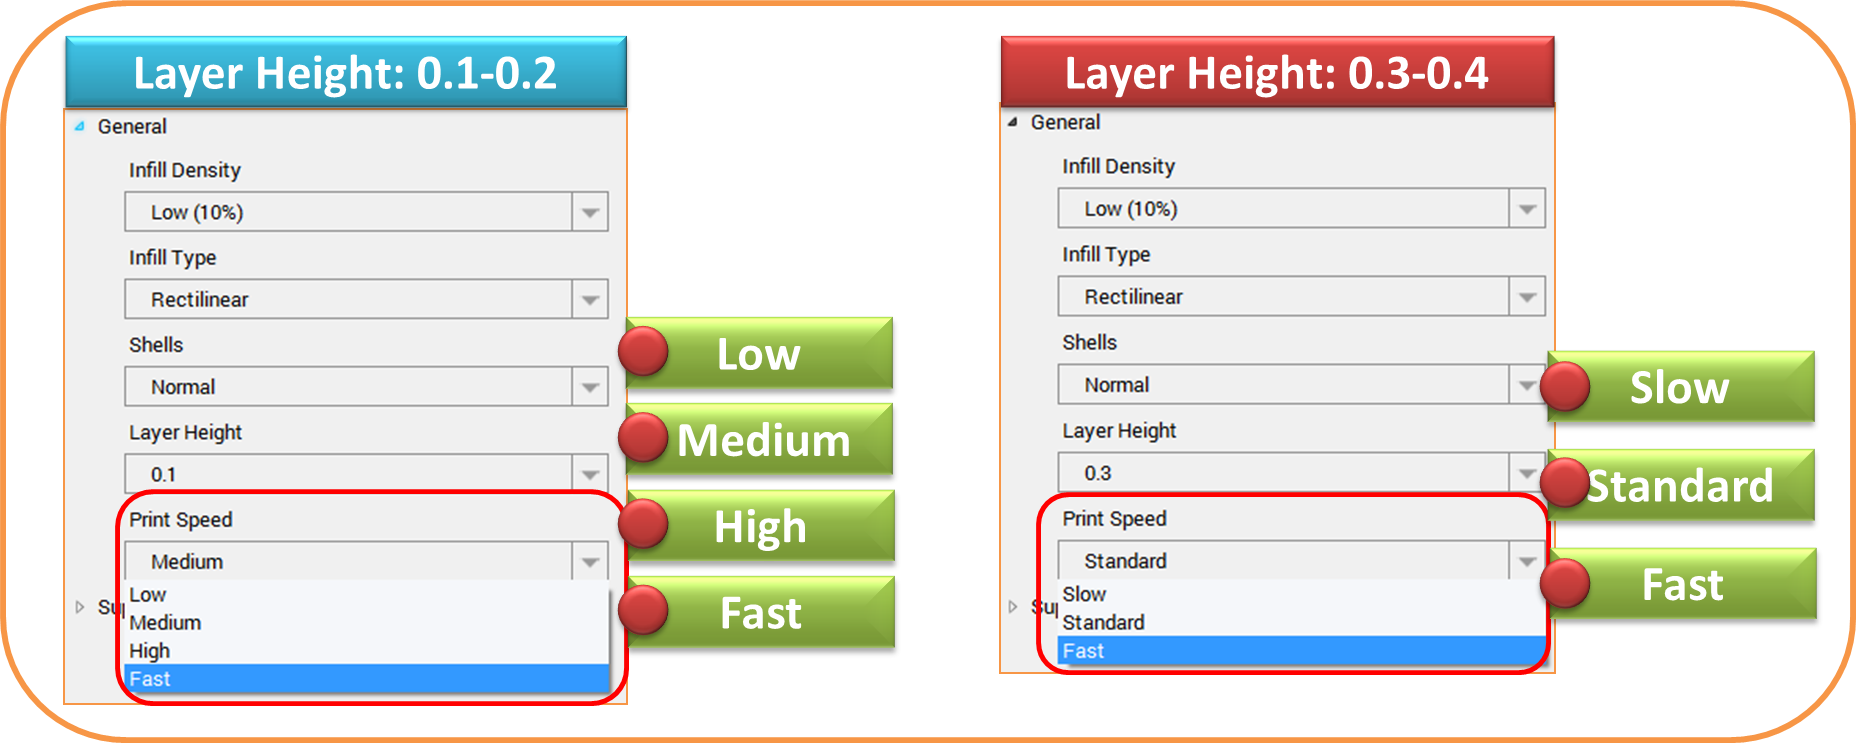
Print Speed is use to change the settings based on the size and precision of the object. In general a better object quality is accompanied with a lower printing speed. Print Speed options vary on your layer height value.
Print Speed(1)


  • Import any textured object.

Import Textured

  • Click File then select Print – da Vinci Printer Plugin

da Vinci Printer Plugin

  • Set the Printing speed by clicking General then select Print Speed.
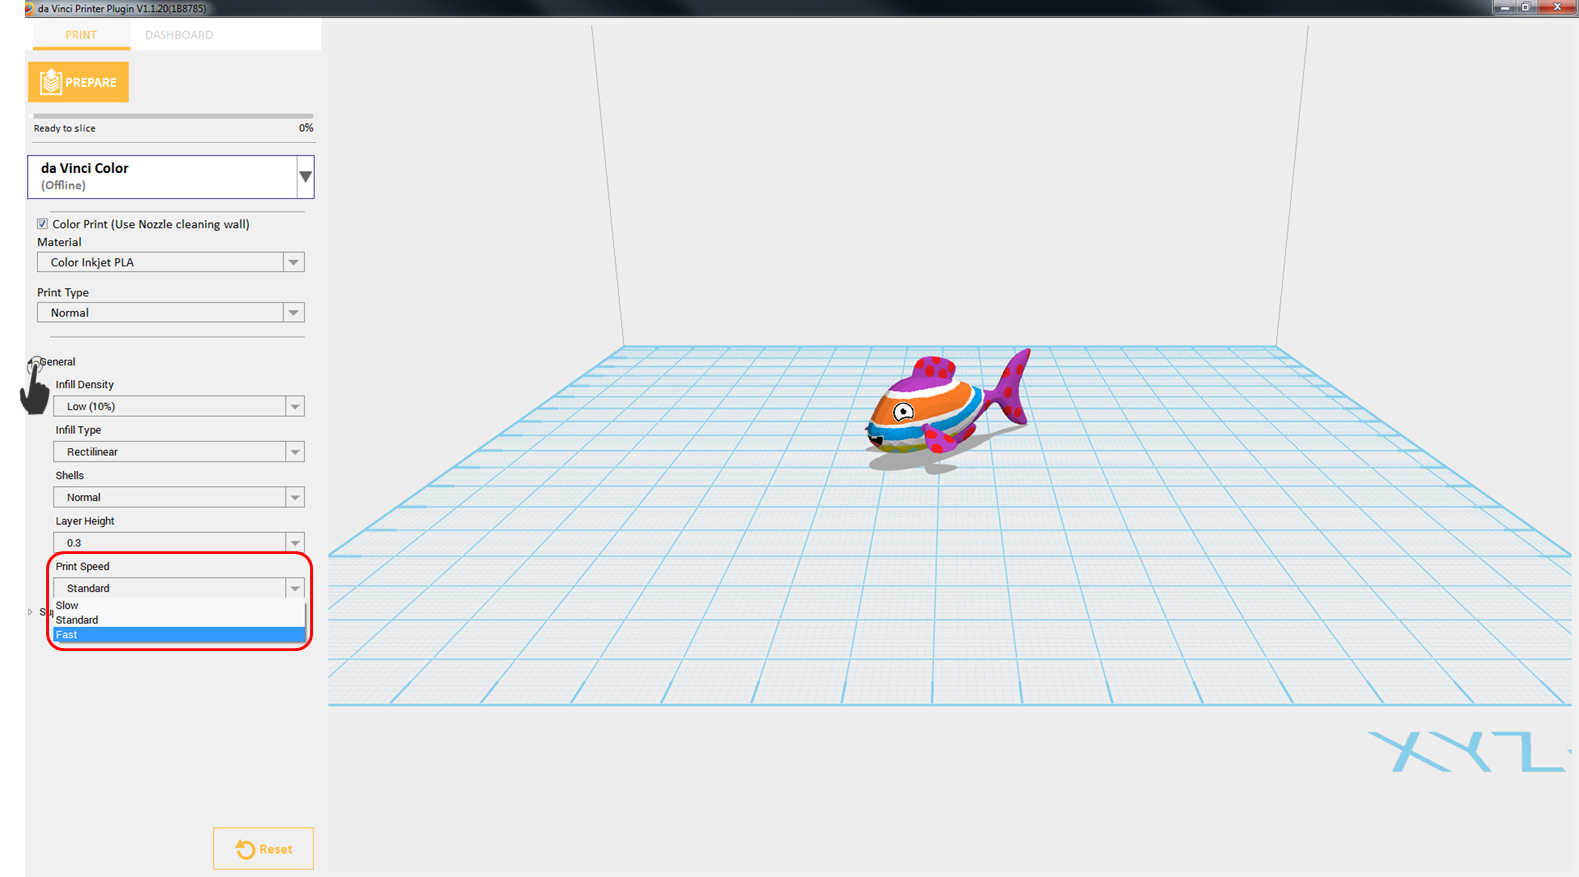
Print Speed(4)

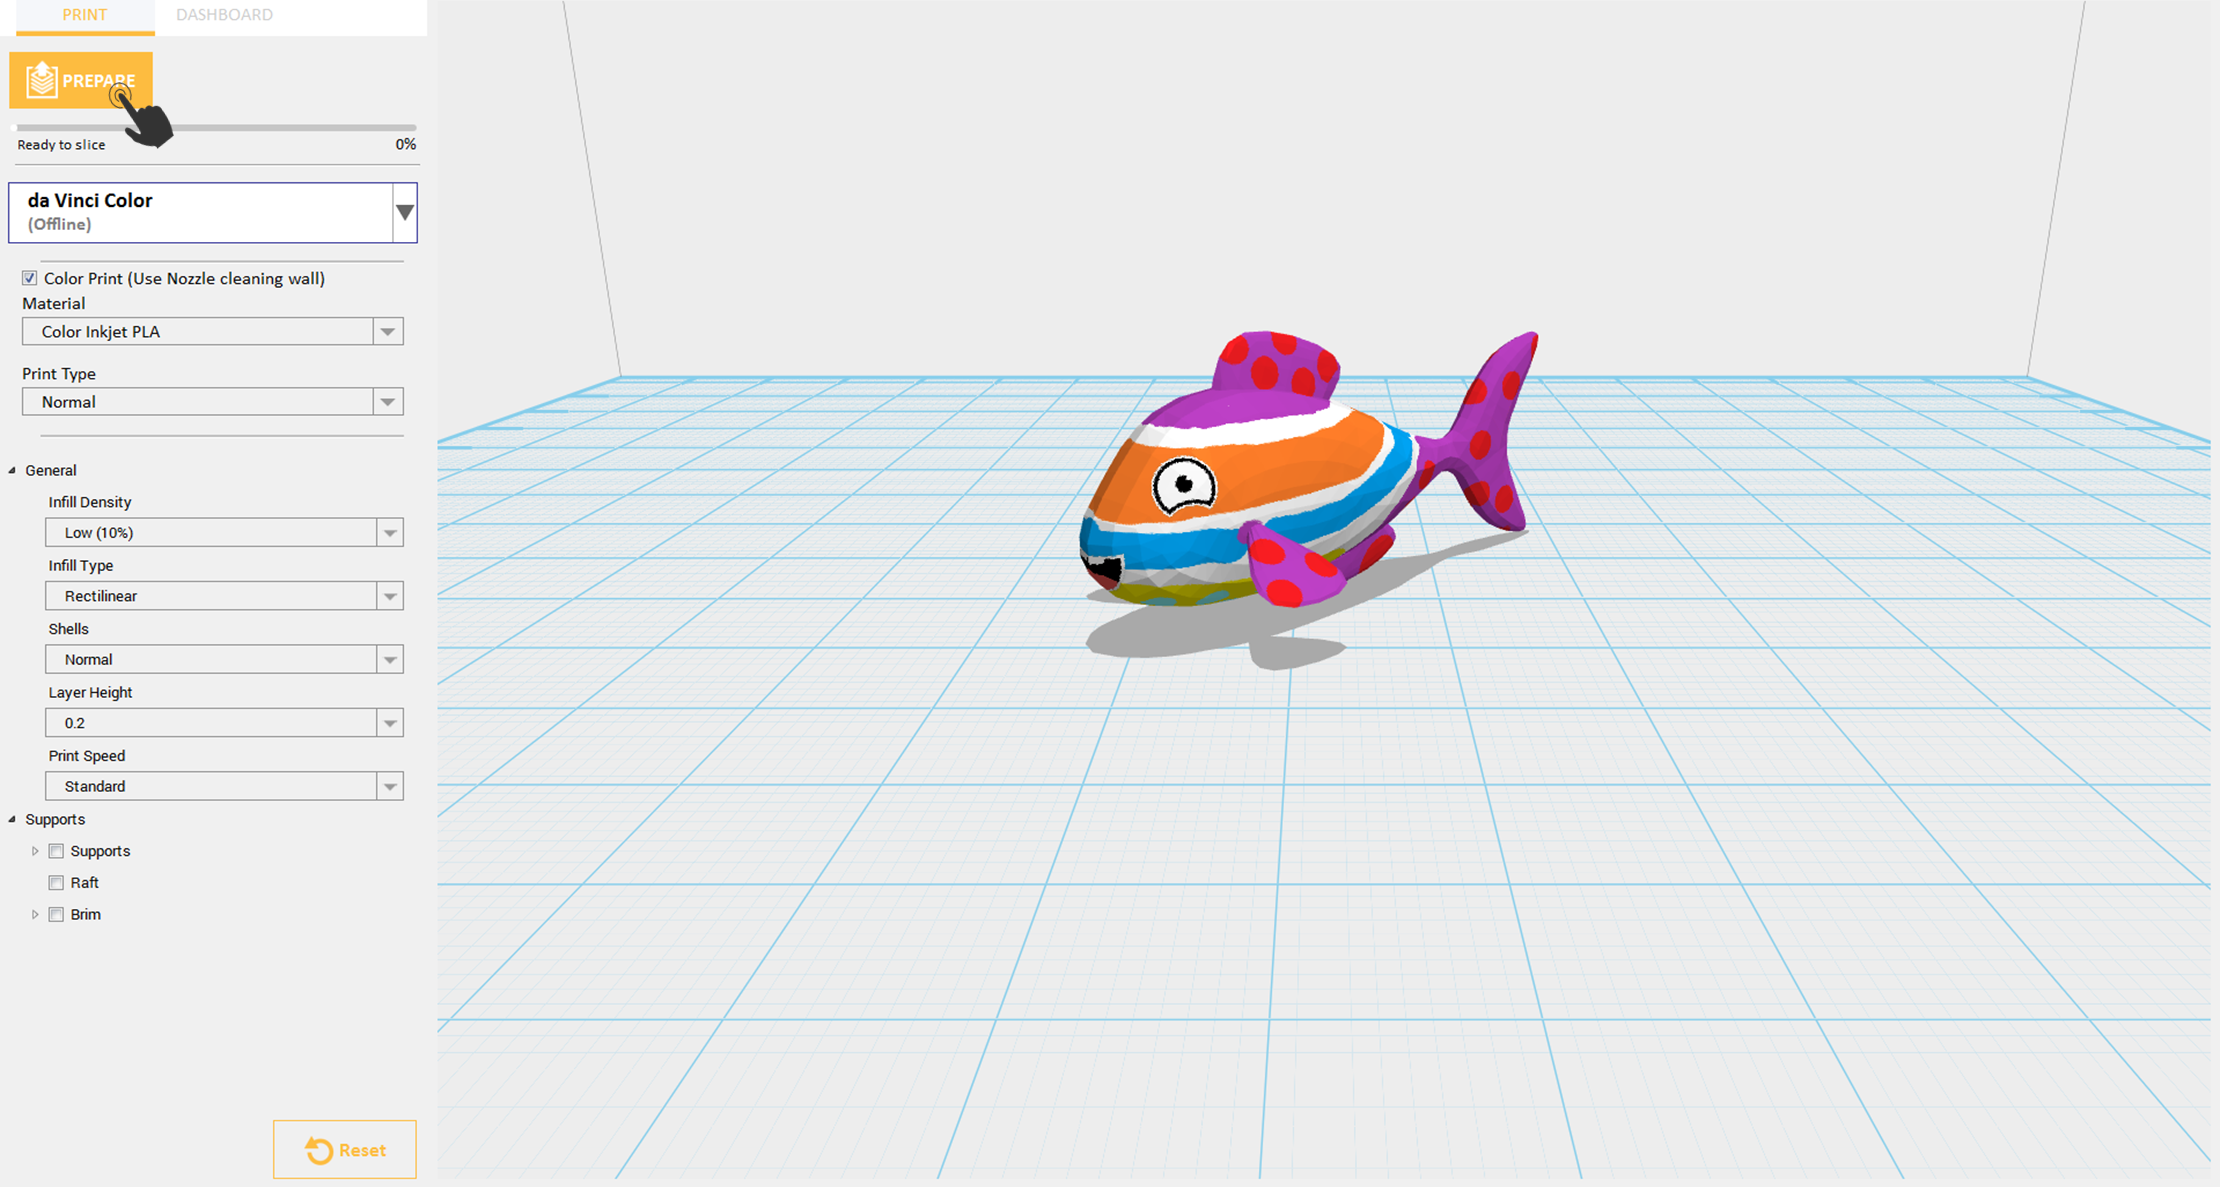
Support

The support structures are printed according to the objects features. Support is used to create structural strength and ensure that your model does not collapse during the printing process.

  • Import object that has overhanging parts.
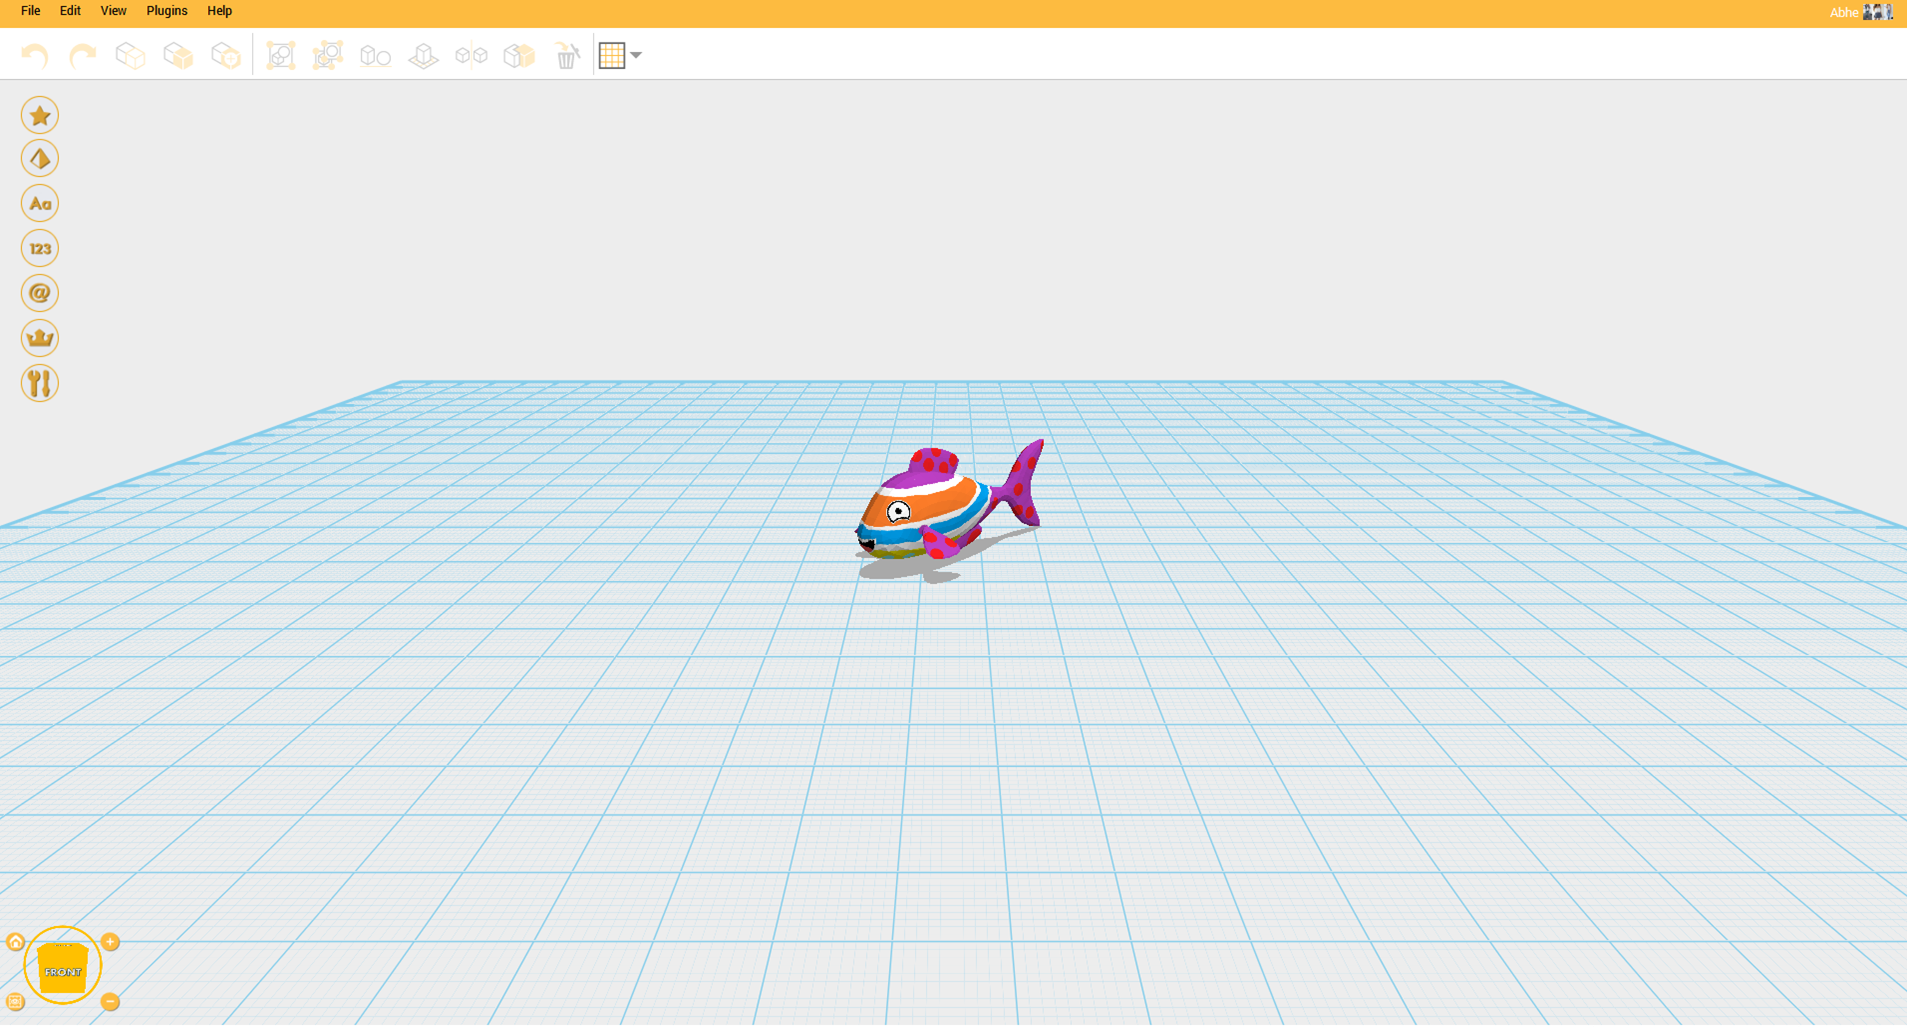
Import Textured

  • Click File then select Print – da Vinci Printer Plugin

da Vinci Printer Plugin

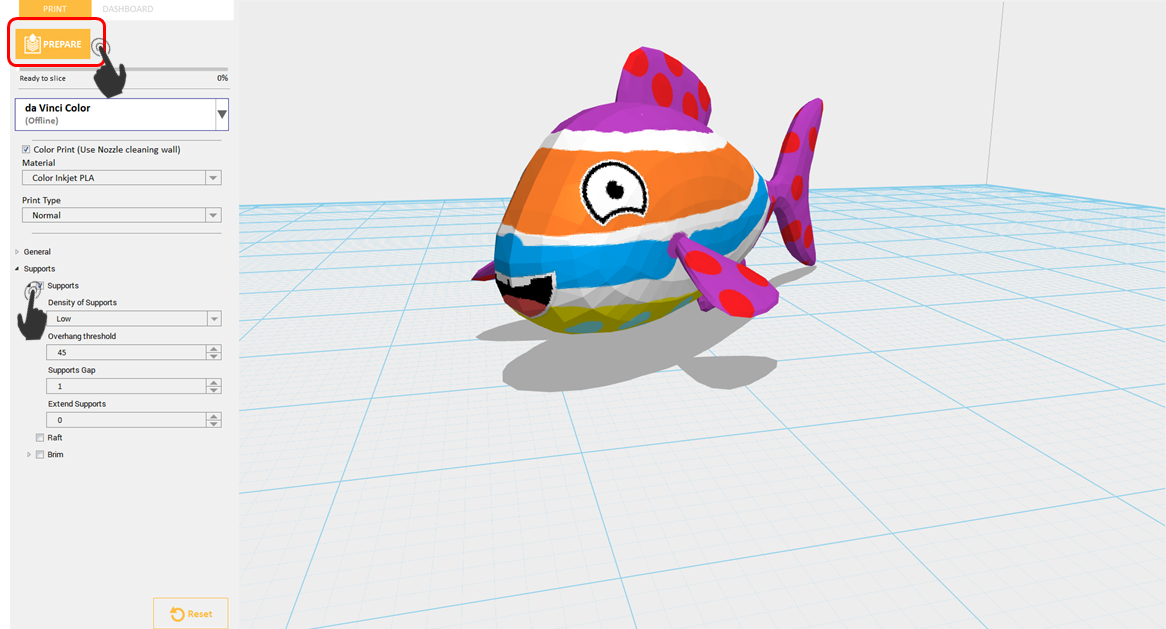
  • Enable Support, then Click Prepare

Support(1)

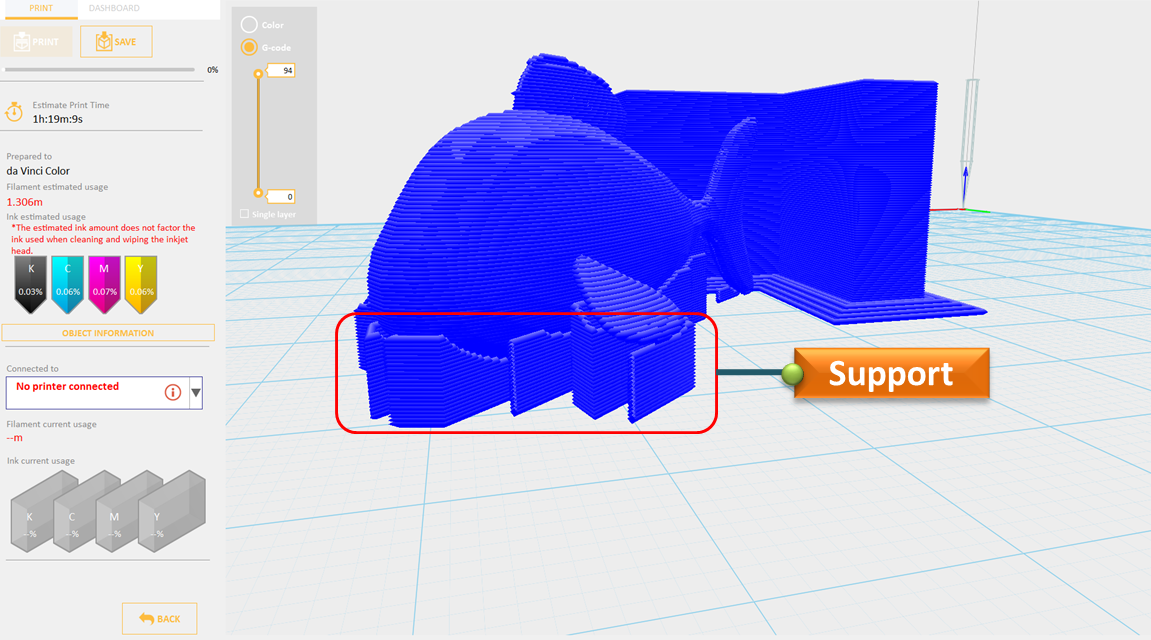
  • Overhang parts has already support.

Support(2)


Density of Supports

Density of Supports allows you to change the thickness of your support structures. Setting it to high will produced stronger support and will use more material.
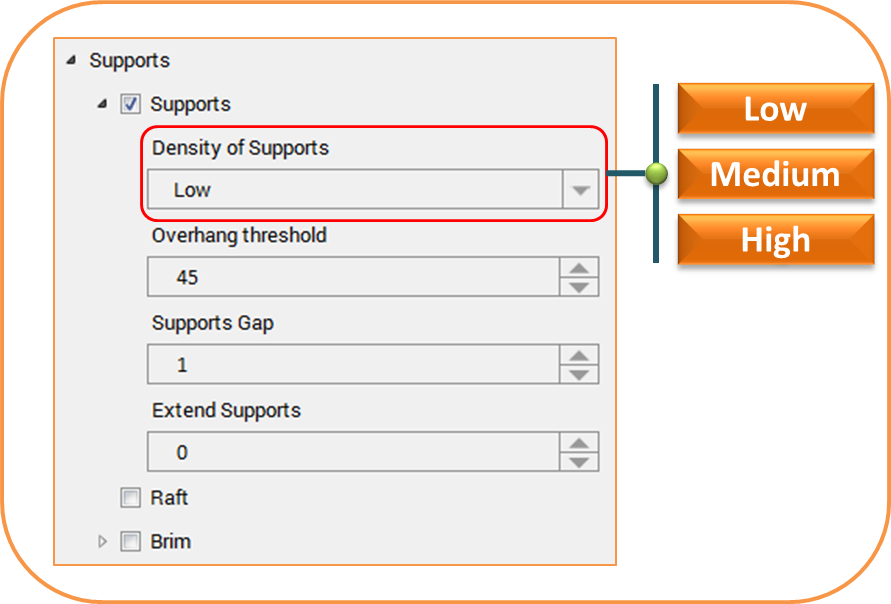
Density of Supports

Overhang Threshold

Models with overhanging parts up to the angle you set will have supports automatically generated for them.

For example you’ve set 45˚, when you slice the object those overhanging parts whose angle are 45˚ above will now have supports.
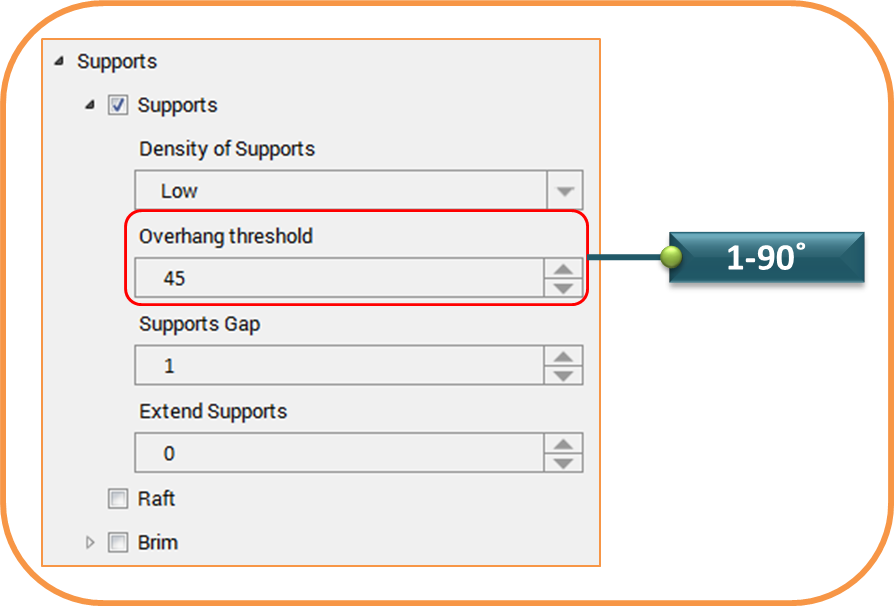
Threshold

Supports Gap

Supports Gap sets the gap between the model and its supports. This will lessen the contact of support to your model and once the printing is done, support can be easily removed.
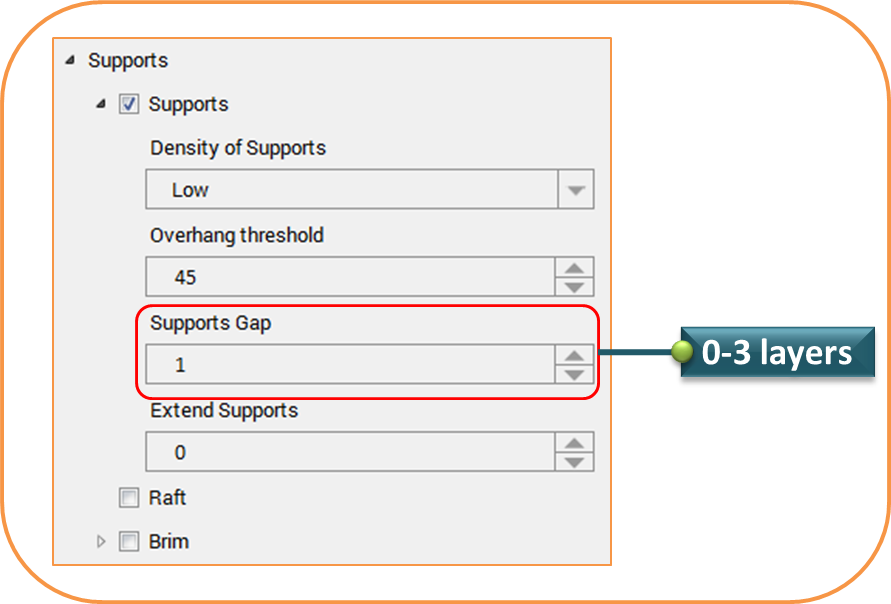
Supports Gap

Raft

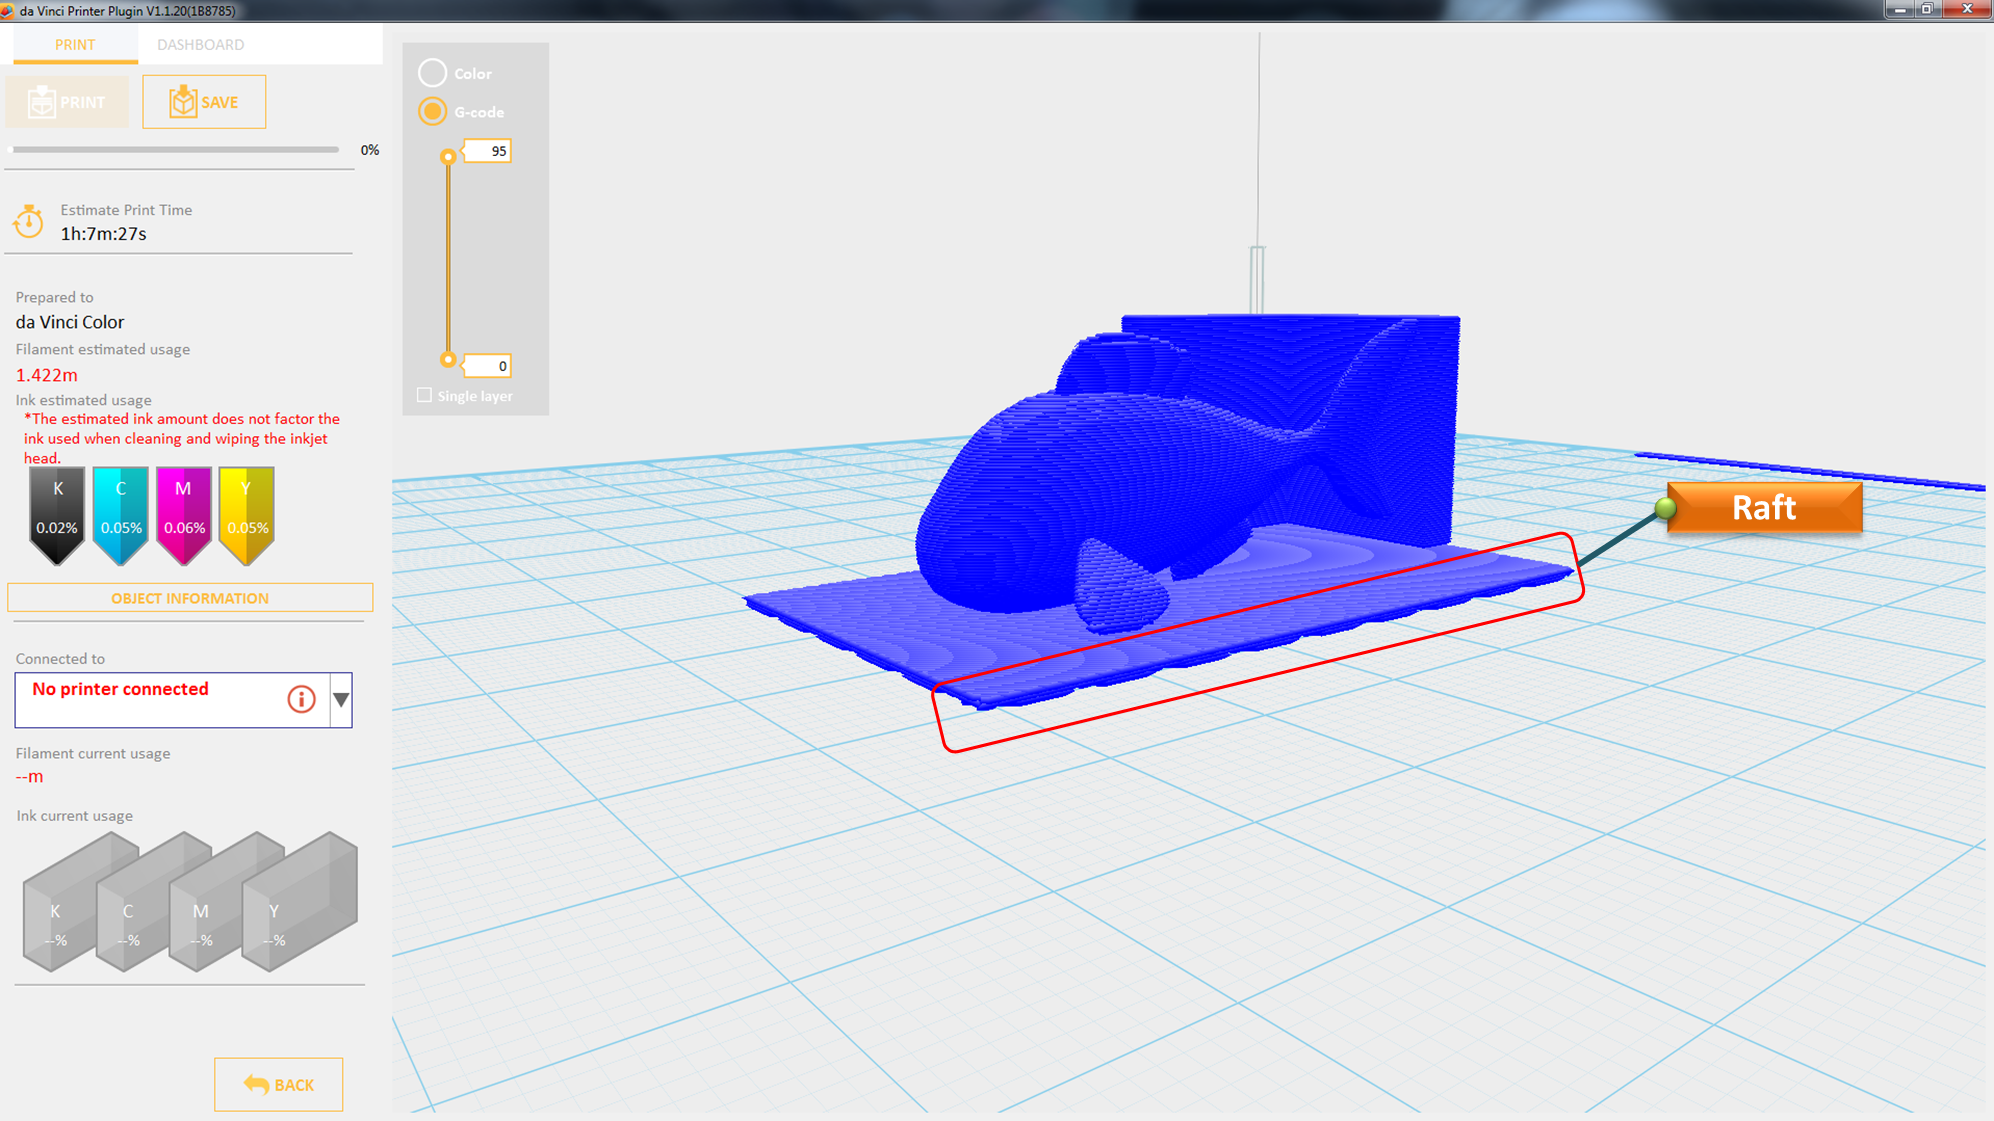
Enabling Raft will raised your object by number of layers this will increase the area of contact between your object and the print bed. Rafts create stability and can be removed after your object has been printed.

  • Import object that has overhanging parts.

Import Textured

  • Click File then select Print – da Vinci Printer Plugin

da Vinci Printer Plugin

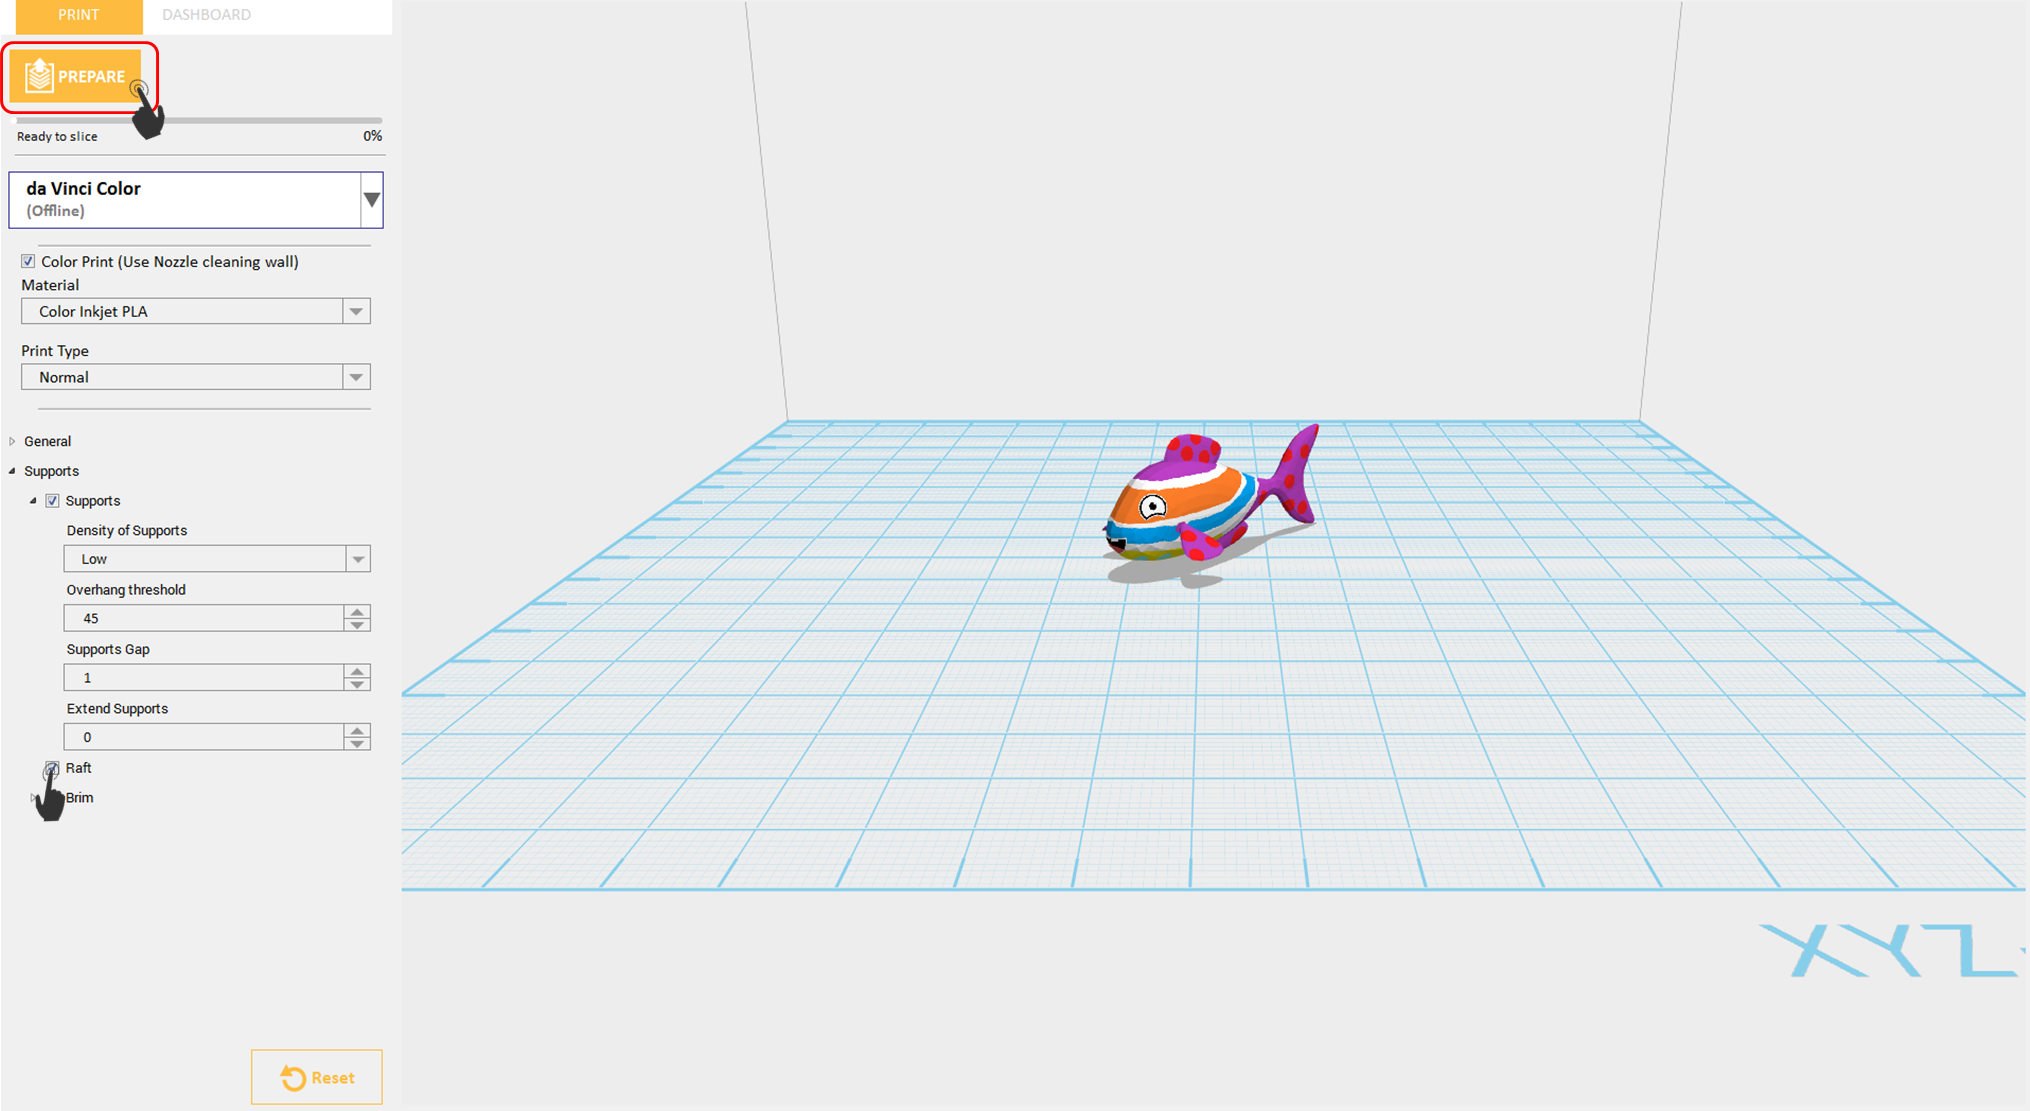
  • Enable Raft then Click PrepareRaft
  • Notice that there is an added raft on the surface.Raft(1)
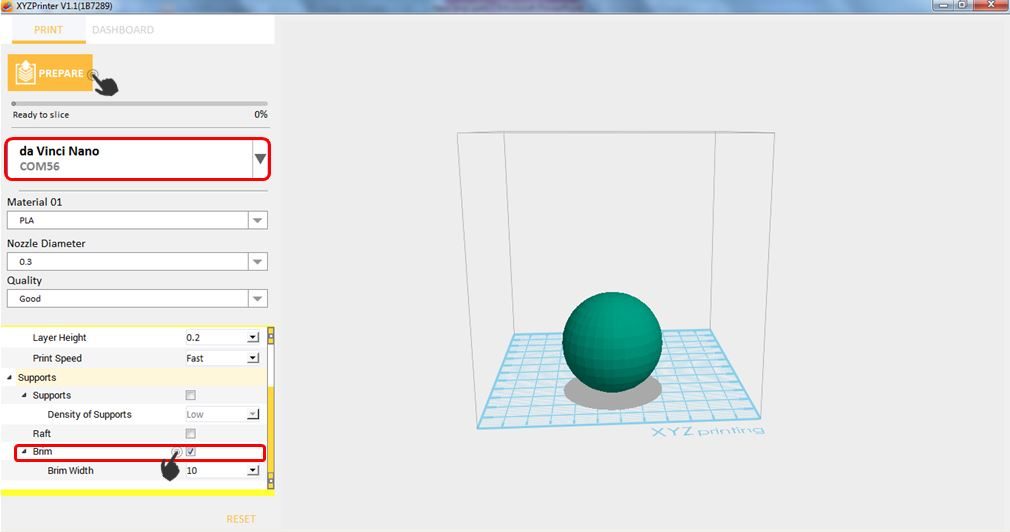
Brim

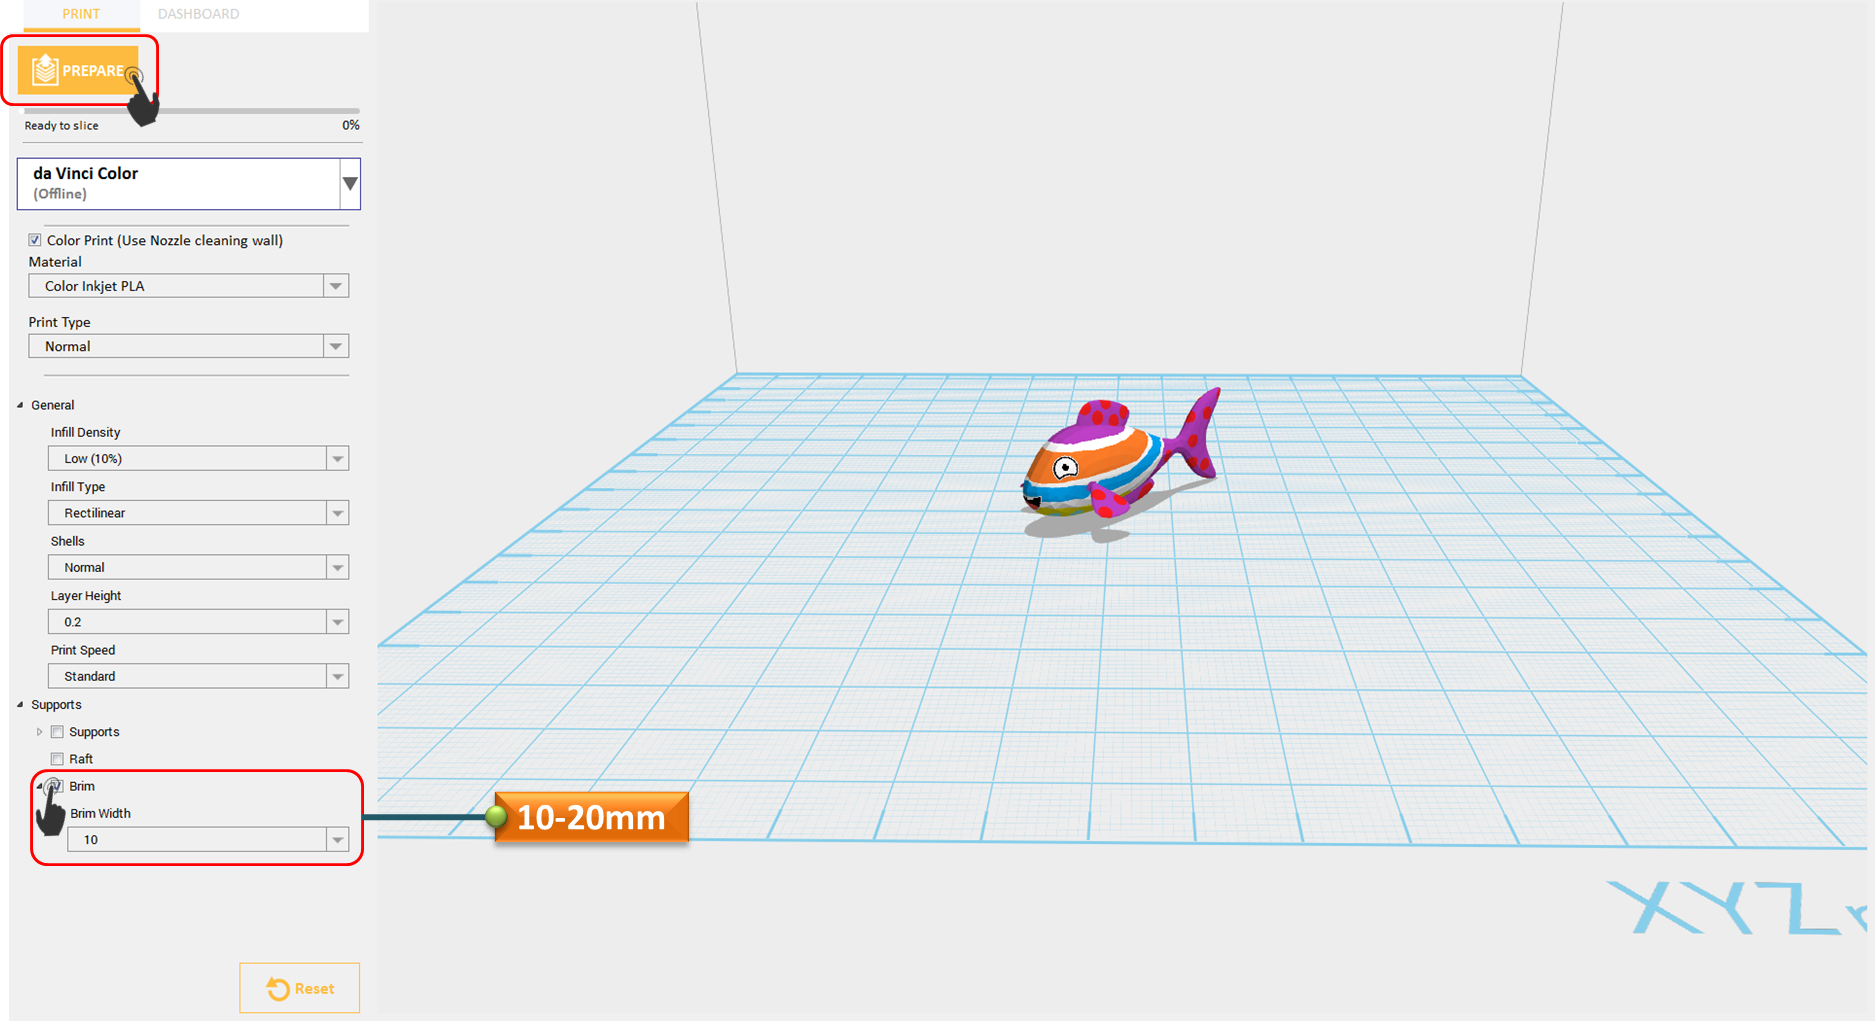
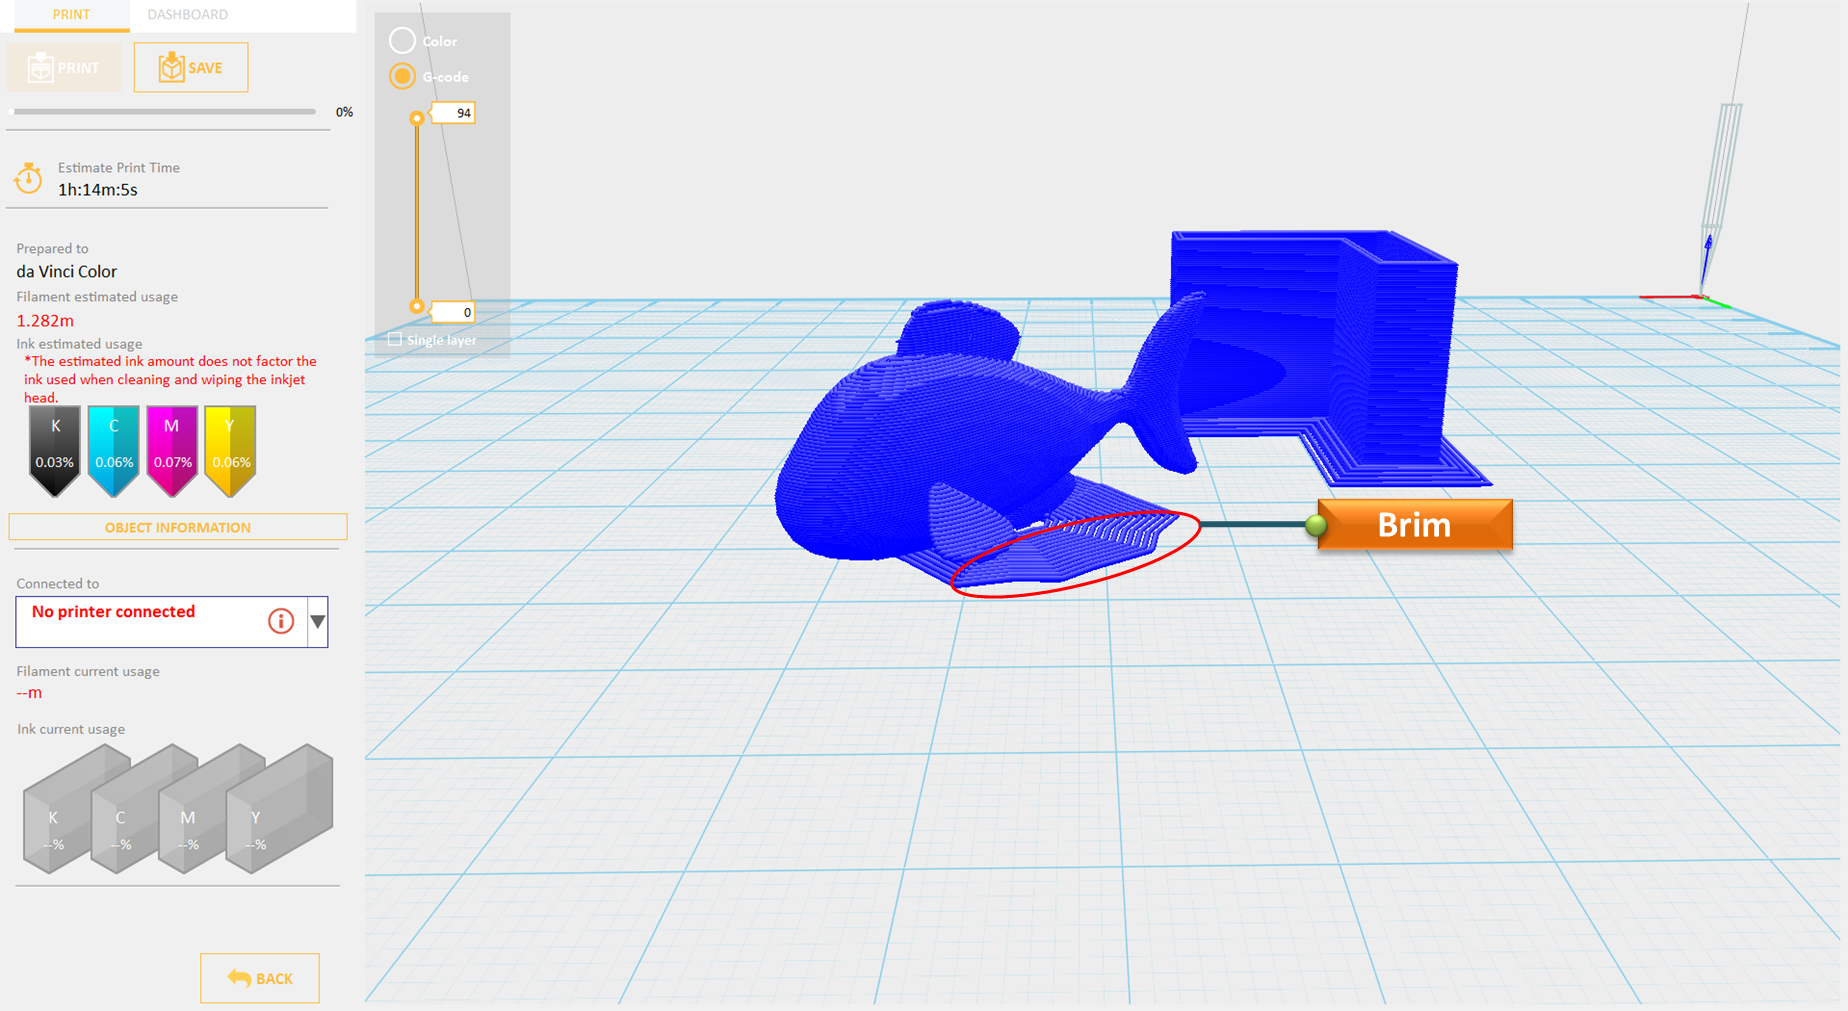
Brim function allows users to enlarge the range of contact with bottom area of print bed in printing relatively elongated object to prevent swing due to print from influencing print quality. You can set the Brim Width from 10 to 20mm.

  • Import object that has overhanging parts.

Import Textured

  • Click File then select Print – da Vinci Printer Plugin

da Vinci Printer Plugin

  • Enable Brim then Click Prepare

Brim

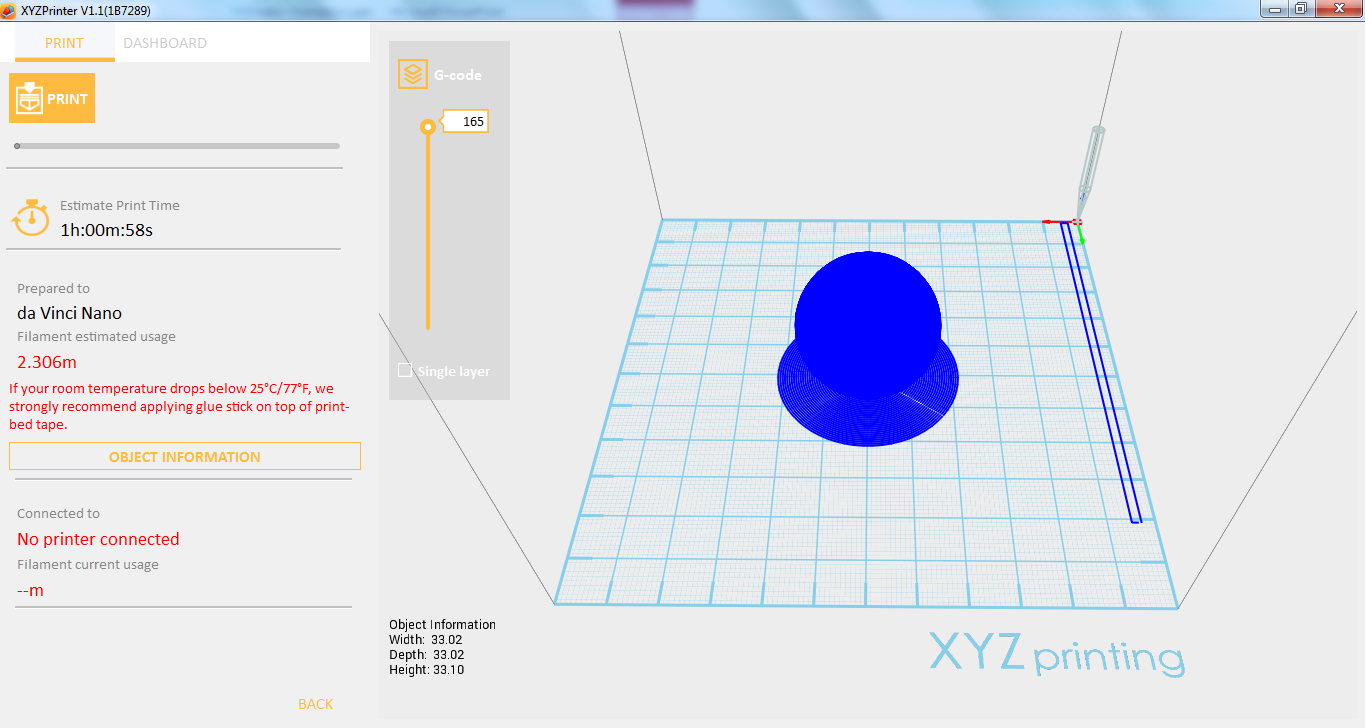
  • Notice that there is an added Brim on the surface.

Brim(1)

打印模块

Last updated on March 28th, 2018 at 03:59 pm

清洁喷头

选择此功能后,喷头将自动加入,并将喷头移至正确的位置。您可在此处轻松清除喷轴头上所有残留的线材。


1.将 PC 连接至 da Vinci nano。

22


2.单击档案(File),然后选择打印(Print)-da Vinci Printer。
1

3.单击控制面板(Dashboard)。

2

4. 单击打印模块(Extruder),然后选择清洁喷头(Clean Nozzle)。

23


5. 单击开始(Start),以开始。

24


6. 打印机将开始加热。

25


7.加热后,请将清洁铁丝穿过喷头。然后单击完成(Finish),以完成程序。

26


8.清洁程序完成后,请点选结束(Finish)

3


打印模块信息

这将显示插入连接打印机的打印模块信息。这会显示打印模块的温度、直径、序号及总打印时间。

1. 将 PC 连接至 da Vinci nano 打印机。

22

2.单击档案(File),然后选择打印(Print)-da Vinci Printer。

1

3.单击控制面板(Dashboard)。

2

4.单击打印模块(Extruder),然后选择信息(Info)。

27

5.将会显示打印模块信息。此包括温度(Temperature)、喷头直径(Nozzle Diameter)、总打印时间(Total Print Time)及序号(Serial Number)。

28


线材

Last updated on March 28th, 2018 at 03:59 pm

即使 da Vinci nano 未如任何其他打印机一样具有 LCD 面板,但您仍可透过一个非常简单的步骤,使用XYZmaker 加载与卸除线材。只要依照以下说明,并等候出料程序进行。

载入线材

1. 将 PC 连接至 da Vinci nano。

22

2.单击档案(File),然后选择打印(Print)-da Vinci Printer。

1-10

3.单击控制面板(Dashboard)。

2

4. 单击线材(Filament),然后选择加载线材(Load Filament)。

1

5.单击开始(Start),以开始。

3

6. 加热程序将开始,并等候线材出料。

25

7.挤出线材后,单击完成(Finish)。

3

Unload Filament

与加载线材相同,只需一个简单步骤,就能在迷你系列打印机轻松卸除。只须依照图中的程序,即可轻松卸除线材。

1.将 PC 连接至 da Vinci nano。

22

2.单击档案(File),然后选择打印(Print)-da Vinci Printer。

1-10

3. 单击控制面板(Dashboard)。

23

4.与加载线材相同,只需一个简单步骤,就能在迷你系列打印机轻松卸除。只须依照图中的程序,即可轻松卸除线材。

14

5. 单击开始(Start),以开始加热。

4

6. 等候加热完成。

25

7. 卸除线材后,单击完成(Finish),以完成程序。

3

设定

Last updated on March 28th, 2018 at 03:59 pm

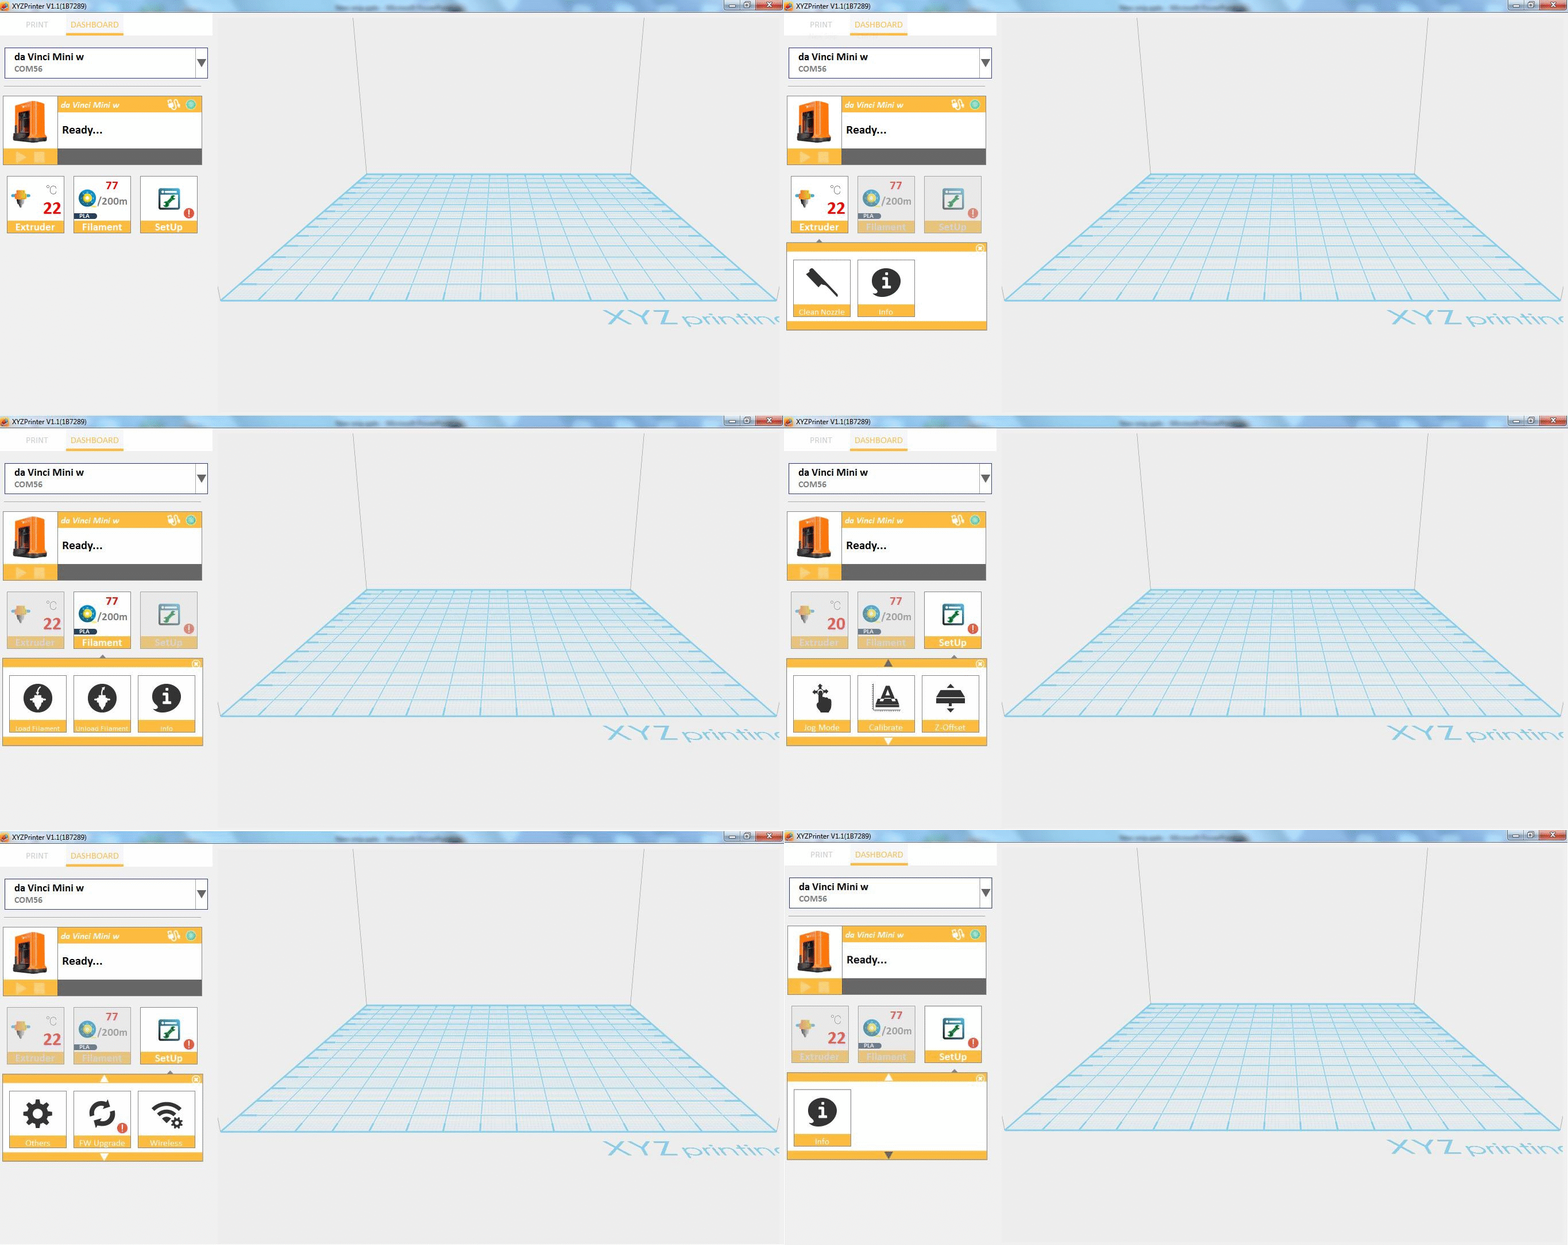
控制面板是为非 LCD 打印机(da Vinci miniMaker、da Vinci miniWifi 及 da Vinci nano)设计的特殊功能。此将作为非 LCD 打印机的标题面板使用。如加载/卸除线材/清洁喷头等操作,以及打印模块和打印机上的其他相关操作,都可透过 XYZmaker 控制面板的协助轻松完成。

Webp.net-gifmaker (6)

线材

Last updated on March 28th, 2018 at 03:59 pm

使用 XYZmaker 可将线材更轻松加载非 LCD 打印机。只需依照以下程序,就能在一分钟内加载线材。请确定您连接打印机的线轴,已将线材放到线材轴架上。

载入线材

1.连接至打印机。

8

2.单击档案(File),然后选择打印(Print)-da Vinci Printer。

1

3.单击控制面板(Dashboard)。

2

4. 单击线材(Filament),然后选择加载线材(Load Filament)。

2

5. 单击开始(Start),以开始。

3

6. 加热程序将开始,并等候线材出料。

5

7. 挤出线材后,单击完成(Finish)。

5

卸除线材

与加载线材相同,只需一个简单步骤,就能在迷你系列打印机轻松卸除。只须依照图中的程序,即可轻松卸除线材。

1.连接至打印机。

8

2. 单击档案(File),然后选择打印(Print)-da Vinci Printer。

1

3. 单击控制面板(Dashboard)。

2

4. 单击线材(Filament),然后选择卸除线材(Unload Filament)。

6

5. 单击开始(Start),以开始加热。

3

6. 等候加热完成。

9

7. 卸除线材后,单击完成(Finish),以完成程序。

10

打印设定

Last updated on March 28th, 2018 at 03:59 pm

品质

打印质量将影响对象打印的预估时间。例如,高质量打印将比低质量列印花更久的时间,这是因为每一层的打印得更细,以达到更细部的表面处理。Quality

内部填充密度

打印前,用户可使用此功能调整对象的打印密度。da Vinci 3D 打印机上的默认打印机设定将根据蜂巢结构,建立对象的内部结构。您可以使用 3D 密度下拉式选单,从中空到高密度调整蜂巢结构密度,以建立所需的强度需求。

1. 汇入对象或建立任何设计。

1

2.单击档案(File),然后选择打印(Print)-da Vinci Printer。

2

3.单击一般(General),然后选择内部填充密度(Infill Density)。内部填充密度从 10 到 100。

16

层厚

您可以设定不同的打印厚度,改变打印机建立的每一层厚度。da Vinci nano 的打印层厚,可在 0.1mm – 0.3mm 之间调整。为获得最佳结果,我们建议 0.2-0.3mm 层厚打印。

19

打印速度

打印速度(Print Speed)用于根据对象的尺寸与精度变更设定。一般而言,较佳的对象质量通常伴随着缓慢的打印速度。速度仅可以是慢(Slow)、标准(Standard)或快(Fast)。

20

1. 汇入对象或建立任何设计。

1

2.单击档案(File),然后选择打印(Print)-da Vinci Printer。

2

3. 单击一般(General),然后选择打印速度(Print Speed),设定打印速度。

21

支撑

支撑结构会根据对象特性打印。支撑结构用于建立结构强度,并确保您的模型不会在打印程序中倒塌。


1.汇入任何具有悬挂部位的对象。

1

2.单击档案(File),然后单击打印(Print)-da Vinci Printer。

2

3.打印机窗口显示时,启用支撑(Support),然后单击准备(Prepare)。

13

4.悬挂部位已有支撑。

14

底座

打印更细、更长的对象需要更多注意,这是因为形状物理不稳定的关系;对象可能因本身的重量而鼓起或扭转。打印细长对象时,应勾选「底座」方块,考虑增加物体与打印平台之间的接触面积。底座可增加稳定性,并在您的对象打印后移除。


1.汇入您要打印的长形或纤细对象。单击档案(File),然后选择打印(Print) – da Vinci Printer。

10

2. 选择打印机列表中的 da Vinci nano。启用底座(Raft),然后单击准备(Prepare)。

11

3. 物件已有底座。

12

底边

底边功能可让用户在打印较长的对象时,放大与打印平台底部区域的接触范围,以免因打印摆动而影响打印质量。


1. 汇入任何对象。

1

2.单击档案(File),然后选择打印(Print)-da Vinci Printer。

2

3. 启用底边(Brim)并设定底边宽度(Brim Width)。

15

4.请注意平台上已新增底边。

^8F154020D52A5439B233AE3F33D3086484BFB899FD8DCDF2A3^pimgpsh_fullsize_distr

一般设定

Last updated on March 28th, 2018 at 03:59 pm

此功能支持对象打印结构的调整,并使用结构密度与外壳打印的设定选项,以产生不同的效果。


温度

调整打印平台(Print Bed)与打印模块(Print Module)的操作温度。温度信息储存在对象切层信息中。Temp

1. 汇入任何对象。

1

2. 单击档案(File),然后选择打印(Print)-da Vinci Printer。

2

3. 选择打印机,然后单击一般(General),然后设定温度(Temperature)。

3

外壳厚度标准

就对象本体的外壳打印层数而言,会从外到内打印两层(层数 = 3),以取得坚固的外壳层,并修复因第一层打印产生的瑕疵,避免在表面上产生空洞。

1


1.汇入任何对象。

1

2.单击档案(File),然后选择打印(Print)-da Vinci Printer。

2

3.单击一般(General),然后选择外壳厚度标准(Shell Thickness Normal),并设定所需数值。

2

外壳厚度顶层

顶层通常是打印程序中对象的最后一部分。使用者可以调整要在顶层打印的层数。若使用,较大的打印层数会产生更密、更扎实的封顶结构。

Top Surface


1.汇入任何对象,然后单击档案(File),并选择打印(Print)-da Vinci Printer。

11

2.单击一般(General),然后选择外壳厚度顶层外壳(Shell Thickness Top Surface)。数值从 1 到 10。

10

外壳厚度底层

在打印对象底部的内部填充结构之前,会先打印对象完整的实心底层外壳。完美无空洞的底层外壳通常可透过三层打印(层数 = 3)达成。除了封底效果外,也会在打印时达到较佳的对象稳定性。

12

若您习惯设定不支持第三方线材(及外壳厚度的样式选择)的打印机,请参阅以下信息设定。

  • 薄:1 层
  • 标准:2 层
  • 厚:3 层

若顶层与实心层(填充)设为 0,就会产生中空的对象。

1.汇入任何对象或建立任何设计。

1

2.单击档案(File),然后选择打印(Print)-da Vinci Printer。

2

3. 选择任何 Professional 打印机。单击一般(General),并在外壳厚度底层外壳(Shell Thickness Bottom Surface)上设定所需的数值。

13

汇出设定

Last updated on September 19th, 2018 at 11:25 am

品质

打印质量将影响对象打印的预估时间。例如,高质量打印将比低质量列印花更久的时间,这是因为每一层的打印得更细,以达到更细部的表面处理。

Quality

打印厚度

您可以设定不同的打印厚度,改变打印机建立的每一层厚度。打印的层厚可以在 0.1mm – 0.4mm 之间调整。为获得最佳结果,我们建议 0.2-0.3mm 层厚打印。

LH

内部填充密度

打印前,用户可使用此功能调整对象的打印密度。da Vinci 3D 打印机上的预设打印机设定将根据蜂巢结构,建立对象的内部结构。您可以使用 3D 密度下拉式选单,从中空到高密度调整蜂巢结构密度,以建立所需的强度需求。

Infill Density
1. 汇入对象或建立任何设计。

1

2.单击档案(File),然后选择打印(Print)-da Vinci Printer。

2

3.单击档案(File),然后选择打印(Print)-da Vinci Printer。

5

外壳

外壳为物件的外层。厚外壳的打印质量较佳,但打印时间较长。薄外壳会缩短打印时间,但可能易碎。

对象强度受到 3D 密度与外壳设定的影响。为确保不同大小、形状及目的对象的永续性,将需要不同密度与外壳设定。

18


1. 汇入对象或建立任何设计。

1

2.单击档案(File),然后选择打印(Print)-da Vinci Printer。

2

3. 单击一般(General),然后设定外壳(Shells)。这可以是标准(Normal)、薄印(Thin)或厚实(Thick)。

17

Print Speed

Printing Speed is use to change the settings based on the size and precision of the object. In general a better object quality is accompanied with a lower printing speed. It can be Slow, Standard or Fast; while if the Layer Height set is 0.2mm, the Printing Speed options are Low, Medium, High and Fast.


1


1.Import any object or create any design.

1

2.Click File then select Print – da Vinci Printer.

2

3.Click on General then Select Layer Height and input the desired value.

7

Support

The supportive structures are printed according to the objects features. Support is used to create structural strength and ensure that your model does not collapse during the printing process. You can set the Support Density to Low, Medium and High if the material set is ABS.

1.Import any object that has overhang parts.

1

2.Click File then Print – da Vinci Printer.

2

3.When Printer Window display, enable Support then click Prepare.

3

4.Notice that the overhang parts has already support structure.

4

Raft

Printing thinner and longer objects require more attention due to the shapes physical instability; the object may buckle or twist under its own weight. When printing long thin objects, you should consider increasing the area of contact between your object and the print bed by checking the “Raft” box. Rafts create stability and can be removed after your object has been printed.

1.Import a long or thin object that you want to print.

1

2.Click on File then select Print – da Vinci Printer

4

3. Select the printer that you want to use. Then enable Raft.

2

4.Notice that there is an added raft on the surface.
3

Brim

Brim function allows users to enlarge the range of contact with bottom area of print bed in printing relatively elongated object to prevent swing due to print from influencing print quality.

1. Import any object.

1

2.Click File then select Print – da Vinci Printer

2

3. Enable Brim and set the Brim Width.

3

4.Notice that there is an added Brim on the surface.
4

打印模块

Last updated on March 28th, 2018 at 03:59 pm

在此功能中列有两个选项,一是清洁喷头,而另一个则是打印模块信息。这项操作只能使用在XYZprinting出产的mini系列。

extruder

清洁喷头

选择此功能后,喷头将自动加入,并将喷头移至正确的位置。您可在此处轻松清除喷轴头上所有残留的线材。

1.连接至打印机。

8

2.单击档案(File),然后选择打印(Print)-da Vinci Printer。
1

3.单击控制面板(Dashboard)。

2

4. 单击打印模块(Extruder),然后选择清洁喷头(Clean Nozzle)。

3

5. 单击开始(Start),以开始。

4

6. 打印机将开始加热。

5

7.加热后,请将清洁铁丝穿过喷头。

6

8.清洁后,单击完成(Finish)。

7

打印模块信息

这将显示插入连接打印机的打印模块信息。这会显示打印模块的温度、直径、序号及总打印时间。

1. 连接至打印机。
8

2.单击档案(File),然后选择打印(Print)-da Vinci Printer。

1

3.单击档案(File),然后选择打印(Print)-da Vinci Printer。

2

4.单击打印模块(Extruder),然后选择信息(Info)。9

5.打印模块信息即会出现,包含了温度,喷头直径,打印总时间预估以及打印机序号。

10

设定

Last updated on March 28th, 2018 at 03:58 pm

您能在XYZmaker上设定您的打印机校正、步进模式、无线通信、Z-Offset、自动较平,和其他打印机信息。在这个章节,您将会学到如何使用不同的设定来帮助您维持您的打印机表现。

SetUp

步进模式

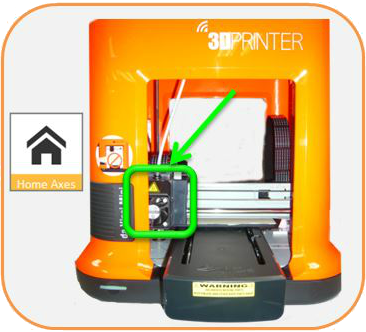
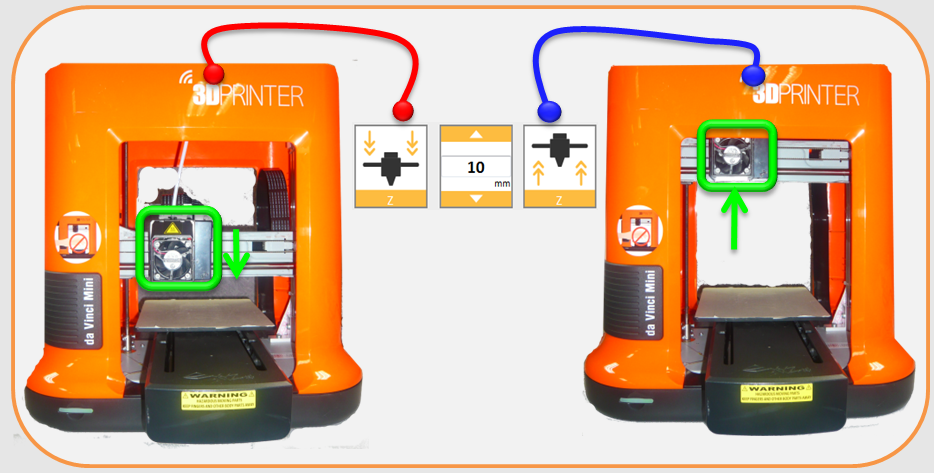
步进模式可让您将打印模块任意沿着 X、Y 及Z 轴移动。这对于维护与维修工作非常实用。此会手动调整 X/Y/Z 轴的移动,以进行打印机维护。

单击 [起始轴]。打印装置将会回到打印区域左下角的起始轴位置。然后调整打印模块(X 轴)、打印平台(Y 轴)及打印轴(Z 轴)的位置。选择「X 轴」时,将会左右移动打印模块;选择「Y 轴」时,打印平台将会前后移动,而您选择「Z 轴」时,打印轴(Z 轴)将会上下移动。

1.连接至打印机。
8

2.单击档案(File),然后选择打印(Print)-da Vinci Printer。

1

3.单击控制面板(Dashboard)。

2

4.单击设定(SetUp),然后选择步进模式(Jog Mode)。

1

5.若要启动步进模式,打印模块应在起始轴位置,因此请单击起始轴(Home Axes)。

2

6. 您现在可以使用步进模式功能。

3


单击起始轴(Home Axes)时,打印模块将移至起始轴位置。

4

选择 X 轴,打印模块将向左或向右移动。

5

选择 Y 轴时,打印平台将前后移动。

6

选择 Z 轴时,打印模块将上下移动。Jog Mode Z

校正

进行打印程序前,可能要进行平台校正。打印装置可移至打印区域的左下角。请参阅软件随附的平台校正说明。

校正前,请按下打印模块的按钮 A。校正后,按下打印模块的按钮 B,以缩回传感器装置。若校正失败,请确定已在重新启动校正程序之前,按下按钮 A(侦测器)。

1.请确定您已连接至打印机。8

2.单击档案(File),然后选择打印(Print)-da Vinci Printer。

1

3.单击控制面板(Dashboard)。

2

4.单击设定(SetUp),然后选择校正(Calibrate)。

6

5.单击开始(Start),以开始。

1

6.打印模块移至起始轴位置。这可能要花数分钟的时间。

2

7. 如图所示按下打印模块的侦测模块。然后单击下一步(Next)。

3

8. 校正将开始。这可能要花数分钟的时间。

4

9. 校正完成时,您需要按下图中所示的按钮,停用侦测模块。单击完成(Finish),以完成程序。

5

Z offset

此功能将协助您调整平台与打印模块之间的打印距离。每次调整的间距为 0.05 mm。若第一层太高(太大)或太低(太近),我们建议您使用 z-offset 调整打印距离。

1.连接至打印机。请确定打印机已就绪。8

2.单击档案(File),然后选择打印(Print)-da Vinci Printer。

1

3.单击控制面板(Dashboard)。

2

4.单击设定(SetUp),然后选择 Z offset。

1

5. 选择是否要减少或增加 Z-Offset。在范例中,选择增加打印平台与打印模块之间的距离。

3

6.变更值后,若您要套用变更,请单击接受(Accept),或若要回复默认值,请单击默认(Default)。

4

<strong>其他</strong>

在其他中,您可以启用或停用蜂鸣器、自动校平及还原默认值指令。自动水平校正可能是 ON 或 OFF。默认值:ON。软件会自动执行水平校正并依此补偿。若自动水平校正已切换至 OFF,可能会改善打印速度。然而,这可能会影响打印质量。

蜂鸣器默认值为开启;您可以选择「OFF」,变更设定。蜂鸣器开启时,将会在按下按钮、接收数据、完成打印作业、或侦测到问题时输出声响信号。使用「还原默认值」时,所有设定将重设回原厂默认值。


1.连接至韧体版本较低的任何打印机。8

2.单击档案(File),然后选择打印(Print)-da Vinci Printer。

1

3.单击控制面板(Dashboard)。

2

4.单击设定(SetUp),然后单击其他(Others)。

1

5. 您可以开启蜂鸣器(Buzzer)与自动校平(Auto Level)。单击确定(OK)接受变更,单击默认值(Default)可回复成默认值。若您不想要套用变更,请单击取消(Cancel)。

2

<strong>韧体升级</strong>

为获得最佳 3D 打印体验,请持续更新软件及/或韧体。更新过程很简单:只要连接打印机,然后单击档案(File) à 打印(Print) à da Vinci Printer à 打印机插件(Printer Plugin) à 选择下拉式清单上的打印机 à 单击控制面板(Dashboard) à 设定(SetUp) à 韧体升级(FW Upgrade)。

注:请确定您在升级韧体或 XYZmaker 软件前,PC 已联机到因特网。


1.连接至韧体版本较低的任何打印机。8

2.单击档案(File),然后选择打印(Print)-da Vinci Printer。1

3.单击控制面板(Dashboard)。

2

4.单击设定(SetUp),然后选择韧体升级(FW Upgrade)。

1

5.单击立即升级(Upgrade Now),以开始进行。请勿在升级时关闭电源或干扰打印机。

2

6.升级后,将显示已升级的韧体版本。

3

无线通信

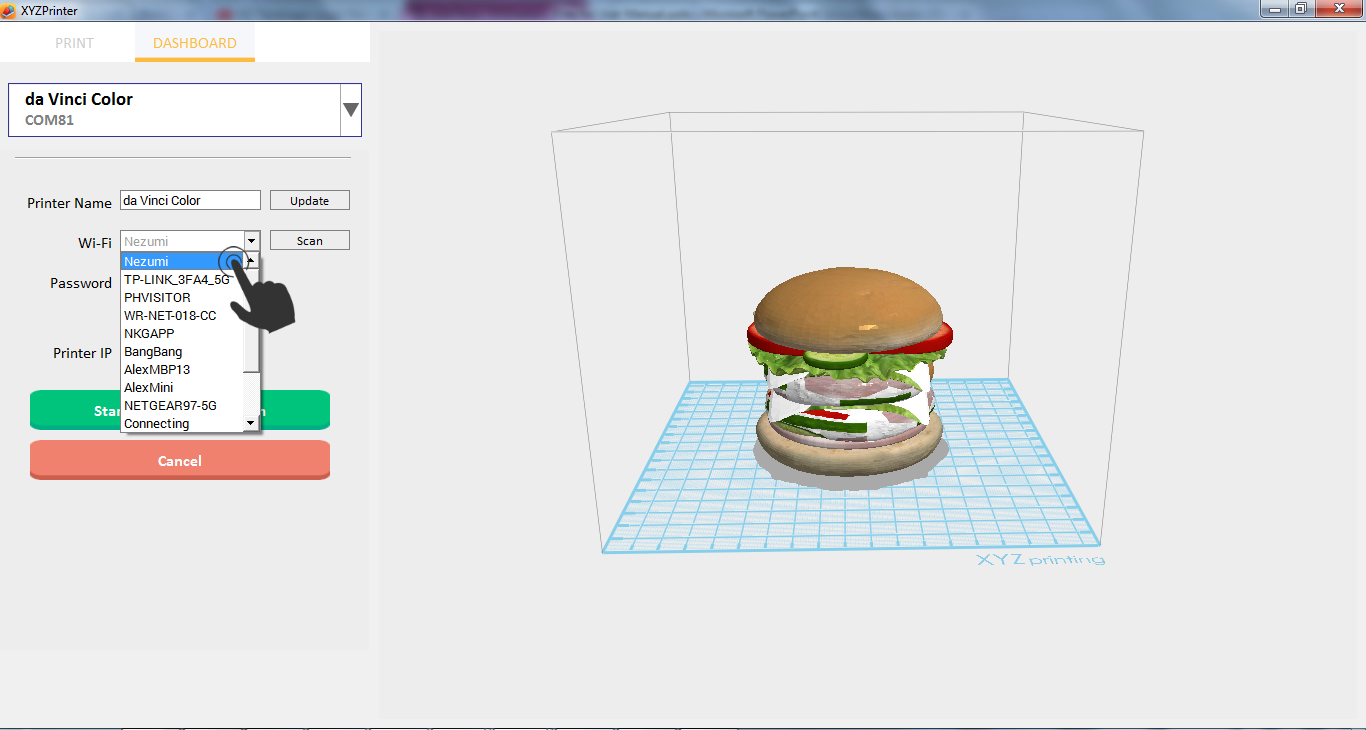
网络打印功能只有在打印机与计算机,均连接至相同的无线网络时可以使用。

1. 请在 PC 上设定无线网络,然后连接至支持无线传送工作的任何打印机。

1

2. 单击 档案(File)->打印(Print)->da Vinci Printer。

1-10

3. 单击设定(SetUp)->无线(Wireless)。

4

4.选择 PC 连接的无线网络。

6

5. 输入密码(Password),然后单击启动 Wi-Fi (Start Wi-Fi)。

7

6. 开始尝试联机。

8

7.已联机时,启动 Wi-Fi 按钮将变成停止无线联机/变更设定(Stop Wireless Connection/ Change Setting)。

9

<strong>信息</strong>

打印机信息可在设定(SetUp) à 信息(Info)下方检视。这将显示所有打印机信息、联机信息及校正信息。所有这些信息将在此页面上摘要显示。

1.连接至任何打印机。8

2.单击档案(File),然后选择打印(Print)-da Vinci Printer。

1

3.单击控制面板(Dashboard)。

2

4.单击设定(SetUp),然后选择信息(Info)。

1

5.您可以检视打印机信息、联机信息及校正信息。

2