Author / xyz_md
probasic
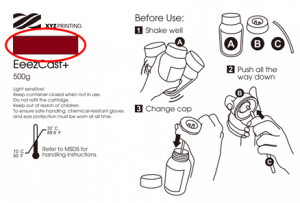
EeezCast+
アルコールの風乾作業
洗浄後の造形物表面にはアルコールが残る場合があります。洗浄後、造形物を放置し、アルコールが完全に乾燥するまで、UV硬化を行ってください。
アルコールが乾燥したら、細かい部分にレジンが残っていないかしっかりと確認してください。オブジェクトの細部をふさがないよう、硬化していないレジンを完全に取り除いてください。
ご注意
 » 造形物の表面にアルコールが残った状態で硬化を行うと、造形物の形が変わり、型取りに影響する恐れがあります。
サポート材の除去
工具を使用し、サポート材を切断して除去します。直接引っ張ると造形物の表面に破損を生じることがあります。
二次硬化
キャスタブルレジンは、完全的な型取りを確保するため、造形完成後、UV硬化を行うことが必要です。
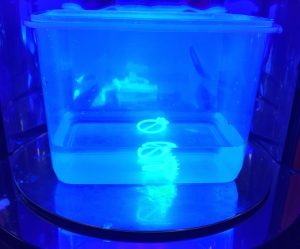
造形物を水の中に入れてから30分間二次硬化を行うと、硬化の効果を向上できます。
参考
 »XYZプリンティング二次硬化製品と純正レジンの設定対照表を確認してください。
レジンの保存に関する推奨事項
レジンタンク内の未硬化レジンは光を避けて保管してください。レジンタンク内のレジンは24時間以上放置されている場合、ろ過してから光を通さない密封容器に保管することを推奨します。
ご注意
 » レジン保管の容器は、光を通さないPP材質の密封容器を推奨します。
EeezCast+
Last updated on October 2nd, 2019 at 05:15 pm
Applicable printer: CastPro100 xP
Resin Model: F2
Developed with special formula, the EeezCast+ Resin has a very clean burn-out with no residues, increasing the efficiency of jewelry designing and creation. The material shows off precise details and smooth surface, making it suitable for the manufacturing of fine jewelry pieces.
Model Design Tips
The properties of the castable resin are similar to those of wax in that both are structurally soft and brittle and the printout can be easily broken due to pulling force during the printing process. Please follow the design tips below for optimized printing.
» » Hole Diameter ≥0.5mm
» For the specs for other features, please follow the general design specs here.
Note
» Avoid scratching the bottom of the tank with any sharp tool, or the coating may be damaged. Damaged tank surface may affect the printing quality.
Instructions for Use
To ensure the performance of the resin, a homogeneous mixture of the resin is required before starting every print job. Please follow below steps closely before start printing.
Before Installing a New Bottle
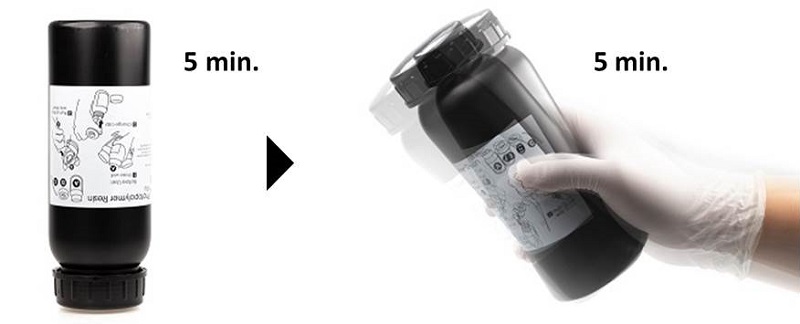
Follow below instruction to ensure the color uniformity of the resin material:
Tighten the original cap closely, place the bottle upside down for 5 minutes, and shake the bottles for around 5 minutes.
Before Every Print Job
Stir the resin left in the tank before starting every print.
Please note that the surface coating on the bottom of the resin tank may be damaged when contacting with sharp or hard tools. Follow below methods to stir the resin.
Check the Color of the Resin
Compare the color of the resin with the color block on the label on the resin bottle. If the color of the resin looks translucent or lighter than the color block, this is possibly caused by uneven distribution of the components. Printing quality may be affected using the uneven distributed material.
Software Settings
Settings for Printing
As with the use of the resin for general purpose, when there are overhangs in the model, or when the area of contact with the platform is small, additional support structures are required to ensure that the object can be printed out completely.
The printing software has an “automatic support” function, which can be used to analyze the structure of the model and automatically generate bracing structures. Sometimes you may need to use the “manual” mode to add more supports to ensure the adhesion of the object.
When printing jewelry pieces, you may want to use the cone and tree support. The cone structure is usually added to the lowest part of the object, and can be left for casting as the sprues. Tree supports connect to your objects with very small contact. It is suitable for holding the details on jewelry designs.
If printing fails, you may consider changing the object’s position and adjust the orientation and the support structures.
Recommended Burnout Process
When casting the printouts, you can work based on the temperature control suggestion as described in the following diagram, in order to ensure the complete burning away of the resin and a smooth and unblemished surface of the casting object.

Recommendation on Finishing
Cleaning
As the material is soft, the suggestion on cleaning is slightly different from the instructions for other resins. Avoid brushing or rubbing the objects during cleaning. Doing so may scratch the surface of the printed parts.
After removing the printed objects from the platform, soak the objects in Eta Cohol (95% alcohol + 5% IPA) and rinse about 2 to 3 minutes. When rinsing, you may hold the supports of the objects with tweezers.
Next, wash away the uncured resin trapped in the fine features on the objects by spraying Eta Cohol on the parts.
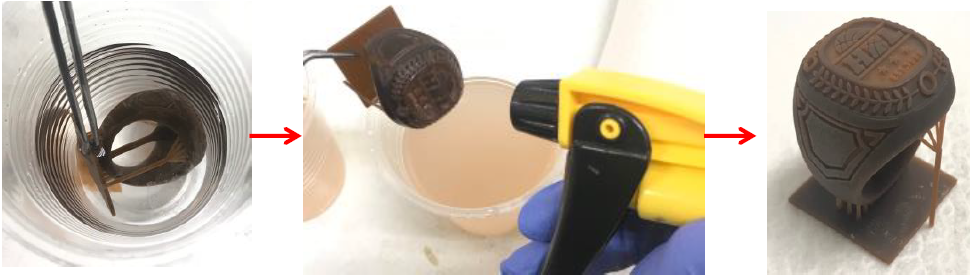
After cleaning, wait until the liquid on the surface to dry out.
Note
» Because of the brittleness of this resin, do not use a brush to scrub the printed item. Doing so may scratch the surface of the printed item.
» Do not immerse the printed item in Eta Cohol for longer than over 5 minutes, or the liquid may erode the item's structure and damage the item.
Air-Dry the Alcohol on the Surface
There will be alcohol residue on the surface of the printed item after it is washed. Do not post cure the parts until the liquid on the surface has dried out. After the alcohol has air-dried, please check carefully whether there is any resin residue in the features. Please make sure to remove the uncured resin to prevent it from blocking the design details of the original model.
Note
If curing is performed when alcohol residue is still present on the surface of the printed item, the surface of the printed item will appear white and misty, possibly affecting the result of casting.
Removing the Support
Please use tools to cut off the support instead of pulling directly (pulling can easily damage the item’s surface).
Post-Curing
The printed item produced from the EeezCast+ Resin must post cured using UV light to ensure the hardness for the lost wax casting.
For the best material properties, UV post-curing the printed parts in water for 30 minutes.
Recommendation
» Read the complete curing profiles for XYZprinting resins on our curing units.
Preservation of the Uncured Resin
Uncured resin inside of the resin tank should not be exposed to light. The uncured resin can be stored in an opaque container after it is filtered. Pour the resin back into the resin tank prior to the next printing.
Note
» Opaque polypropylene containers are recommended for storing the resins.
ProHighTemp
Last updated on November 29th, 2018 at 11:06 am
Applicable printer: PartPro100 xP
Resin Model: F1
ProHighTemp is a heat resistant resin, which can tolerate heat deflection temperature up to 140 degree Celsius. For engineering application, it is ideal for printing the master models for making rubber mold.
Model Design Tips
For the ideal printing result and the complete output of design details, please follow the design specifications here when designing the models.
Recommendation on Finishing
Please refer to the complete guide here for post-processing.
ProAccure
Last updated on November 29th, 2018 at 11:20 am
Applicable printer: PartPro100 xP
Resin Model: D3
ProAccure is a strong material featuring high rigidness, making it resistant to deformation. The engineering material is suitable for prototyping of thin-wall objects.
Model Design Tips
For the ideal printing result and the complete output of design details, please follow below design specifications when designing the models.
» Hole Diameter ≥1.0mm
» For the specs for other features, please follow the general design specs here.
Recommendation on Finishing
Please refer to the complete guide here for post-processing.
Post Curing Profile
Last updated on August 7th, 2019 at 04:20 pm
Resin-printed object should be post cured to ensure the material is completely polymerized to achieve the best material properties. This is especially important for functional resins such as castable resins and engineering resins.
When using XYZprinting UV Curing Chamber for XYZprinting resins, follow the below curing profile for post-processing:
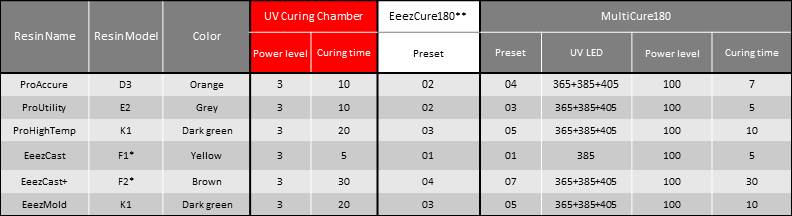
Note *Post cure EeezCure prints in water for best performance.
General Post Processing
Last updated on June 5th, 2019 at 04:51 pm
To achieve the best performance of the materials, following below steps on post-processing resin based prints.
Recommendation on Finishing
1. Cleaning
After removing the printed object from the platform, please clean it with ethyl alcohol of concentration greater than 95%.
Rinse the objects in clear alcohol thoroughly while gently scrubbing the surface.
Note
» Do not immerse the printed item in alcohol for longer than over 10 minutes, or the alcohol may erode the item's structure and damage the item.
2. Air-Dry the Alcohol on the Surface
There will be alcohol residue on the surface of the printed item after it is washed. Please keep the printed item still after it is washed and do not perform post-curing until you have confirmed that the alcohol has completely volatilized. After the alcohol has air-dried, please check carefully whether there is any resin residue in the features. Please make sure to remove the uncured resin to prevent it from blocking the design details of the original model.
3. Removing the Support
Please use tools to cut off the support instead of pulling directly (pulling can easily damage the item’s surface).
4. Post Curing
The printed object produced with the resin must be post cured using UV light to ensure the material is completely polymerized to achieve the best material properties.
Click here to read the curing profile for using XYZprinting UV Curing Chamber (Model: 3UD10).
Preservation of the Uncured Resin
Uncured resin inside of the resin tank should not be exposed to light. The uncured resin can be stored in an opaque container after it is filtered. Pour the resin back into the resin tank prior to the next printing.
Note
» Opaque polypropylene containers are recommended for storing the resins.
ProUtility
Last updated on November 29th, 2018 at 12:40 pm
Applicable printer: PartPro100 xP
Resin Model: D3
ProUtility is the grey resin, featuring moderate toughness. The material is ideal for general purpose prototyping.
Model Design Tips
For the ideal printing result and the complete output of design details, please follow the design specifications here when designing the models.
Instructions for Use
To ensure the performance of the resin, a homogeneous mixture of the resin is required before starting every print job. Please follow below steps closely before start printing.
Before Installing a New Bottle
Follow below instruction to ensure the color uniformity of the resin material:
Tighten the original cap closely, place the bottle upside down for 5 minutes, and shake the bottles for around 5 minutes.
Before Every Print Job
Stir the resin left in the tank before starting every print.
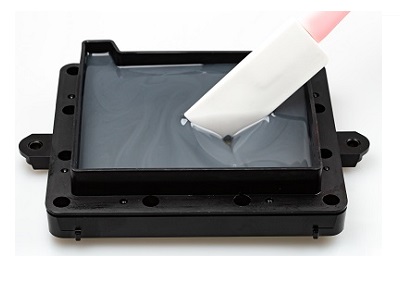
Please note that the surface coating on the bottom of the resin tank may be damaged when contacting with sharp or hard tools. Follow below methods to stir the resin.
Method 1: Stir the resin with a silicon scraper.
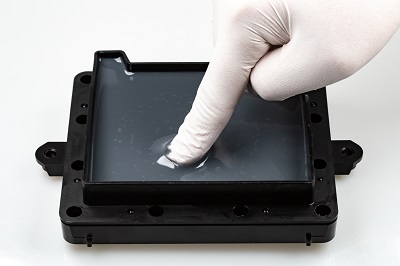
Method 2: Wear impervious gloves and stir the resin with fingers.
When the resin is mixed thoroughly, it should look like below image:
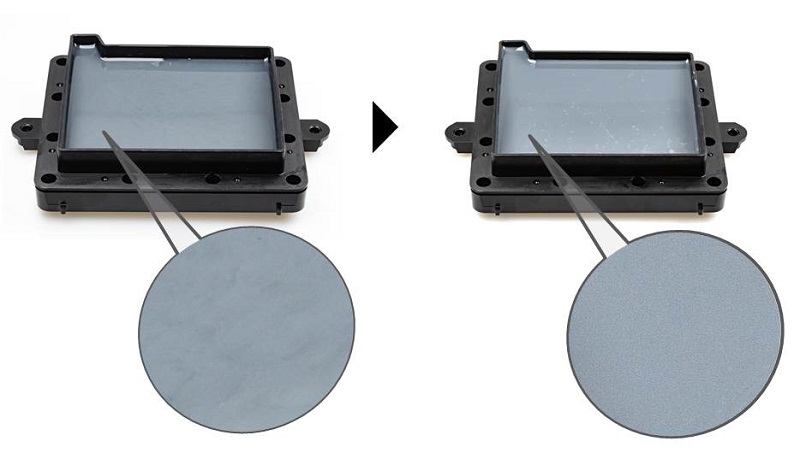
Note » Pay special attention when stirring the resin. Avoid scratching the coating on the bottom of the tank. » Check the resin level in the tank before printing. Fill the resin until the material reaches the "Max" mark on the tank.» If the resin in the bottle has been left used for more than 24 hours, please change to the original cap and overturn the bottle and shake the bottle for approx. 5 minutes respectively before printing.
Preservation of the Uncured Resin
Uncured resin inside of the resin tank should not be exposed to light. If the resin in tank will be left unused for more than 24 hours, store it in a clean container after it is filtered. Avoid sunlight or UV light exposure.

Pour the resin back into the resin tank prior to the next printing.
Note
» Opaque polypropylene containers are recommended for storing the resins.
» Overturn and shake the container of unused resin for approx. 5 minutes before pouring it back to the tank right before the next print.
Recommendation on Finishing
Please refer to the complete guide here for post-processing.
EeezMold
Last updated on November 29th, 2018 at 11:08 am
Applicable printer: CastPro100 xP
Resin Model: K1
EeezMold is a heat resistant resin, which can tolerate heat deflection temperature up to 140 degree Celsius. For jewelry application, it is ideal for printing the master models for making rubber mold.
Model Design Tips
For the ideal printing result and the complete output of design details, please follow the design specifications here when designing the models.
Recommendation on Finishing
Please refer to the complete guide here for post-processing.