Perfil de pós-cura

A fim de obter as melhores propriedades do material, objetos impressos em resina devem passar por uma pós-cura para garantir que o material está completamente polimerizado. Isso é especialmente importante para resinas funcionais, como resinas moldáveis e resinas de engenharia.

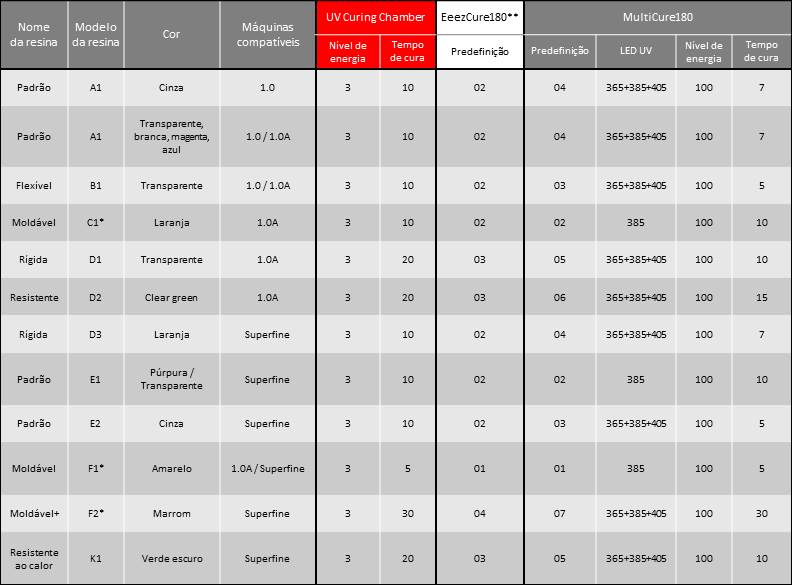
Ao utilizar a câmara de cura UV da XYZprinting para resinas da XYZprinting, siga o perfil de cura abaixo para o pós-processamento:


Nota
*Efetue em água a pós-cura de impressões em resina moldável para obter um melhor desempenho.

** Os parâmetros de secagem são os mesmos para a EeezCure180 e a câmara de secagem por UV. Ao utilizar a EeezCure180, basta alternar entre predefinições diferentes para aplicar as configurações de secagem sugeridas.

Dicas de Projeto de Modelo

Impressora compatível: Nobel 1.0A

Para o resultado de impressão ideal e a saída completa dos detalhes do design, siga abaixo as especificações de design para elaborar os modelos.

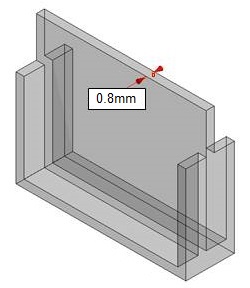
Espessura da parede ≥ 0,8mm

Paredes mais finas do que o recomendado podem se deformar ou quebrar durante o processo de descamação.

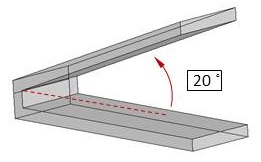
Ângulo de saliência ≥20°

São necessárias estruturas de suporte para saliências inclinadas com um ângulo maior do que o recomendado. Caso contrário, os saliências podem se deformar ou quebrar.

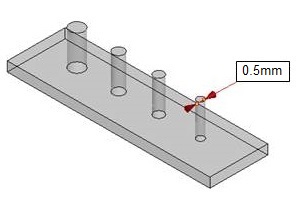
Diâmetro mínimo do fio vertical ≥0,5mm

Redes ou paredes mais finas do que o recomendado podem se deformar ou quebrar durante o processo de descamação.

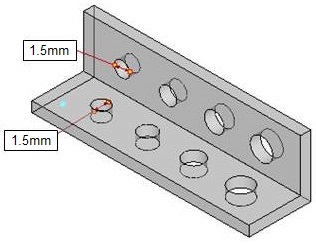
Diâmetro do furo ≥1,5mm

Furos menores do que o recomendado podem prender a resina no objeto ou podem ser fechados durante a impressão.

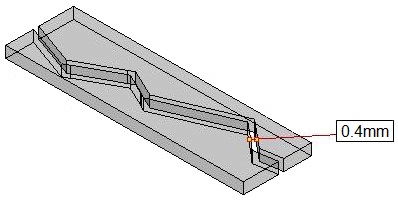
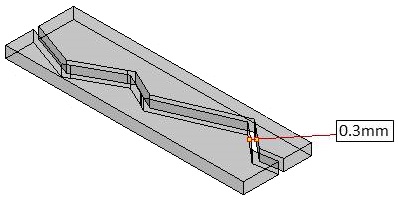
Folga ≥0,4mm

Uma folga menor do que o recomendado pode fundir-se durante a impressão. As partes móveis podem, então, tornar-se não funcionais.

Nota
» A recomendação é baseada no resultado da impressão em altura de 0,1mm.
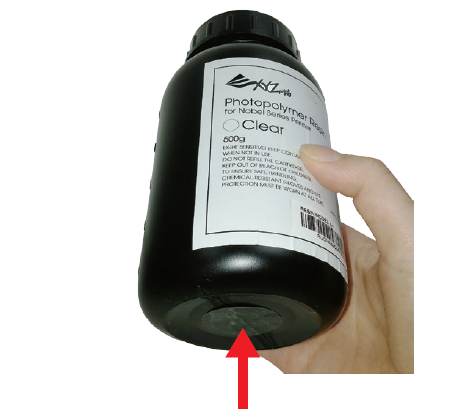
» Evite arranhar a parte inferior do cartucho com qualquer ferramenta afiada ou o revestimento pode ser danificado. A superfície danificada do cartucho pode afetar a qualidade da impressão.
» As especificações de alguns recursos são diferentes para determinadas resinas. Siga também as especificações de design na página da Wiki de cada resina, se disponível.

Dicas de Projeto de Modelo

Impressora compatível: Nobel Superfine

Para o resultado de impressão ideal e a saída completa dos detalhes do design, siga abaixo as especificações de design para elaborar os modelos.

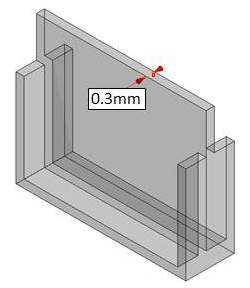
Espessura da parede ≥ 0,3mm

Paredes mais finas do que o recomendado podem se deformar ou quebrar durante o processo de descamação.

Ângulo de saliência ≥20°

São necessárias estruturas de suporte para saliências inclinadas com um ângulo maior do que o recomendado. Caso contrário, os saliências podem se deformar ou quebrar.

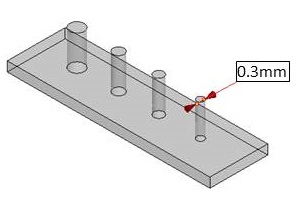
Diâmetro mínimo do fio vertical ≥0,3mm

Redes ou paredes mais finas do que o recomendado podem se deformar ou quebrar durante o processo de descamação.

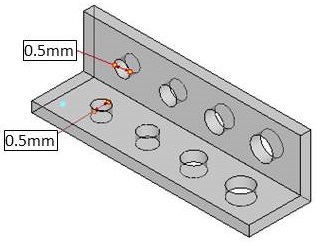
Diâmetro do furo ≥0,5mm

Furos menores do que o recomendado podem prender a resina no objeto ou podem ser fechados durante a impressão.

Folga ≥0,3mm

Uma folga menor do que o recomendado pode fundir-se durante a impressão. As partes móveis podem, então, tornar-se não funcionais.

Nota
» A recomendação é baseada no resultado da impressão em altura de 0,025mm.
» Evite arranhar a parte inferior do cartucho com qualquer ferramenta afiada ou o revestimento pode ser danificado. A superfície danificada do cartucho pode afetar a qualidade da impressão.
» As especificações de alguns recursos são diferentes para determinadas resinas. Siga também as especificações de design na página da Wiki de cada resina, se disponível.

Resina padrão (E1)

Impressora compatível: Nobel Superfine
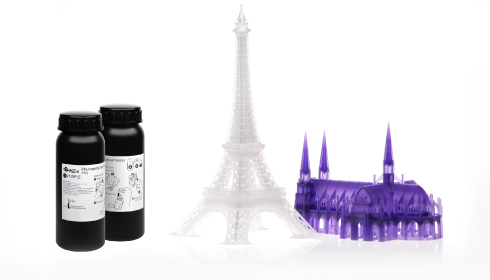
Modelo da resina: E1 (Cor: Roxo, Claro)

Para o resultado de impressão ideal e a saída completa dos detalhes do design, siga abaixo as especificações de design para elaborar os modelos.

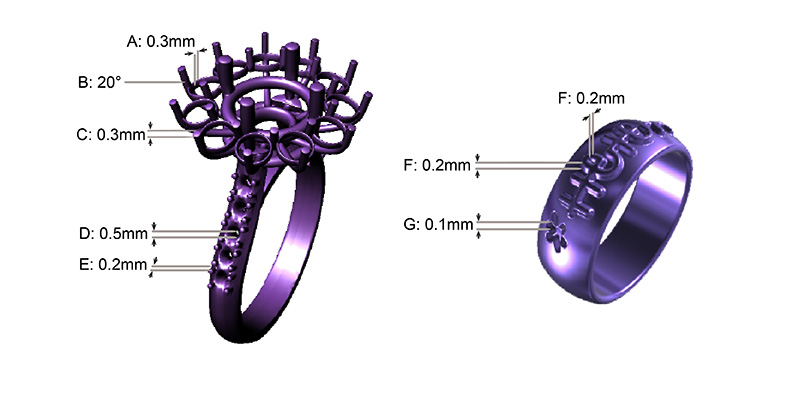
# Merkmale Mínimo
A Espessura da parede Paredes mais finas do que o recomendado podem se deformar ou quebrar durante o processo de descamação. ≥0.5mm
B Ângulo de saliência São necessárias estruturas de suporte para saliências inclinadas com um ângulo maior do que o recomendado. Caso contrário, os saliências podem se deformar ou quebrar. ≥20°
C Diâmetro mínimo do fio vertical Redes ou paredes mais finas do que o recomendado podem se deformar ou quebrar durante o processo de descamação. ≥0.3mm
D Diâmetro do furo Furos menores do que o recomendado podem prender a resina no objeto ou podem ser fechados durante a impressão. ≥1.2mm
E Folga Uma folga menor do que o recomendado pode fundir-se durante a impressão. As partes móveis podem, então, tornar-se não funcionais. ≥0.3mm
F Detalhe em relevo Esses detalhes menores do que o recomendado em altura e espessura podem não ser visíveis na impressão. ≥0.1mm
G Detalhe gravado Esses detalhes menores do que o recomendado em altura e espessura podem não ser visíveis na impressão. ≥0.3mm
Observação
» A recomendação é baseada no resultado da impressão com resina de uso geral da XYZprinting com uma camada de 0,025 mm de altura.
» A qualidade da impressão pode ser afetada ao imprimir com um tanque de resina turva.
» Faça o processo pós-cura das impressões com câmaras de cura UV para aumentar a dureza e a durabilidade dos produtos impressos.

Resina Moldável (F1)

Impressora compatível: Nobel Superfine
Modelo da resina: F1

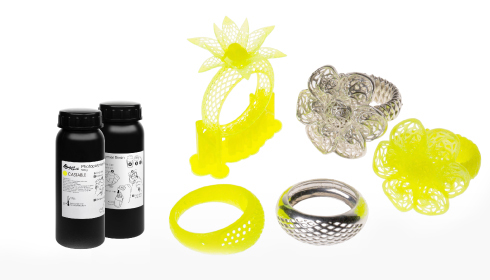
As propriedades da resina moldável são semelhantes às da cera. Não há nenhum resíduo de cinzas depois que ela é aquecida e é apropriada para a fundição de cera perdida, economizando procedimentos, ou seja, escultura de cera usada no processo de produção convencional.

Model Design Tips

As propriedades da resina moldável são semelhantes às da cera. Não há nenhum resíduo de cinzas depois que ela é aquecida e é apropriada para a fundição de cera perdida, economizando procedimentos, ou seja, escultura de cera usada no processo de produção convencional.

» Espessura da parede ≥0,4mm

» Diâmetro do furo ≥1,0mm

» Folga ≥0,4mm

» Para as especificações de outros recursos, siga as especificações gerais de design aqui.

Observação
» A recomendação é baseada no resultado da impressão com resina moldável da XYZprinting com uma camada de 0,025 mm de altura.
» Objetos maiores de dimensão maior do que 40x30x40mm ou peso superior a 6g podem exigir mais apoios para manter a plataforma.
» Evite arranhar a parte inferior do cartucho com qualquer ferramenta afiada ou o revestimento pode ser danificado. A superfície danificada do cartucho pode afetar a qualidade da impressão.

Recomendações sobre a Configuração de Impressão

Como com o uso da resina para uso geral, quando há saliências no modelo, ou quando a área de contato com a plataforma é pequena, estruturas de suporte adicionais são necessárias para assegurar que o objeto possa ser imprimido completamente.

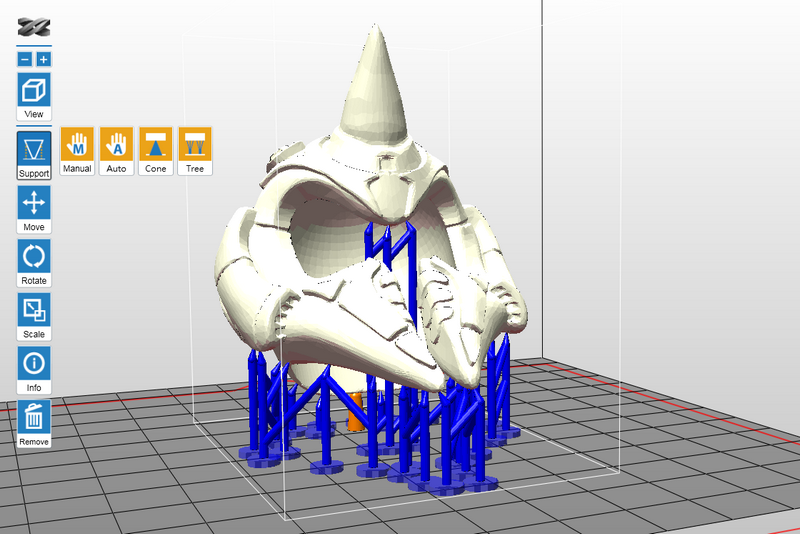
O software de impressão de XYZware_Nobel tem uma função de “suporte automático”, que pode ser usada para analisar a estrutura do modelo e automaticamente gerar estruturas de contraventamento. Às vezes você pode precisar usar o modo “manual” para adicionar mais suportes para garantir a adesão do objeto.

Clique aqui para as instruções de funções de suporte.

Se a impressão falhar, por favor mude a posição do objeto e ajustar a configuração de ângulo e as estruturas de contraventamento.

Processo de Gravação Recomendado

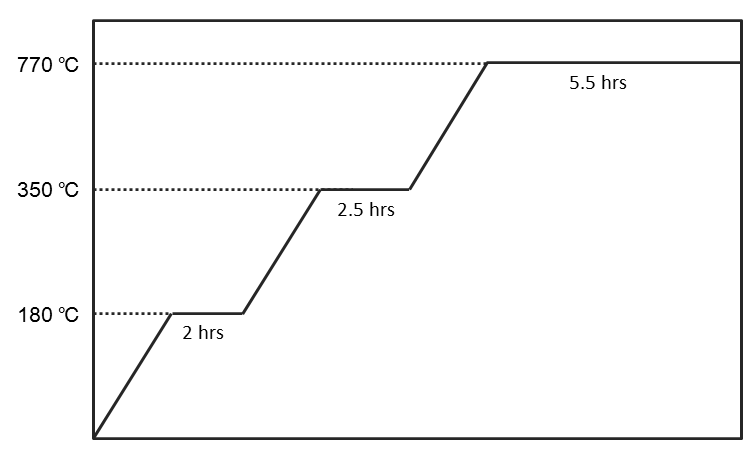
Quando a projeção as impressões, você pode trabalhar com base na sugestão de controle de temperatura conforme descrito no diagrama a seguir, a fim de assegurar a completa queima afastado da resina e uma superfície lisa e sem mácula do objeto de fundição.
Recomendação sobre Acabamento

Limpeza

Depois de remover o objeto impresso da plataforma, por favor, limpe com álcool etílico de concentrações superiores a 75%. Durante o processo de limpeza, recomenda-se usar uma peneira para manter o item impresso e mergulhar a peneira no álcool para limpar os resíduos de resina da superfície do item impresso.
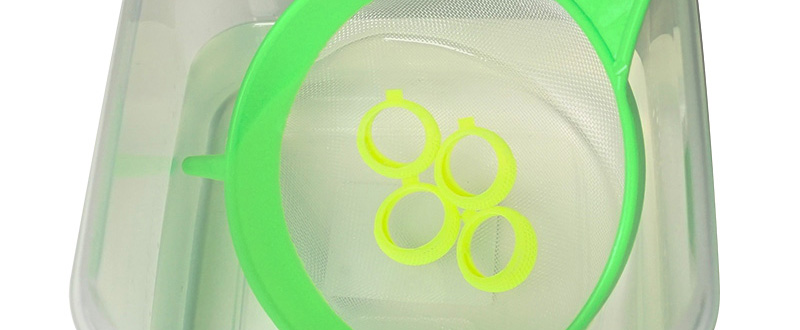
Borrife álcool nas estruturas detalhadas com uma lata de spray para lavar a resina que sobrou.

Tire o item impresso do álcool depois que ele estiver limpo e espere que o álcool em sua superfície evapore.

Nota 
» Por causa da fragilidade da resina, não utilize uma escova para esfregar o item impresso. Isso pode arranhar a superfície do item impresso. 
» Não mergulhe o item impresso no álcool por mais de mais de 10 minutos, ou o álcool pode corroer a estrutura do item e danificá-lo. 
» É normal haver desbotamento após o item impresso ser imerso em álcool. O desbotamento não afetará o resultado da fundição.

Seque ao ar livre o álcool na superfície e deixe o Item impresso até o álcool evaporar

Haverá resíduos de álcool sobre a superfície do item impresso depois de ser lavado.
Por favor, mantenha o item impresso ainda depois de ser lavado e não realize pós-cura até ter confirmado que o álcool volatilizou completamente. Após o álcool ter secado ao ar, por favor, verifique cuidadosamente se há resíduos de resina nos recursos. Por favor, certifique-se de remover a resina não polimerizada para impedir bloqueio dos detalhes do projeto do modelo original.

Nota 
» Se cura for executada quando o resíduo de álcool ainda está presente na superfície do item impresso, a superfície do item impresso aparecerá branco e nebulosa, possivelmente afetando o resultado de fundição.

Removendo o Suporte

Por favor, use ferramentas para cortar o suporte em vez de puxar diretamente (puxar pode facilmente danificar a superfície do item).

Pós-cura

O item impresso produzido a partir da resina moldável deve ser pós curada usando luz UV para garantir a dureza para a fundição da cera perdida.
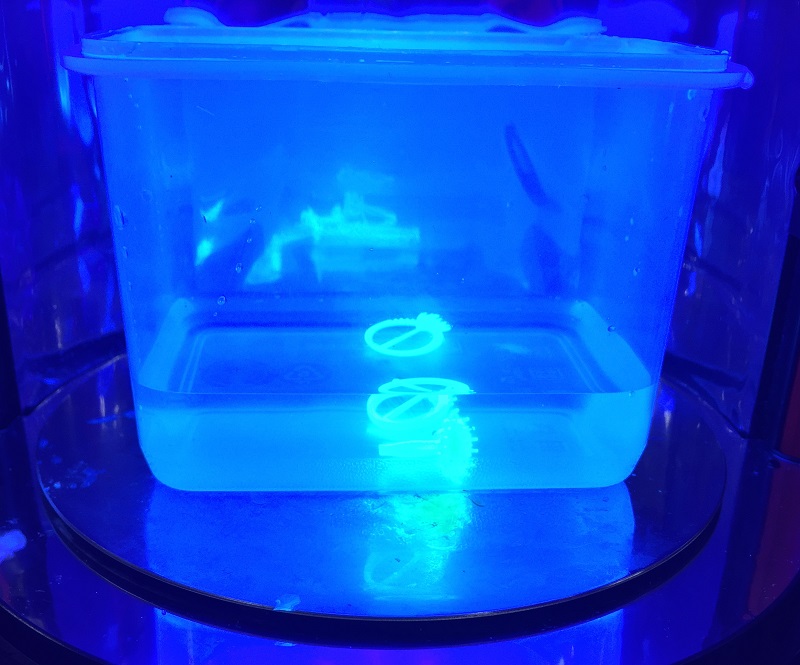
Para obter as melhores propriedades do material, realize pós-cura UV nas partes impressas em água por 5 minutos.

Recomendação
» Ao usar a câmara de Cura UV da XYZprinting, coloque as peças impressas na água por 5 minutos.
» Sob condições de UV de comprimento de onda 385 nm e a radiação intensidade de 14 mW/cm², quando a espessura da estrutura do objeto for superior a 7 mm, é aconselhável pós curar o objeto por 5 minutos.


Preservação da Resina Não Curada

Resina não curada dentro do tanque de resina não deve ser exposta à luz. A resina não curada pode ser armazenada em um recipiente opaco depois de ser filtrada. Despeje a resina de volta no tanque de resina antes da próxima impressão.
Modo Aberto do Nobel 1.0

Configuração do Modo Aberto

Para entrar no Modo Aberto:

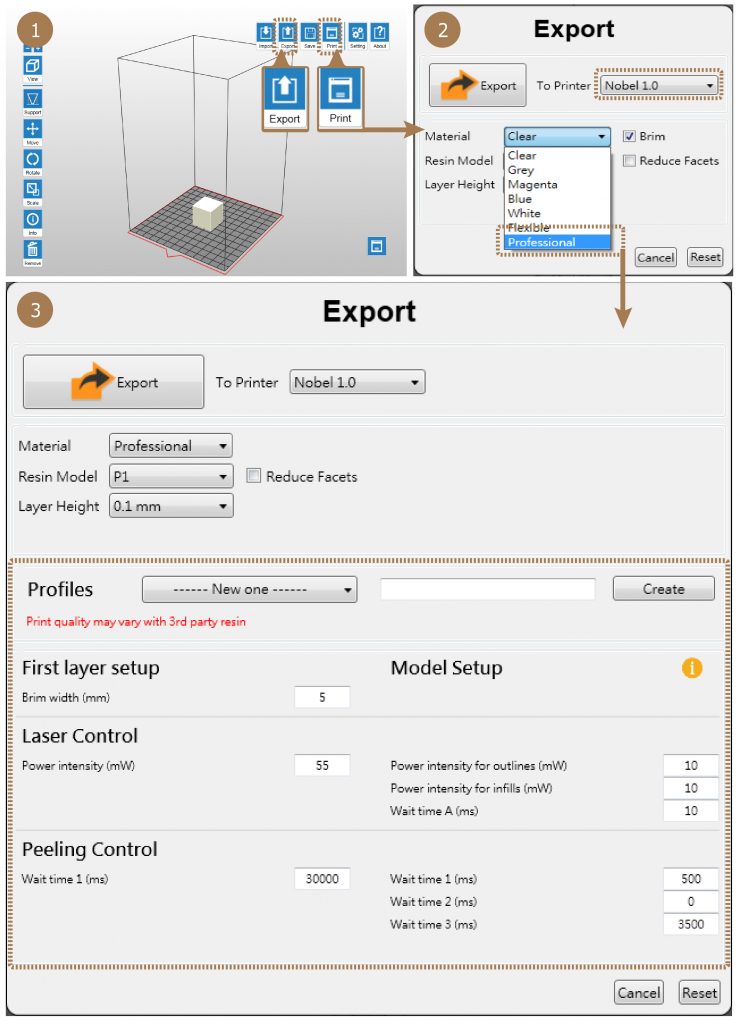
Selecione “Export” [Exportar] ou “Print” [Imprimir], e a seguir selecione “Professional” no menu “Material”.

Nota
A qualidade da impressão pode variar com resinas de outras marcas.
A função de preenchimento automático será desativada quando for utilizada uma resina de outras marcas. Se utilizar a resina XYZprinting, selecione as opções corretas para materiais XYZprinting.

Processo de Impressão

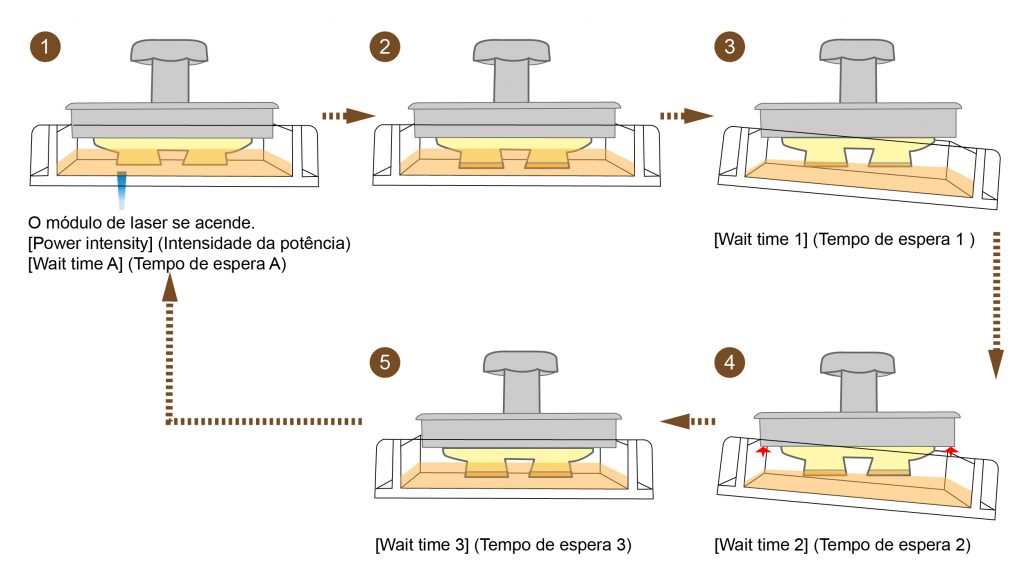
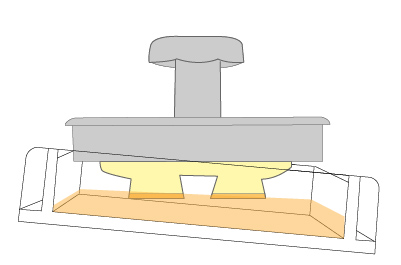
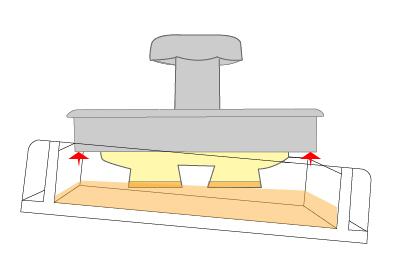
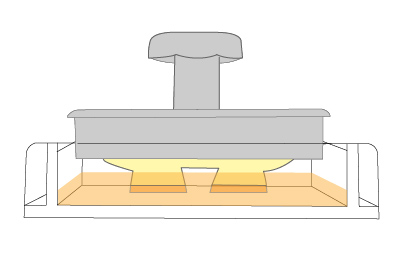
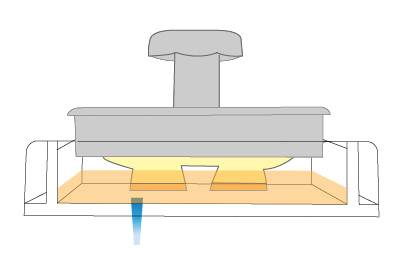
O processo de impressão do Nobel 1.0 funciona conforme ilustrado. Abaixo está a lista de parâmetros ajustáveis para imprimir com resina de terceiros em cada fase.

Parâmetros ajustáveis em cada fase

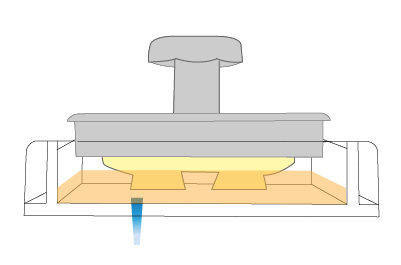
1.  O módulo de laser se acende, com base nas configurações de Controle do Laser:

Intensidade da potência

O item controla a intensidade da potência do feixe de laser.
Faixa: 0 – 72 mW

Observação
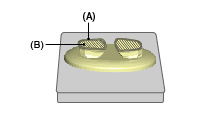
Você pode configurar uma intensidade de potência diferente para curar os contornos e enchimentos do modelo.

(A) Contornos
(B) Enchimentos
Tempo de espera A

O feixe de laser se apaga de acordo com o período especificado ao mudar de uma seção para outra na mesma camada.
Faixa: 10 – 15 ms

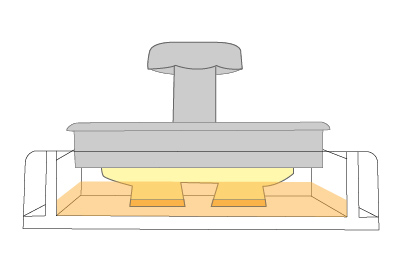
2. O feixe de laser se apaga depois de percorrer toda a camada.

3. O tanque se inclina para retirar a camada curada da superfície do revestimento e aguarda.

Tempo de espera 1

O tanque se inclina e a impressora aguarda pelo tempo especificado até a resina ser completamente polimerizada.
Faixa: 0 – 65535 ms

4. A plataforma se move para cima de acordo com a configuração da altura da camada e aguarda.

Tempo de espera 2

A plataforma se move para cima e a impressora aguarda pelo tempo especificado até a resina esfriar.
Faixa: 0 – 65535 ms

5. O tanque reinicia e aguarda.

Tempo de espera 3

O tanque reinicia e a impressora aguarda pelo tempo especificado até a resina parar de fluir.
Faixa: 0 – 65535 ms

6. O módulo de laser se acende para curar a próxima camada.

Best Practice

To ensure the printing quality, check the following items before printing.

Filter the resin in tank

Sift any residue or cured debris from the platform and tank with the scraper, high-density filter or other tools. Resin can be reused after filtering.

Note
Filter the resin after every prints may ensure the stability of printing. 
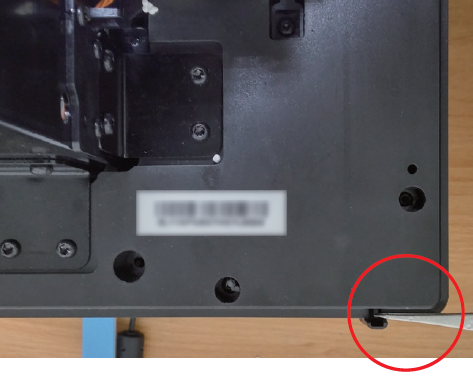
Resin resided in the black filling tube may drip on the printer case. Please cover the opening of the tube with paper towel before removing the tank.

Clean the tank bottom

Mop the fingerprint or resin under the tank or on the glass with with lint-free cloth dampened with alcohol.

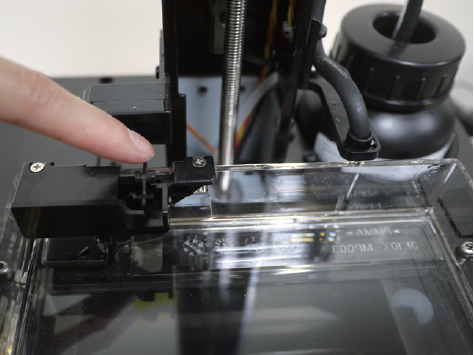
Clean the level sensor

Brush the level sensor with alcohol if it gets stuck.
Level sensor should return to the original position after a soft push. When the tank is full or the resin gets sticky, the sensor’s movement may be hindered greatly. Normally, it may take 1 minute for sensor to return. If stuck, remove the remaining resin from tank before cleaning. If resin in tank is cured, please replace the tank.

Platform calibration

Re-calibrate the platform after changing the platform or the tank. Make sure that the platform is paralleled with the tank.
Please note that platform calibration should be done with an empty tank.

Avoid cloudy area

Check if the tank is cloudy at where you place the model. Move the model away from the cloudy area in the software with the “Move” function. Replace the tank if the overall surface is cloudy.

Note
The placement on the virtual platform in the software is opposite to the actual placement in the tank. For models placed at the right side of the virtual
platform, they will be built on the left side of the tank.
Printing at the left side of the tank (right side on the virtual platform) will be less affected by the peeling force during build process.

Check for optimized setup

Optimize the placement and the support structure of the model with the ”Rotate”, “Support” and “Brim”functions in the software.

Rotate

For models of top-heavy structure, with less contact with the platform, or with any larger solid layer, please rotate the model to reduce the effect of peeling force during build process.

Support

For models of top-heavy structure, with overhanging parts or with less contact with the platform after rotated, please add support structures.

Tips
For larger overhanging parts, please choose the support structure with higher density and larger contact point.

Brim

One of the keys to successful printing on the bottom up type SL printer is to ensure the adhesion of the model to the platform. If rotating the model doesn’t increase the contact between the models and the platform greatly, please check “Brim” while exporting or printing the file. Also add “support” if necessary.

Avoid non-manifold geometry

For models with non-manifold geometry (black-highlighted in the software), please repair the models before printing.

Post-Processing

Post processing to printouts may be required

Remove Support Structure

Use pliers or other tools to remove the support structure from the cleaned prints to ensure perfect finish.

Empty Uncured Resin Inside the Prints

Hollow prints with uncured resin inside may break as time passes. To ensure the durability of hollow prints, leave a weep hole at the bottom of your 3D design, so you can empty the uncured resin easily.

Post-cure Prints for Optimal Results

The post-curing process maximizes the mechanical properties of resin-printed objects. It ensures the stable performance of functional resins and successful burnout of castable material. It’s essential for professionals such as dentists or jewelers. Post-cure with XYZprinting UV Curing Chamber is easy. Refer to the curing profile here.

Solução de Problemas

When an error occurs, please refer to the service code on the printer and/or in the software, and check the suggestion below for troubleshooting.

If any error persists, please contact customer service center for support.


Error Code 1000

Cause: Vibration generator movement abnormalities or tank sensor malfunctioned.

Suggestion:

Contact customer service center directly

[collapse]
Error Code 1001

Cause: Z axis motor upward movement abnormalities or Z axis top sensor malfunctioned.

Suggestion:

Select “INFO”>”SENSOR STATUS” on the printer, touch Z axis top sensor, and see if the status of “Z-T” switches from 0 to 1.

If the value doesn’t switch accordingly, then the sensor is malfunctioning. Then select “UTILITIES”>”MOVE PLATFORM”>”TO TOP” to raise the . If the platform doesn’t rise accordingly, then the motor is malfunctioning.
Contact the service center after you have checked the status of the printer.

[collapse]
Error Code 1002

Cause: Z axis motor downward movement abnormalities or Z axis bottom sensor malfunctioned.

Suggestion:

Select “INFO”>”SENSOR STATUS” on the printer, touch Z axis bottom sensor, and see if the status of “Z-B” switches from 0 to 1.

If the value doesn’t switch accordingly, then the sensor is malfunctioning. Then select “UTILITIES”>”MOVE PLATFORM”>”TO BOTTOM” to descend the platform. If the platform doesn’t descend accordingly, then the motor is malfunctioning.

Contact the service center after you have checked the status of the printer.

[collapse]
Error Code 1003

Cause: NFC tag reader malfunctioned.

Suggestion:

Contact customer service center directly.

[collapse]
Error Code 1004, 1006, 1007, 1008

Cause: Engine board malfunctioned.

Suggestion:

Contact customer service center directly.

[collapse]
Error Code 1005

Cause: Y axis movement problem.

Suggestion:

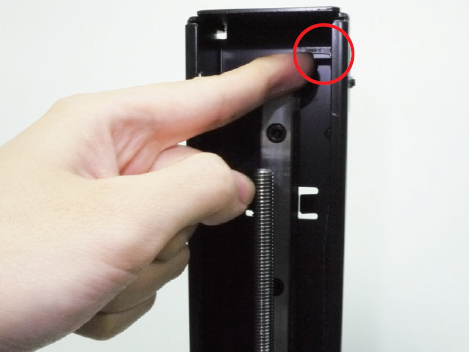
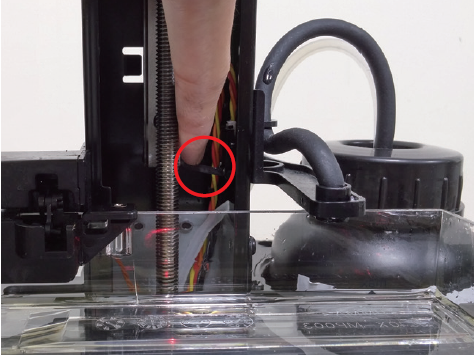
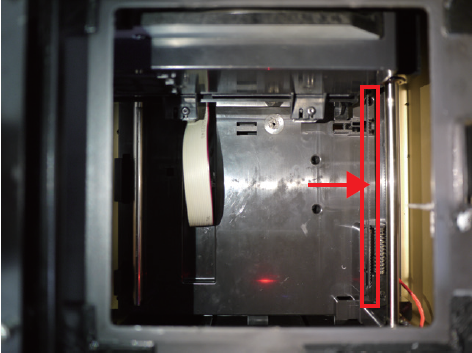
Remove the resin tank, release 3 latches by the glass and remove the glass. If you find any object falls inside the printing chamber and blocks the movement of the printing module, please remove it. If you find the belt is broken, please contact the service center.

Y-axis belt

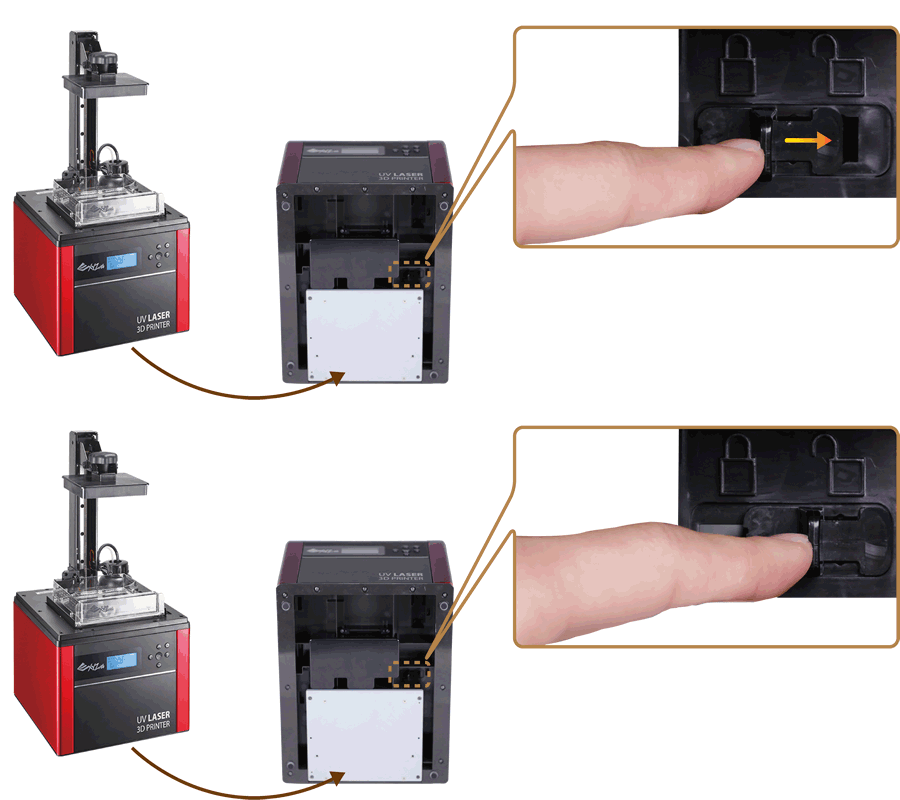
Please also check if the printing module lock at the bottom of the printer has been released.

[collapse]
Error Code 1009

Cause: WIFI module malfunctioned.

Suggestion:

Contact customer service center directly.

[collapse]
Error Code 100A

Cause: Z axis motor malfunctioned.

Suggestion:

Turn off the printer and confirm if the printing platform and the resin tank are installed correctly. If the error still occurs, contact customer service center.

[collapse]
Error Code 100C, 100D, 100C

Cause: Internal error.

Suggestion:

Contact customer service center directly.

[collapse]
Error Code 1020

Cause: Printer not found.

Suggestion:

Make sure printer is powered on, and connected to PC correctly. If the error persists, please try to restart your PC or refer to FAQ on XYZprinting website.

[collapse]
Error Code 1021

Cause: XYZware_Nobel slicer not found.

Suggestion:

Reinstall XYZware_Nobel.

[collapse]
Error Code 1022

Cause: Transmission failed.

Suggestion:

Make sure the USB wire is securely connected to the printer. Do not remove the wire before data transmission is completed.

[collapse]
Error Code 1023

Cause: Insufficient memory to load file(s).

Suggestion:

Increase system memory to 4G RAM and 1G graphics RAM or above. Leave some prints for next task if you are printing several models.
For better performance, it is recommended to run the program on 64-bit operating system.

[collapse]
Error Code 1024

Cause: XYZware_Nobel runtime error.

Suggestion:

Restart XYZware_Nobel.

[collapse]
Error Code 1025

Cause: Unable to save the file.

Suggestion:

Please check if there is enough space on the selected disk/device. Delete some files and try again. If you are saving the file to external device, make sure that the device is securely connected.

[collapse]
Error Code 1026

Cause: Non-manifold issue is found in the file.

Suggestion:

Repair the file with 3D model repairing software (such as netfabb or MakePrintable) and slice the model with XYZware_Nobel again.

[collapse]
Error Code 2000

Cause: Resin filling timeout.

Suggestion:

If the resin bottle is not empty, and the NFC tag matches the cartridge, first check if the nozzle cap is securely closed. Then check if the tank level sensor is functioning. Select “INFO”>”SENSOR STATUS”, and touch the tank level sensor. If the value doesn’t switch from 1 to 0 after “L”, the sensor is not working.


Then tap the floater to see if it moves smoothly.
If the sensor gets stuck, clean the sensor by following the cleanup procedure.
Also check the status of the filling pump. Disconnect the transparent filling tube, and select “UTILITIES”>”INSTALL RESIN”. If you don’t feel air releasing from the tube, then the pump is malfunctioning.
Contact the service center after you have checked the status of the printer.

[collapse]
Error Code 2001

Cause: Resin bottle not found.

Suggestion:

Make sure resin bottle is placed correctly and NFC tag is in place under the bottle.

If the NFC label is missing, please contact customer service center.

[collapse]
Error Code 2002

Cause: UV laser module not calibrated.

Suggestion:

Contact customer service center directly.

[collapse]
Error Code 2003

Cause: Resin bottle empty.

Suggestion:

Resin bottle is empty is based on the the reading from the NFC tag. Select “INFO”>”RESIN STATUS” to check resin level. When “REMAINING” is shown as “0%”, then the resin bottle should be empty. Please install another XYZprinting resin bottle before printing.

[collapse]
Error Code 2004

Cause: Lid not covered during printing.

Suggestion:

Place the lid on the printer before printing. If the lid is placed correctly, please remove the lid, select “INFO”>”SENSOR STATUS”, tap the lid sensor and see if the status of “C” switches from 0 to 1.

If the value doesn’t switch accordingly, then the sensor is malfunctioning.

Contact the service center after you have checked the status of the printer.

[collapse]
Error Code 2005

Cause: Unrecognized resin tag.

Suggestion:

Check the record of the resin bottle by selecting “INFO”>”RESIN STATUS”. If the display shows “UNIDENTIFIED TAG”, please change to XYZprinting resin bottle.

[collapse]
Error Code 2006

Cause: Unable to resolve the file.

Suggestion:

Slice the file again with XYZware_Nobel. Be sure to select the “Printer Type” according to the printer model used while slicing the file.

[collapse]
Error Code 2007

Cause: File too large.

Suggestion:

Please select a .3wn file, size no more than 200MB.

[collapse]
Error Code 2008

Cause: Non-manifold issue is found in the file.

Suggestion:

Repair the file with 3D model repairing software (such as netfabb, MakePrintable, or 3D Builder) and slice the model with XYZware_Nobel again.

[collapse]
Error Code 2009

Cause: Resin tank is not installed correctly.

Suggestion:

Confirm if the resin tank is installed correctly. If the resin tank is placed correctly, remove the tank, select “INFO”>”SENSOR STATUS” on the printer, touch the resin tank sensor, and see if the status of “T” switches from 0 to 1. If the value doesn’t switch accordingly, then the sensor is malfunctioning. Contact the service center after you have checked the status of the printer.

[collapse]
Error Code 2020

Cause: Printer is busy.

Suggestion:

Wait until the printer finishes current task. If the error persists when the printer is idle, please try to restart the printer.

[collapse]

User Interface

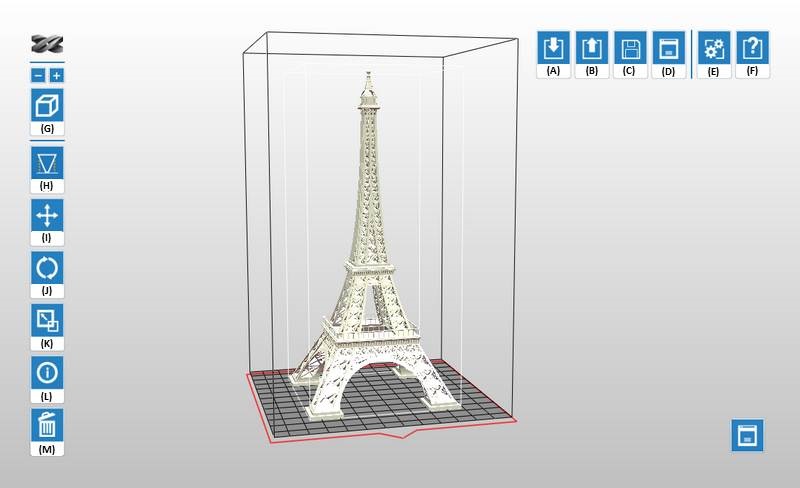
XYZware_Nobel is not only for printing, it also enables basic edits and printer setups. Below is the descriptions of all functions.

(A) Import

Import objects in .stl/.3ws/.3wn format.

Open the file browser and select the files to print.

Note
Only one 3ws or 3wn file is allowed on the workspace.
Tip 
You may also drag the files from a folder into XYZware_Nobel. To load more than one file, press Shift key while selecting the files and drag them into XYZware_Nobel.

(B) Export

Export the objects on the workspace to sliced file in 3wn format. Click here to read the description on each options.

(C) Save

Save as .stl or .3ws file.

Save all objects on the platform to a single stl/3ws file. Any adjustment to the size or placement of the objects will apply to the file.

(D) Print

Setup printing preference and send the objects for printing.

The options are the same as for the Export function. Click here to read the description on each options.

(E) Setting

Setup interface language, display units, printer type, printout scaling, light strength tuning and sign in as XYZprinting member. Click here to read the description on each options.

(F) About

Software and firmware version are displayed here.

To update software or printer firmware, please click in the update/upgrade button in this window. In this section, you can also find the contact information of XYZprinting in different regions.

Tip 
Apply printer firmware and XYZware_Nobel updates when prompt by the software for stable printing performance.

(G) Zoom

Zoom in/out the view.

Zoom in or out the platform to view the details of objects.

Tip
You can also zoom with the scroll wheel on the mouse.

(H) View

Switch views.

Switch views with a click to view objects from different angle.

Tip
You can also drag the mouse to rotate the view.

(I) Support

Add supports to overhangs on the models.

Support structure is required under overhangs. It prevents the falling for gravity and the deforming due to the peeling force during printing, and increases adhesion of the model to the platform. Click here to read more.

(J) Move

Move the object along the x, y, or z axis.

You can move the object by dragging the slider or inputting a value in the field by the slider.

Keyboard shortcut
Press and hold ALT key and drag the mouse to move the object horizontally.

(K) Rotate

Adjust the angle of the object around the x, y, or z axis.

Orientation is one of the keys to a successful print. For models of top-heavy structure, with less contact with the platform, or with any larger solid layer, please rotate the model to reduce the effect of peeling force during build process.

To rotate the model, drag the mouse over the circular slider or input the desired angle in center of the circular slider.

(L) Scale

Scale the object as you desire. The adjustment to the object on the platform will not affect the size of your original file.

To scale up or down the model, input the desired size on X, Y or Z axis, drag on the slider bar, or input the scale ratio directly.

Tip
To resize the whole model, be sure to check "Uniform". Unselect "Uniform" if you wish to make non-uniform scaling.

(M) Info

View info of the object.

You can check the dimension and location of the object in this function. For sliced objects, the info window also shows printing related data, including selected printer type, estimated print time and resin volume.

(N) Remove

Remove the object from the platform.

Select an object and click the option to delete it from the platform.

Keyboard shortcut
You can also press Delete key to remove the selected object from the platform.

(O) Printer Monitor

View printer status, including printing progress and the resin level in the resin cartridge.

“My Printer” window shows the information on the connected printer(s). However, only one connection is allowed. To switch to another printer, click “Connect” button below the target printer.

Note
"Wireless Setting" is only compatible with printer model Nobel Superfine.