Author / xyz_md
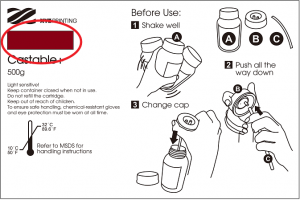
Castable+ Resin (F2)
Applicable printer: Nobel Superfine
Developed with special formula, the Castable+ Resin has a very clean burn-out with no residues, increasing the efficiency of jewelry designing and creation. The material shows off precise details and smooth surface, making it suitable for the manufacturing of fine jewelry pieces.
Model Design Tips
The properties of the castable resin are similar to those of wax in that both are structurally soft and brittle and the printout can be easily broken due to pulling force during the printing process. Please follow the design tips below for optimized printing.
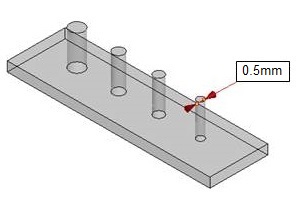
» » Hole Diameter ≥0.5mm
» For the specs for other features, please follow the general design specs here.
Note
» Avoid scratching the bottom of the tank with any sharp tool, or the coating may be damaged. Damaged tank surface may affect the printing quality.
Instructions for Use
To ensure the performance of the resin, a homogeneous mixture of the resin is required before starting every print job. Please follow below steps closely before start printing.
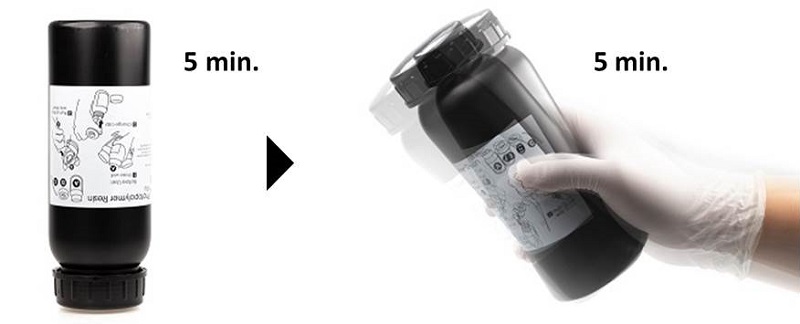
Before Installing a New Bottle
Follow below instruction to ensure the color uniformity of the resin material:
Tighten the original cap closely, place the bottle upside down for 5 minutes, and shake the bottles for around 5 minutes.
Before Every Print Job
Stir the resin left in the tank before starting every print.
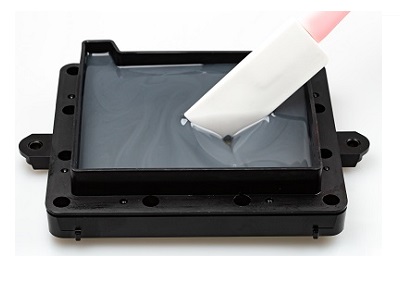
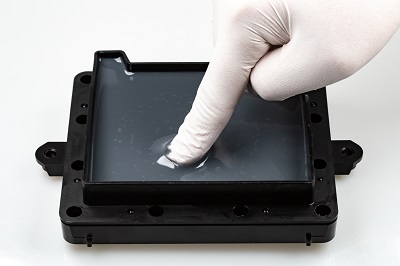
Please note that the surface coating on the bottom of the resin tank may be damaged when contacting with sharp or hard tools. Follow below methods to stir the resin.
Check the Color of the Resin
Compare the color of the resin with the color block on the label on the resin bottle. If the color of the resin looks translucent or lighter than the color block, this is possibly caused by uneven distribution of the components. Printing quality may be affected using the uneven distributed material.
Software Settings
Settings for Printing
As with the use of the resin for general purpose, when there are overhangs in the model, or when the area of contact with the platform is small, additional support structures are required to ensure that the object can be printed out completely.
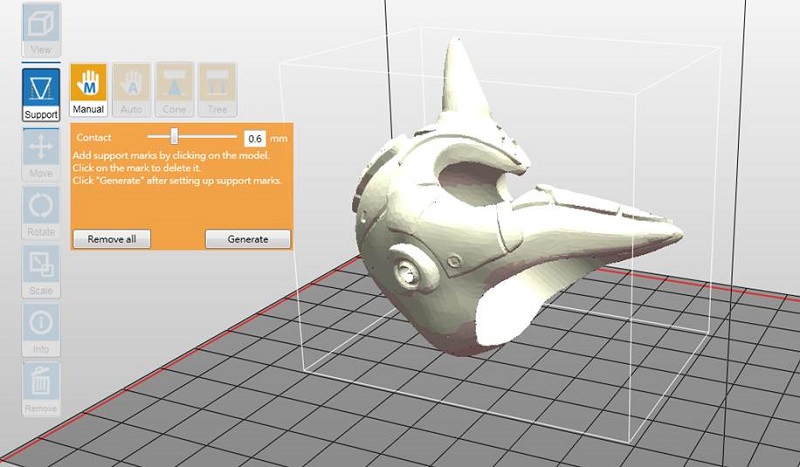
The printing software has an “automatic support” function, which can be used to analyze the structure of the model and automatically generate bracing structures. Sometimes you may need to use the “manual” mode to add more supports to ensure the adhesion of the object.
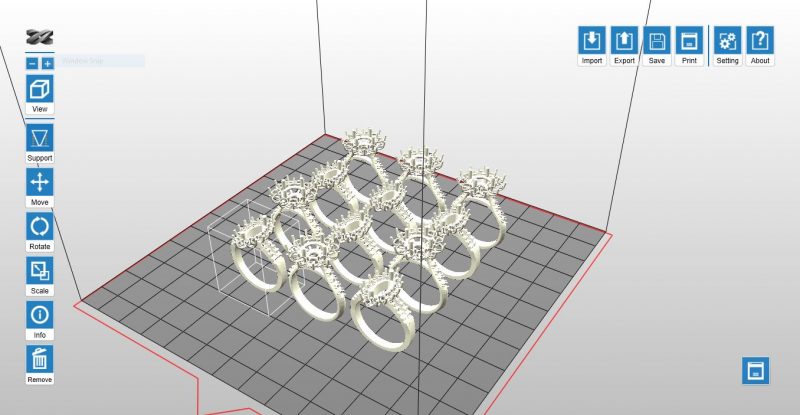
When printing jewelry pieces, you may want to use the cone and tree support. The cone structure is usually added to the lowest part of the object, and can be left for casting as the sprues. Tree supports connect to your objects with very small contact. It is suitable for holding the details on jewelry designs.
Click here for the instructions for support functions.
If printing fails, you may consider changing the object’s position and adjust the orientation and the support structures.
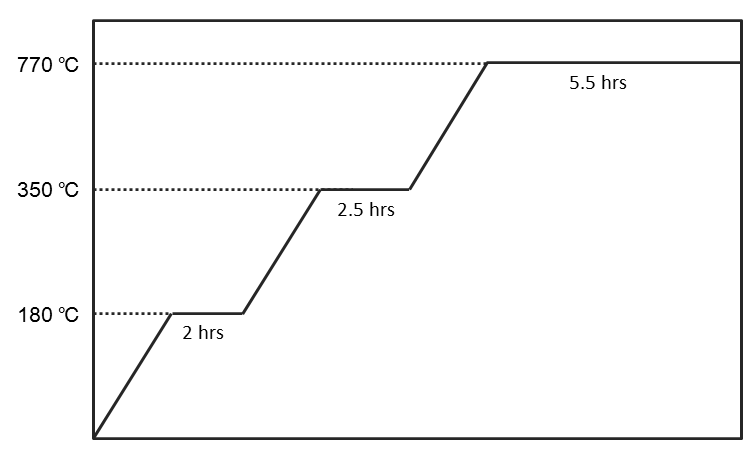
Recommended Burnout Process
When casting the printouts, you can work based on the temperature control suggestion as described in the following diagram, in order to ensure the complete burning away of the resin and a smooth and unblemished surface of the casting object.
Recommendation on Finishing
Cleaning
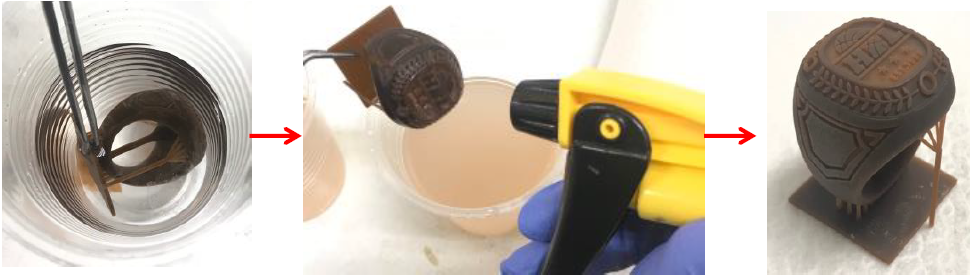
As the material is soft, the suggestion on cleaning is slightly different from the instructions for other resins. Avoid brushing or rubbing the objects during cleaning. Doing so may scratch the surface of the printed parts.
After removing the printed objects from the platform, soak the objects in Eta Cohol (95% alcohol + 5% IPA) and rinse about 2 to 3 minutes. When rinsing, you may hold the supports of the objects with tweezers.
Next, wash away the uncured resin trapped in the fine features on the objects by spraying Eta Cohol on the parts.
After cleaning, wait until the liquid on the surface to dry out.
Note
» Because of the brittleness of this resin, do not use a brush to scrub the printed item. Doing so may scratch the surface of the printed item.
» Do not immerse the printed item in Eta Cohol for longer than over 5 minutes, or the liquid may erode the item's structure and damage the item.
Air-Dry the Alcohol on the Surface
There will be alcohol residue on the surface of the printed item after it is washed. Do not post cure the parts until the liquid on the surface has dried out. After the alcohol has air-dried, please check carefully whether there is any resin residue in the features. Please make sure to remove the uncured resin to prevent it from blocking the design details of the original model.
Note
If curing is performed when alcohol residue is still present on the surface of the printed item, the surface of the printed item will appear white and misty, possibly affecting the result of casting.
Removing the Support
Please use tools to cut off the support instead of pulling directly (pulling can easily damage the item’s surface).
Post-Curing
The printed item produced from the Castable+ Resin must post cured using UV light to ensure the hardness for the lost wax casting.
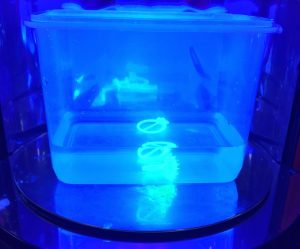
For the best material properties, UV post-curing the printed parts in water for 30 minutes.
Recommendation
» Read the complete curing profiles for XYZprinting resins on our curing units.
Preservation of the Uncured Resin
Uncured resin inside of the resin tank should not be exposed to light. The uncured resin can be stored in an opaque container after it is filtered. Pour the resin back into the resin tank prior to the next printing.
Note
» Opaque polypropylene containers are recommended for storing the resins.
Heat Resistant Resin (K1)
Applicable printer: Nobel Superfine
Resin Model: K1
This material is a heat resistant resin, which can tolerate heat deflection temperature up to 140 degree Celsius. For jewelry and engineering applications, it is ideal for printing the master models for making rubber mold.
Model Design Tips
For the ideal printing result and the complete output of design details, please follow the design specifications here when designing the models.
Recommendation on Finishing
Please refer to the complete guide here for post-processing.
General Post Processing
To achieve the best performance of the materials, following below steps on post-processing resin based prints.
Recommendation on Finishing
1. Cleaning
After removing the printed object from the platform, please clean it with ethyl alcohol of concentration greater than 95%.
Rinse the objects in clear alcohol thoroughly while gently scrubbing the surface.
Note
» Do not immerse the printed item in alcohol for longer than over 10 minutes, or the alcohol may erode the item's structure and damage the item.
2. Air-Dry the Alcohol on the Surface
There will be alcohol residue on the surface of the printed item after it is washed. Please keep the printed item still after it is washed and do not perform post-curing until you have confirmed that the alcohol has completely volatilized. After the alcohol has air-dried, please check carefully whether there is any resin residue in the features. Please make sure to remove the uncured resin to prevent it from blocking the design details of the original model.
3. Removing the Support
Please use tools to cut off the support instead of pulling directly (pulling can easily damage the item’s surface).
4. Post Curing
The printed object produced with the resin must be post cured using UV light to ensure the material is completely polymerized to achieve the best material properties.
Click here to read the curing profile for using XYZprinting UV Curing Chamber.
Preservation of the Uncured Resin
Uncured resin inside of the resin tank should not be exposed to light. The uncured resin can be stored in an opaque container after it is filtered. Pour the resin back into the resin tank prior to the next printing.
Note
» Opaque polypropylene containers are recommended for storing the resins.
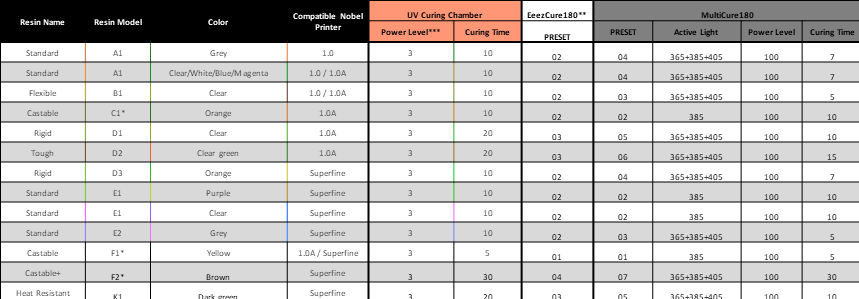
Post Curing Profile
Resin-printed object should be post cured to ensure the material is completely polymerized to achieve the best material properties. This is especially important for functional resins such as castable resins and engineering resins.
When using XYZprinting UV Curing Chamber for XYZprinting resins, follow the below curing profile for post-processing:
| Resin Name | Resin Model | Color | Compatible Nobel Printer | UV Curing Chamber | EeezCure180** | MultiCure180 | ||||
|---|---|---|---|---|---|---|---|---|---|---|
| Power Level | Curing Time | Preset | Preset | UV LED | Power Level | Curing Time | ||||
| Standard | A1 | Grey | 1.0 | 3 | 10 | 02 | 04 | 365+385+405 | 100 | 7 |
| Standard | A1 | Clear/White/Blue/Magenta | 1.0 / 1.0A | 3 | 10 | 02 | 04 | 365+385+405 | 100 | 7 |
| Flexible | B1 | Clear | 1.0 / 1.0A | 3 | 10 | 02 | 03 | 365+385+405 | 100 | 5 |
| Castable | C1* | Orange | 1.0A | 3 | 10 | 02 | 02 | 385 | 100 | 10 |
| Rigid | D1 | Clear | 1.0A | 3 | 20 | 03 | 05 | 365+385+405 | 100 | 10 |
| Tough | D2 | Clear green | 1.0A | 3 | 20 | 03 | 06 | 365+385+405 | 100 | 15 |
| Rigid | D3 | Orange | Superfine | 3 | 10 | 02 | 04 | 365+385+405 | 100 | 7 |
| Standard | E1 | Purple | Superfine | 3 | 10 | 02 | 02 | 385 | 100 | 10 |
| Standard | E1 | Clear | Superfine | 3 | 10 | 02 | 02 | 385 | 100 | 10 |
| Standard | E2 | Grey | Superfine | 3 | 10 | 02 | 03 | 365+385+405 | 100 | 5 |
| Castable | F1* | Yellow | 1.0A / Superfine | 3 | 5 | 01 | 01 | 385 | 100 | 5 |
| Castable+ | F2* | Brown | Superfine | 3 | 30 | 04 | 07 | 365+385+405 | 100 | 30 |
| Heat Resistant | K1 | Dark green | Superfine | 3 | 20 | 03 | 05 | 365+385+405 | 100 | 10 |
Note *Post cure castable resin prints in water for best performance.** Curing parameters are the same for EeezCure180 and the UV curing chamber. When using EeezCure180, simply switch between different presets to apply the suggested curing settings.
General Design Specs
Applicable printer: Nobel 1.0A
For the ideal printing result and the complete output of design details, please follow below design specifications when designing the models:
Wall thickness ≥ 0.8mm
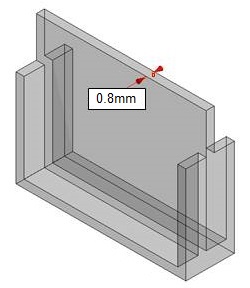
Walls thinner than recommended may warp or break during the peel process.
Overhang angle ≥20°
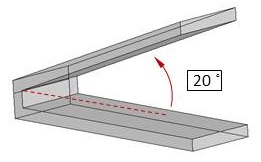
Support structures are required for steep overhangs with an angle larger than recommended limits. Otherwise the overhangs may deform or break.
Vertical-Wire Diameter ≥0.5mm
Nets or wires thinner than recommended may break or deform during the peel process.
Hole Diameter ≥1.5mm
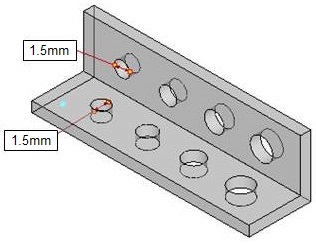
Holes smaller than recommended may trap resin in the object or may close off during printing.
Clearance ≥0.4mm
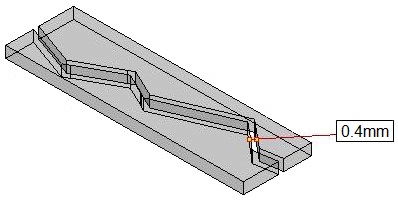
Clearance smaller than recommended may fuse during printing. Moving parts may thus become non-functioning.
Note
» The recommendation is based on the printing result at layer height of 0.1mm.
» Print quality may be affected when printing with a damaged or cloudy resin tank.
» The specs for some features are different for certain resins. Please also follow the design specs in the wiki page for each resin, if available.
General Design Specs
Applicable printer: Nobel Superfine
For the ideal printing result and the complete output of design details, please follow below design specifications when designing the models:
Wall thickness ≥ 0.3mm
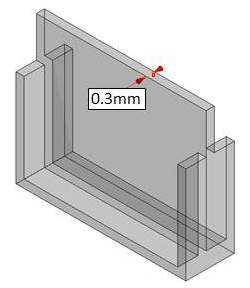
Walls thinner than recommended may warp or break during the peel process.
Overhang angle ≥20°
Support structures are required for steep overhangs with an angle larger than recommended limits. Otherwise the overhangs may deform or break.
Vertical-Wire Diameter ≥0.3mm
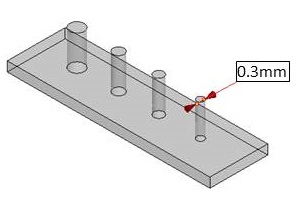
Nets or wires thinner than recommended may break or deform during the peel process.
Hole Diameter ≥0.5mm
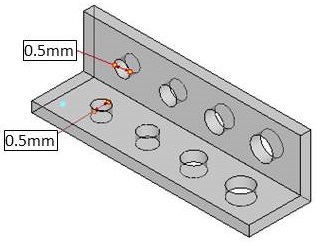
Holes smaller than recommended may trap resin in the object or may close off during printing.
Clearance ≥0.3mm
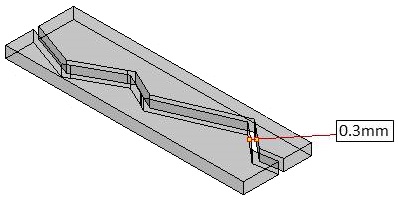
Clearance smaller than recommended may fuse during printing. Moving parts may thus become non-functioning.
Note
» The recommendation is based on the printing result at layer height of 0.025mm.
» Print quality may be affected when printing with a damaged or cloudy resin tank.
» The specs for some features are different for certain resins. Please also follow the design specs in the wiki page for each resin, if available.
Setting
In Setting function, you can adjust the interface language, display units, printer type, printout scaling, light strength tuning and sign in as XYZprinting member.
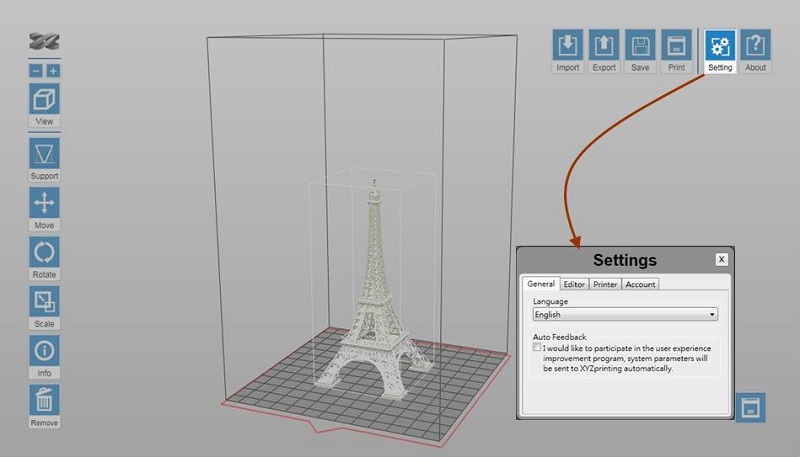
Click on below items to read more information on each setting:
Language
Select the display language of the software.
[collapse]
Display Units
Select the display unit of the workspace. You can change the display unit between cm and inch.
Note
Each grid on the virtual platform illustrates 1 cm² / inch² in the actual size.
[collapse]
Auto Position
When Auto Position is selected, the software will adjust the position of the object while importing the file. The option makes sure that the objects will not overlap each other on the workspace.
When the option is not selected, all objects imported will be placed at the center of the workspace.
[collapse]
Printer Type
The change to Printer Type will be reflected at the size of workspace and options in Export and Print functions. If the Printer Type is changed after any object has been imported, the workspace will be reset.
[collapse]
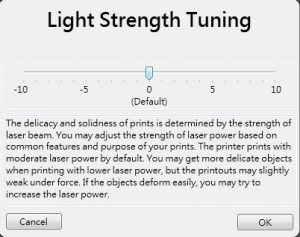
Light Strength Tuning
The delicacy and solidness of prints is determined by the strength of the laser beam. You may adjust the strength of the laser’s power based on common features and purposes of your prints.
The printer prints in moderate laser power by default. You may get more delicate objects when printing with lower laser power, but the printouts may slightly weaken under force. Try post curing the parts in this case. If the objects deform easily, you may try to increase the laser power.
Note
The function is shown only when the printer is connected.
[collapse]
Printout Scaling
To improve the dimensional accuracy of the printer, you may adjust the scale of the X/Y axis with this option. Once adjusted, the setting will be applied to all files processed later on on the same computer.
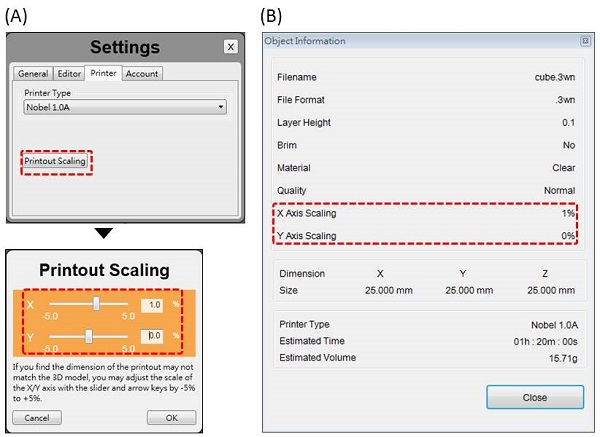
(A)Printout Scaling under Settings. (B) The scaled ratio is included in the “Info” of the file.
[collapse]
Account
Log in your XYZprinting account.
[collapse]
Grey Resin (E2)
Applicable printer: Nobel Superfine
The dark and opaque color shows the details easily. The material is ideal for general purpose prototyping.
Model Design Tips
For the ideal printing result and the complete output of design details, please follow the design specifications here when designing the models.
Instructions for Use
To ensure the performance of the resin, a homogeneous mixture of the resin is required before starting every print job. Please follow below steps closely before start printing.
Before Installing a New Bottle
Follow below instruction to ensure the color uniformity of the resin material:
Tighten the original cap closely, place the bottle upside down for 5 minutes, and shake the bottles for around 5 minutes.
Before Every Print Job
Stir the resin left in the tank before starting every print.
Please note that the surface coating on the bottom of the resin tank may be damaged when contacting with sharp or hard tools. Follow below methods to stir the resin.
Method 1: Stir the resin with a silicon scraper.
Method 2: Wear impervious gloves and stir the resin with fingers.
When the resin is mixed thoroughly, it should look like below image:
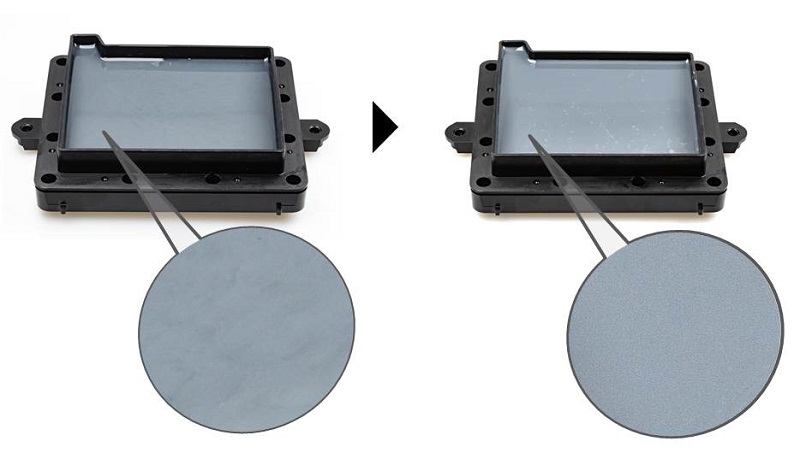
Note » Pay special attention when stirring the resin. Avoid scratching the coating on the bottom of the tank. » Check the resin level in the tank before printing. Fill the resin until the material reaches the "Max" mark on the tank.» If the resin in the bottle has been left used for more than 24 hours, please change to the original cap and overturn the bottle and shake the bottle for approx. 5 minutes respectively before printing.
Preservation of the Uncured Resin
Uncured resin inside of the resin tank should not be exposed to light. If the resin in tank will be left unused for more than 24 hours, store it in a clean container after it is filtered. Avoid sunlight or UV light exposure.

Pour the resin back into the resin tank prior to the next printing.
Note
» Opaque polypropylene containers are recommended for storing the resins.
» Overturn and shake the container of unused resin for approx. 5 minutes before pouring it back to the tank right before the next print.
Recommendation on Finishing
Please refer to the complete guide here for post-processing.
Manual Mode
You can build the supports from scratch with the manual mode, or use it to adjust the supports generated in the Auto mode.
In Auto Mode, all supports are in the same size at the contact points. However, the size of the contact can be set to different based on the features of the object.
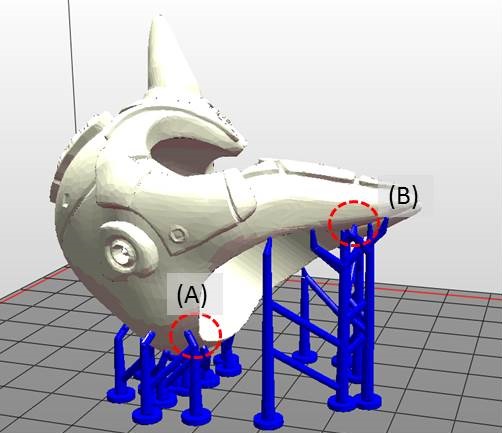
(A) Larger contact may be required for heavy part.
(B) Smaller contact is good enough for holding lighter structure. Also it is easier for post-processing.
To Edit Supports Manually
Step 1: Resize, rotate and/or move the object as the way you want to print it.
However, if you have already generate supports with the Auto Mode, you can only move the object horizontally. Other adjustments to the object will lead to the reset of supports.
Step 2: Setup below settings based on the features of your object.
If supports were added in the Auto Mode, they will be shown as blue dots in the manual editing mode.
To add support, simply select a proper size of the contact point and then click on the model at the overhangs.
To delete support, just click on the support mark (the blue dot).
Step 2: Click “Generate” to finish editing.
Note
» When there is more than one object on the platform, you will need to select one of the model before you can launch the support options.
» If the object is resized, rotated, or moved vertically, the support structure will be reset. Please set up the supports again.