Platform Calibration

Platform calibration ensures the platform is parallel with the resin tank for more stable printing performance. If the platform is not calibrated, objects may fall during printing.
Always perform platform calibration after changing to a new tank or a tank or a platform different the one used for last print.

To ensure the effectiveness of the calibration, you may use the special-designed jig while operation.

About the jig for platform calibration
» Click here to download the stl file and print 2 copies.
» The jigs can be printed with standard resin.

How to calibrate the platform?

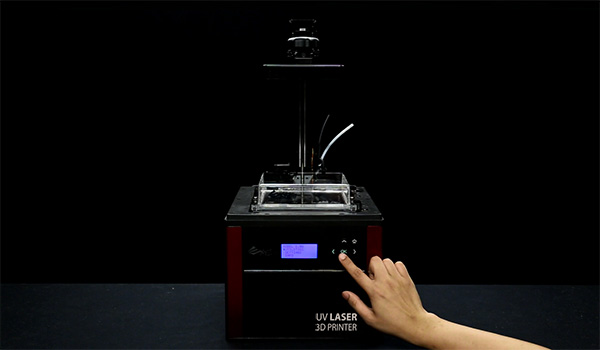
On the printer, select “UTILITIES” > “”HORIZON CALIB” and “Yes”, and press [OK] to begin.

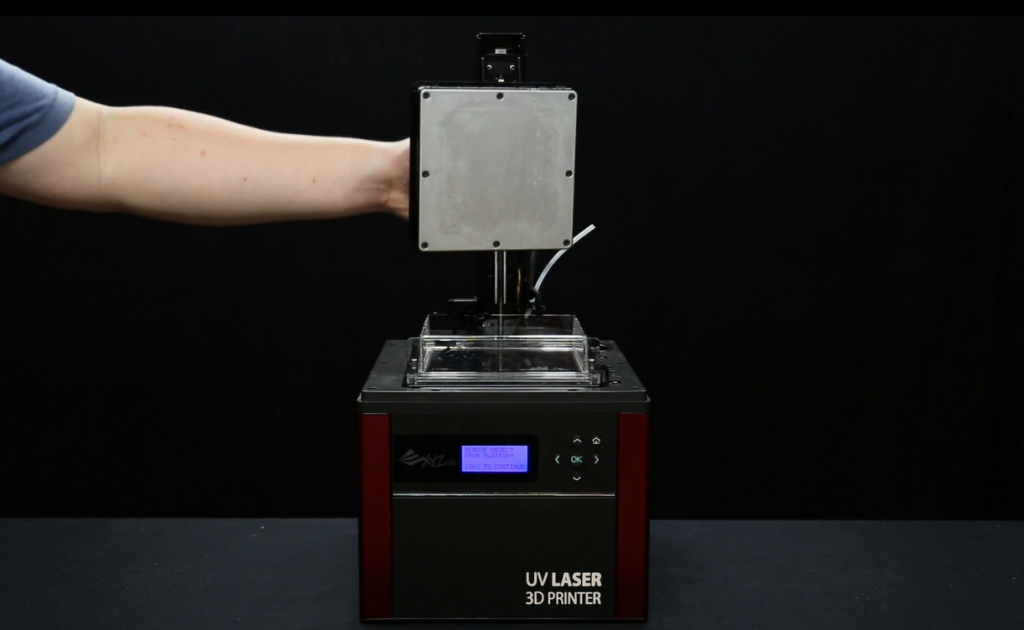
When “REMOVE OBJECT FROM PLATFORM” is displayed, check and remove the residues on the platform or in the tank, if any, and press [OK] to proceed.

Loosen 4 screws by the platform holder, press [OK] and wait until the platform has descended to the bottom.

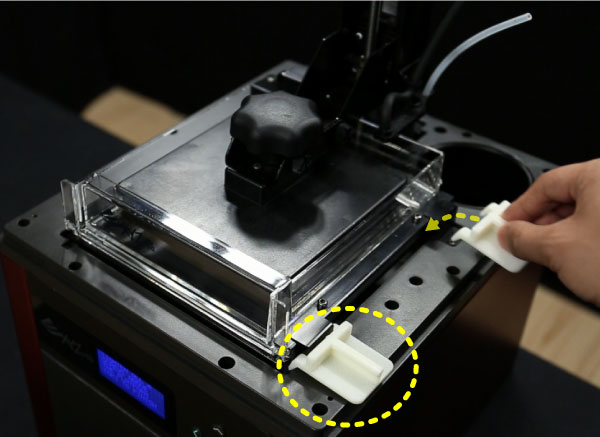
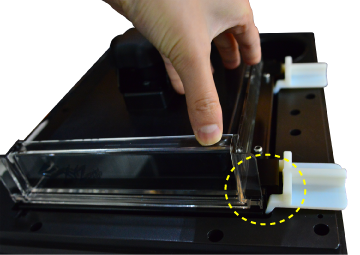
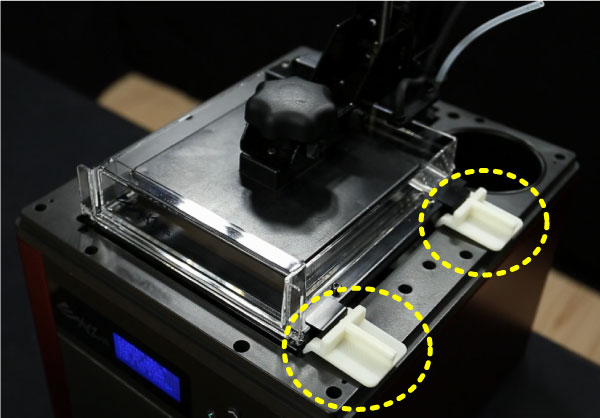
Place the jigs on the right side of the metal frame, at the location as illustrated.

When the jigs are placed correctly, the black frame should stay in place when the right side of the resin tank is pressed down.

Press the platform slightly with both hands.

Hold down one side of the platform while tightening 2 screws on the opposite side, and continue on tightening the screws on the other side.

Note
» To ensure the leveling of the platform, be sure to hold down the platform from the opposite side when tightening the screws.

Finally tighten the screws with a coin or other tools. Be sure to hold down the platform at the same time.

Remove the jigs for calibration, press [OK] on the printer, and the printer is ready for next print.


Tutorial video on platform calibration

Note
If the subtitle is not displayed while playing, press the button "CC" at the bottom of the video to enable to subtitle.

디자인 사양

Nobel 1.0A용 모델 디자인 사양

모델을 디자인할 때 이상적인 프린팅 결과와 디자인 디테일의 완벽한 출력을 위해,아래의 디자인 사양을 따르십시오.design spec

프린팅 재료: XYZprinting Nobel 시리즈 프린터용 범용 수지

색인 특징 권장됨
A 벽 두께 벗겨내는 동안 권장 규격보다 얇은 벽은 틀어지거나 부서질 수 있습니다. ≥0.5mm
B 오버행 각도 각이 권장 한계보다 큰 가파른 오버행의 경우 지지 구조물이 필요합니다. 지지 구조물을 사용하지 않을 경우 오버행이 변형되거나 파손될 수 있습니다. ≥20°
C 최소 수직 와이어 직경 벗겨내는 동안 권장 규격보다 얇은 그물이나 벽은 파손되거나 변형될 수 있습니다. ≥0.3mm
D 구멍 직경 프린팅하는 동안 권장 규격보다 작은 구멍은 수지가 개체안에 들어가있게 되거나 막힐 수 있습니다. ≥1.2mm
E 간격 프린팅하는 동안 권장 규격보다 좁은 간격은 붙어버릴 수 있습니다. 따라서 움직이는 부품이 움직이지 못할 수 있습니다. ≥0.3mm
F 양각 디테일 이와 같이 권장된 높이와 두께보다 작은 디테일은 프린트에서 보이지 않을 수 있습니다. ≥0.1mm
G 음각 디테일 이와 같이 권장된 높이와 두께보다 작은 디테일은 프린트에서 보이지 않을 수 있습니다. ≥0.3mm


참고•권장 규격은 XYZprinting 범용 수지를 0.1mm의 레이어 높이에서 사용했을 때의 프린팅 결과를 기초로 산출했습니다.•탁한 수지 탱크를 이용해서 프린팅할 경우 프린팅 품질이 영향을 받을 수 있습니다.•프린팅된 제품의 경도와 내구성을 높이려면 UV 경화기를 이용해서 출력물을 후경화하십시오.

Standard Resin (A1)

Applicable printer: Nobel 1.0A

Standard resin provides a wide range of applications and moderate rigidity, making it suitable for general design outputs and engineering design prototyping.

Model Design Tips

For the ideal printing result and the complete output of design details, please follow the design specifications here when designing the models.

Recommendation on Finishing

Please refer to the complete guide here for post-processing.

Castable Resin (C1)

Applicable printer: Nobel 1.0A

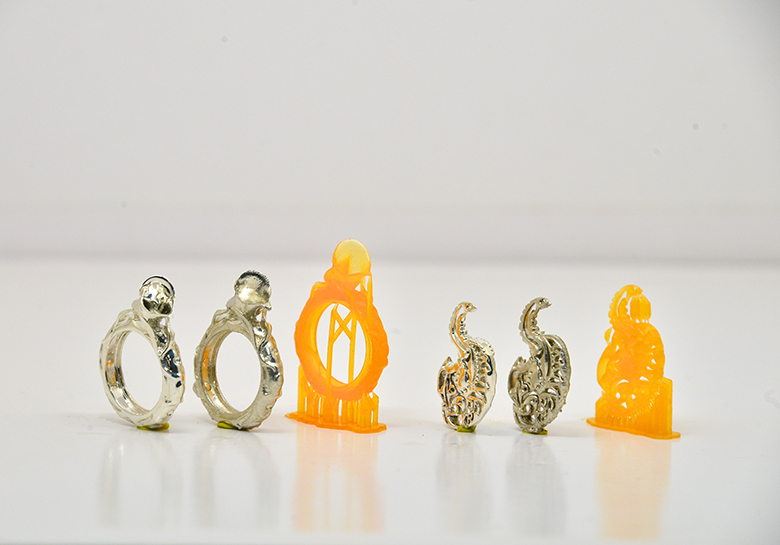
The properties of the castable resin are similar to those of wax. There is no ash residue after it is heated and it is suitable for lost wax casting, saving procedures, i.e. wax carving used in the conventional production process.

Model Design Tips

The properties of the castable resin are similar to those of wax in that both are structurally soft and brittle and the printout can be easily broken due to pulling force during the printing process.

For the ideal printing result and the complete output of design details, please consider the design specifications when designing the models.

» Minimum Vertical-Wire Diameter ≥0.8mm

» For the specs for other features, please follow the general design specs here.

Note
» Larger objects of dimension larger than 60x60x120 mm or a weight exceeding 10g may require more supports to stick to the platform.

Recommendations on Printing Setup

As with the use of the resin for general purpose, when there are overhangs in the model, or when the area of contact with the platform is small, additional support structures are required to ensure that the object can be printed out completely. The printing software XYZware_Nobel has an “automatic support” function, which can be used to analyze the structure of the model and automatically generate bracing structures. Sometimes you may need to use the “manual” mode to add more supports to ensure the adhesion of the object.

Click here for the instructions for support functions.

If printing fails, please change the object’s position and adjust the setup of the angle and the bracing structures.

Recommended Burnout Process for Lost Wax Casting

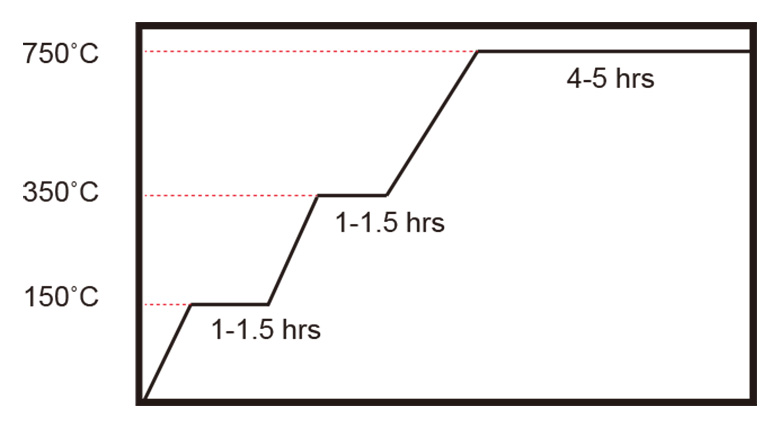
When casting the printouts, you can work based on the temperature control suggestion as described in the following diagram, in order to ensure the complete burning away of the resin and a smooth and unblemished surface of the casting object.
Recommendation on Finishing

Cleaning

After removing the printed object from the platform, please clean it with ethyl alcohol of concentration greater than 95%. During the cleaning process, you are recommended to use a scoop net to hold the printed item and to sway the scoop net in the alcohol in order to clean the resin residue from the surface of the printed item.

Scoop up the printed item from the alcohol after it is cleaned and wait for the alcohol on its surface to evaporate away.

Note
» Because of the brittleness of this resin, do not use a brush to scrub the printed item. Doing so may scratch the surface of the printed item.
» Do not immerse the printed item in alcohol for longer than over 10 minutes, or the alcohol may erode the item's structure and damage the item.
» It is normal for there to be fading after the printed item is immersed in alcohol. The fading will not affect the result of the casting.

Air-Dry the Alcohol on the Surface

There will be alcohol residue on the surface of the printed item after it is washed.Please keep the printed item still after it is washed and do not perform post-curing until you have confirmed that the alcohol has completely volatilized. After the alcohol has air-dried, please check carefully whether there is any resin residue in the features. Please make sure to remove the uncured resin to prevent it from blocking the design details of the original model.

Note
» If curing is performed when alcohol residue is still present on the surface of the printed item, the surface of the printed item will appear white and misty, possibly affecting the result of casting.
Tip
» The color of the printed item will fade slightly after the item is immersed in alcohol. After the alcohol has air-dried, the item will return to its original light orange color. Consequently, you can use the color of the printed item to determine whether the alcohol has air-dried.

Removing the Support

Please use tools to cut off the support instead of pulling directly (pulling can easily damage the item’s surface).

Post-Curing

The printed item produced from the castable resin must post cured using UV light to ensure the hardness for the lost wax casting.

Click here to read the curing profile for using XYZprinting UV Curing Chamber (Model: 3UD10).

Preservation of the Uncured Resin

Uncured resin inside of the resin tank should not be exposed to light. The uncured resin can be stored in an opaque container after it is filtered. Pour the resin back into the resin tank prior to the next printing.

Note
» Opaque polypropylene containers are recommended for storing the resins.
Flexible Resin (B1)

Applicable printer: Nobel 1.0A

Due to the flexible resins being softer compared to general purpose acrylic resins, the material’s characteristics enrich of the application of stereo-lithography printing technology. When printing thin structures, the product can be easily bent, while thick structures are flexible, compressible and vibration resistant.

Model Design Tips

The resin is softer and flexible, which causes it to be prone to deformation and breaking due to the peeling force during printing. The thinner and higher structure, the easier it is affected. Please follow the design tips below for optimized printing.

» Vertical-Wire Diameter ≧ 0.6mm

» Overall height ≦ 100mm

» Horizontal overhang structure length < 10mm (adding support structures may improve the stability of the structure)

» For the specs for other features, please follow the general design specs here.

Recommendations on Printing Setup

Use the “Rotate” function to turn directions, situating the solid structure’s center of gravity on the base of the platform.

Choose “Mid” or “High” for support density and “Mid” or “Large” for the size of the contact point of the support, since the support structures of low density and small contact are prone to deformation and breaking while being printed.

Recommendation on Finishing

Removing the prints from the platform

Printouts of flexible resins are fragile. Carefully retrieve the printout by scraping it off gently.

Note
» The thin brim is prone to breaking when being scraped off from the platform. 
» Make sure to remove all residual structures on the platform to avoid affecting the next printing.

Cleaning

Same as cleaning general purpose resin printed items, immerse the item in 95% concentration alcohol and gently brush the surface of the item for 10 minutes with a soft brush (alternatively, use a ultrasonic cleaner), and remove the printed item after rinsing and allow the alcohol on the surface to evaporate completely.

Note
» Do not immerse the printed item in alcohol for over 10 minutes to avoid the alcohol from eroding the item's surface structure and damaging the item.
Tip
» Prior to cleaning, use a soft cloth to wipe off the uncured resin on the surface to allow for easier cleaning.

Post-Curing

To reduce the stickiness on the surface of the flexible resin printed item, post-cure the item with UV curing equipment after completely cleaning the surface of the item with alcohol.

Click here to read the curing profile for using XYZprinting UV Curing Chamber (Model: 3UD10).

Note
» The flexible resin will harden after exposure to UV light; make sure to avoid over curing to UV light.

Preservation of the Uncured Resin

Uncured resin inside of the resin tank should not be exposed to light. The uncured resin can be stored in an opaque container after it is filtered. Pour the resin back into the resin tank prior to the next printing.

Note
» Opaque polypropylene containers are recommended for storing the resins.