Profilo di post-essiccazione

L’oggetto stampato in resina deve essere post-essiccato per garantire che il materiale sia completamente polimerizzato per ottenere le migliori proprietà del materiale. Questo è particolarmente importante per le resine funzionali, quali resine colabili e resine ingegneristiche.

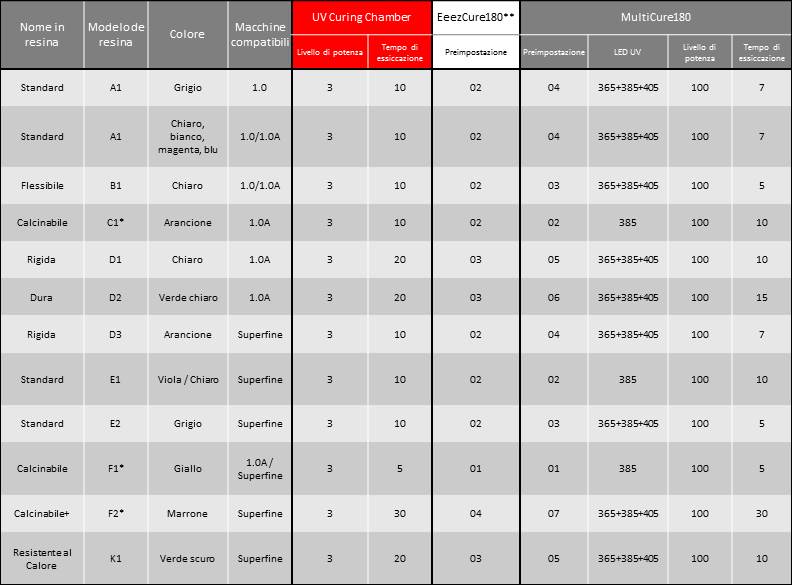
Quando si utilizza la Camera di essiccazione UV XYZprinting per le resine di XYZprinting, seguire il profilo di essiccazione seguente per la post-elaborazione:


Nota 
*Eseguire la post-essiccazione delle stampe in resina colabile in acqua per le migliori performance.

** I parametri di essiccazione sono uguali per EeezCure180 e la camera di essiccazione UV. Quando si utilizza EeezCure180, per applicare le impostazioni di essiccazione suggerite è sufficiente commutare semplicemente fra le varie preimpostazioni.

Suggerimenti sul design del modello

Stampante compatibile: Nobel 1.0A

Per ottenere il risultato di stampa ottimale e la riproduzione completa di tutti i dettagli del progetto, si prega di seguire, per la progettazione dei modelli, le istruzioni fornite qui di seguito.

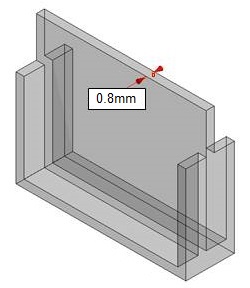
Spessore parete ≥ 0,8mm

Pareti più sottili del valore raccomandato potrebbero deformarsi o spezzarsi durante il processo di distacco.

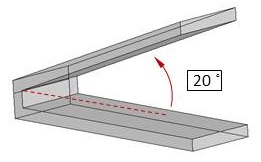
Angolo parti sporgenti ≥20°

Per le strutture sporgenti con un angolo di inclinazione superiore ai limiti raccomandati sono necessarie strutture di supporto. In caso contrario la struttura sporgente potrebbe deformarsi o spezzarsi.

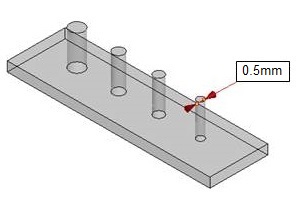
Diametro minimo filo verticale ≥0,5mm

Reti o fili più sottili del valore raccomandato potrebbero deformarsi o spezzarsi durante il processo di distacco.

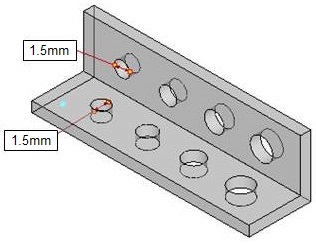
Diametro foro ≥1,5mm

Fori più piccoli di quanto raccomandato potrebbero trattenere resina nell’oggetto o chiudersi durante la stampa.

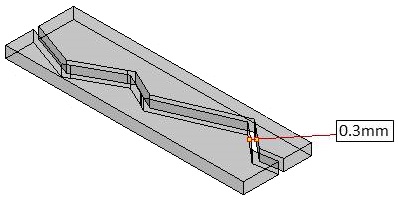
Spazio vuoto ≥0,4mm

Spazi vuoti di dimensioni inferiori al valore raccomandato potrebbero fondere e chiudersi durante la stampa. In tal modo le parti mobili potrebbero non funzionare.

Nota
» La raccomandazione si basa sul risultato di stampa con altezza strato di 0,1 mm.
» Evitare di graffiare il fondo del serbatoio con uno strumento appuntito. Il rivestimento potrebbe danneggiarsi. La superficie del serbatoio danneggiata può influire sulla qualità di stampa.
» Le specifiche per alcune funzionalità sono differenti per determinate resine. Seguire anche le specifiche di design nella pagina wiki per ciascuna resina, se disponibili.

Suggerimenti sul design del modello

Stampante compatibile: Nobel Superfine

Per ottenere il risultato di stampa ottimale e la riproduzione completa di tutti i dettagli del progetto, si prega di seguire, per la progettazione dei modelli, le istruzioni fornite qui di seguito.

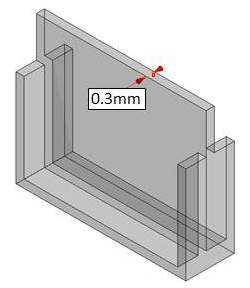
Spessore parete ≥ 0,3mm

Pareti più sottili del valore raccomandato potrebbero deformarsi o spezzarsi durante il processo di distacco.

Angolo parti sporgenti ≥20°

Per le strutture sporgenti con un angolo di inclinazione superiore ai limiti raccomandati sono necessarie strutture di supporto. In caso contrario la struttura sporgente potrebbe deformarsi o spezzarsi.

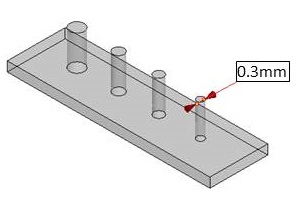
Diametro minimo filo verticale ≥0,3mm

Reti o fili più sottili del valore raccomandato potrebbero deformarsi o spezzarsi durante il processo di distacco.

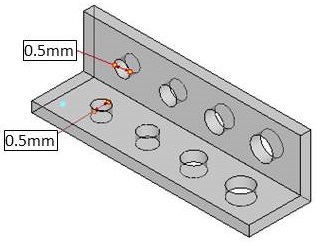
Diametro foro ≥0,5mm

Fori più piccoli di quanto raccomandato potrebbero trattenere resina nell’oggetto o chiudersi durante la stampa.

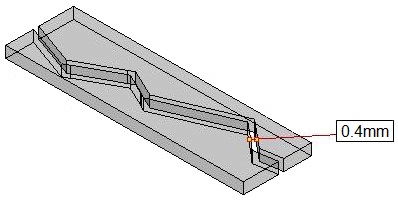
Spazio vuoto ≥0,3mm

Spazi vuoti di dimensioni inferiori al valore raccomandato potrebbero fondere e chiudersi durante la stampa. In tal modo le parti mobili potrebbero non funzionare.

Nota
» La raccomandazione si basa sul risultato di stampa con altezza strato di 0,025 mm.
» Evitare di graffiare il fondo del serbatoio con uno strumento appuntito. Il rivestimento potrebbe danneggiarsi. La superficie del serbatoio danneggiata può influire sulla qualità di stampa.

Resina standard (E1)

Stampante compatibile: Nobel Superfine
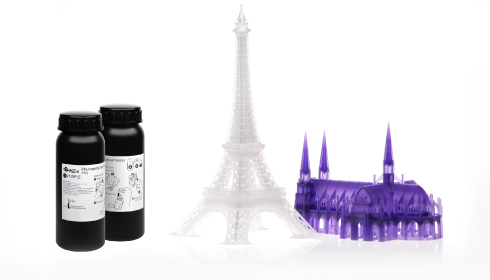
Modelo de resina: E1 (Colore: Viola, Trasparente)

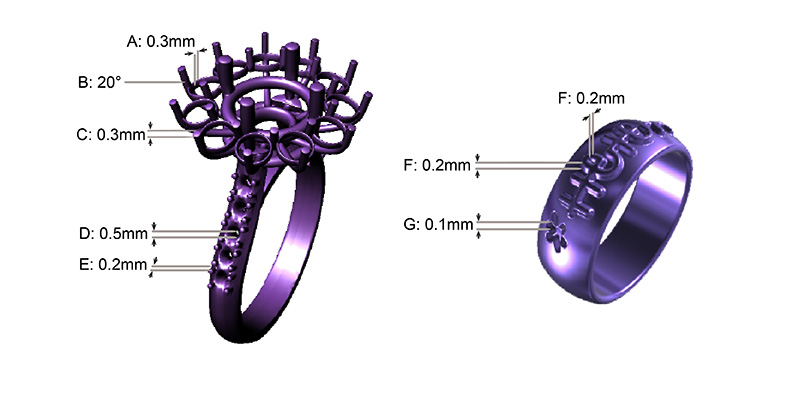
Per ottenere il risultato di stampa ottimale e la riproduzione completa di tutti i dettagli del progetto, si prega di seguire, per la progettazione dei modelli, le istruzioni fornite qui di seguito.

# Caratteristiche Raccomandazione
A Spessore parete Pareti più sottili del valore raccomandato potrebbero deformarsi o spezzarsi durante il processo di distacco. ≥0,3mm
B Angolo parti sporgenti Per le strutture sporgenti con un angolo di inclinazione superiore ai limiti raccomandati sono necessarie strutture di supporto. In caso contrario la struttura sporgente potrebbe deformarsi o spezzarsi. ≥20°
C Diametro minimo filo verticale Reti o fili più sottili del valore raccomandato potrebbero deformarsi o spezzarsi durante il processo di distacco. ≥0,3mm
D Diametro foro Fori più piccoli di quanto raccomandato potrebbero trattenere resina nell’oggetto o chiudersi durante la stampa. ≥0,5mm
E Spazio vuoto Spazi vuoti di dimensioni inferiori al valore raccomandato potrebbero fondere e chiudersi durante la stampa. In tal modo le parti mobili potrebbero non funzionare. ≥0,2mm
F Dettaglio in rilievo Dettagli di questo tipo con altezza e spessore inferiore al valore raccomandato potrebbero non risultare visibili sulla stampa. ≥0,2mm
G Dettaglio inciso Dettagli di questo tipo con altezza e spessore inferiore al valore raccomandato potrebbero non risultare visibili sulla stampa. ≥0,1mm
Nota
» I valori raccomandati sono riferiti a risultati di stampa con resina universale XYZprinting e un'altezza dello strato di 0,025 mm.
» La qualità di stampa potrebbe risultare alterata se si stampa con un serbatoio di resina appannato.
» Si prega di essiccare le stampe in camere di essiccazione UV per aumentare la durezza e la robustezza dei prodotti stampati.

Resina Calcinabile (F1)

Stampante compatibile: Nobel Superfine
Modelo de resina: F1

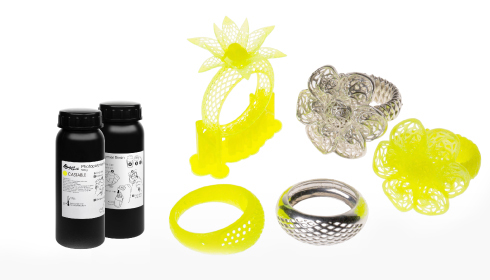
Le proprietà della resina calcinabile sono simili a quelli della cera. Non rimane alcun residuo di cenere una volta riscaldata ed è adatta per fusione a cera persa, procedure di risparmio, ovvero modellazione della cera usata nel processo di produzione convenzionale.

Suggerimenti sul design del modello

Le proprietà della resina calcinabile sono simili a quelle della cera, in quanto entrambi sono strutturalmente morbide e fragili e la stampa può rompersi facilmente a causa della forza di trazione durante il processo di stampa. Seguire i suggerimenti di design di seguito per una stampa ottimizzata.

» Spessore parete ≥0,4mm

» Diametro foro ≥1,0mm

» Spazio vuoto ≥0,4mm

» Per le specifiche relative ad altre funzionalità, seguire le specifiche di progettazione generali qui.

Nota
» I valori raccomandati sono riferiti a risultati di stampa con resina calcinabile e un'altezza dello strato di 0,025 mm.
» Gli oggetti grandi di dimensioni superiori a 40x30x40 mm o un peso superiore a 6 g potrebbero richiedere un ulteriore supporto per aderire alla piattaforma.
» Evitare di graffiare il fondo del serbatoio con uno strumento appuntito. Il rivestimento potrebbe danneggiarsi. La superficie del serbatoio danneggiata può influire sulla qualità di stampa.

Consigli sulle impostazioni di stampa

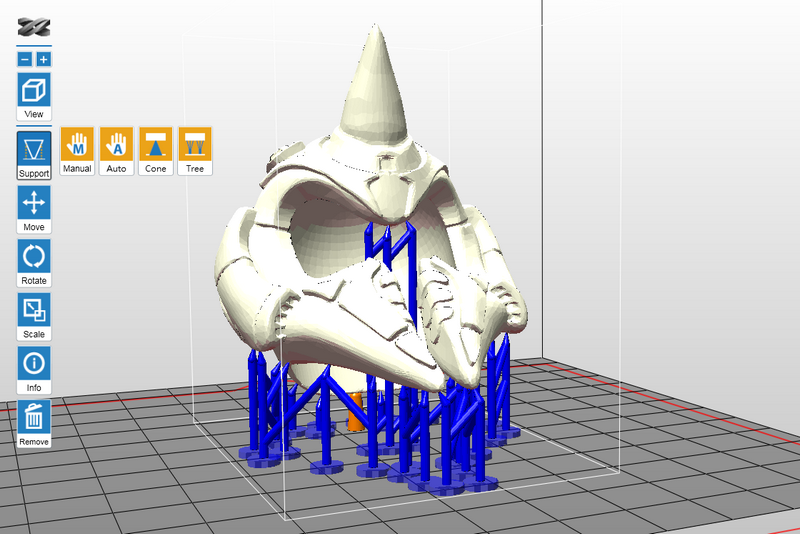
Come per l’uso della resina per scopi generici, quando vi sono sporgenze nel modello o quando l’area di contatto con la piattaforma è ridotta, sono necessarie delle strutture di supporto aggiuntive per assicurarsi che l’oggetto possa essere stampato completamente.

Il software di stampa XYZware_Nobel dispone di una funzione di “supporto automatico”, che può essere utilizzata per analizzare la struttura del modello e generare automaticamente le strutture controventate. A volte potrebbe essere necessario utilizzare la modalità “manuale” per aggiungere più supporti e garantire l’adesione dell’oggetto.

Fare clic qui per le istruzioni per le funzioni di supporto.

In caso di errore di stampa, modificare la posizione dell’oggetto e regolare l’impostazione dell’angolo e delle strutture controventate.

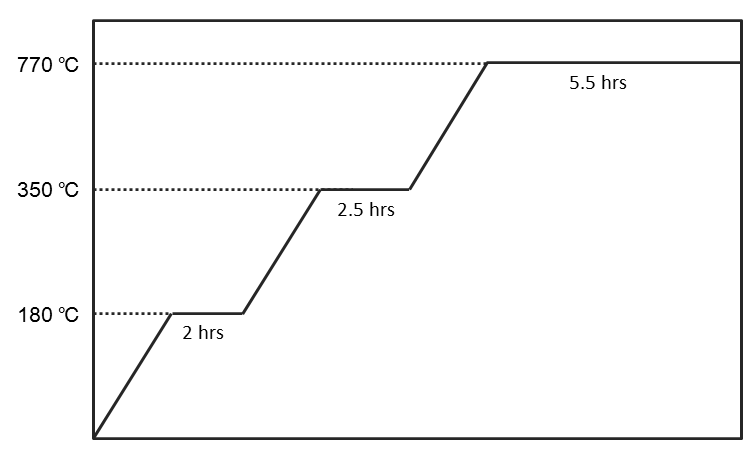
Processo di calcinazione consigliato

Quando si esegue la fusione delle stampe, si può lavorare in base ai suggerimenti di controllo della temperatura, come descritto nel seguente schema, in modo da garantire la combustione completa della resina e una superficie liscia e senza difetti dell’oggetto di fusione.
Consigli sulla finitura

Pulizia

Dopo aver rimosso l’oggetto stampato dalla piattaforma, pulirlo con alcool etilico in una concentrazione superiore al 75%. Durante il processo di pulizia, si consiglia di utilizzare una rete per tenere l’elemento stampato e immergere la rete nell’alcool per pulire il residuo di resina dalla superficie dell’elemento stampato.
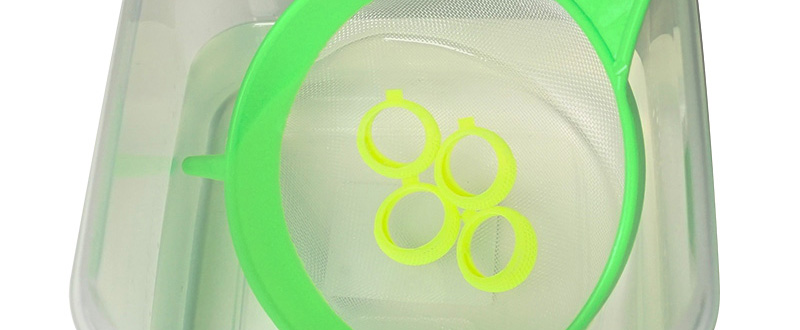
Spruzzare alcol sulle strutture dettagliate con uno spray per eliminare la resina non polimerizzata.

Rimuovere l’elemento stampato dall’alcool una volta pulito e attendere che l’alcool presente sulla superficie evapori.

Nota 
» A causa della fragilità di questa resina, non utilizzare una spazzola per pulire l'elemento stampato. Si potrebbe graffiare la superficie dell'elemento stampato. 
» Non immergere l'elemento stampato nell'alcool per oltre 10 minuti, in quanto l'alcool potrebbe erodere la struttura dell'elemento, danneggiandolo.
» È normale che si verifichi dissolvenza dopo che l'elemento stampato viene immerso nell'alcool. La dissolvenza non influisce sul risultato della fusione.

Lasciare asciugare all’aperto l’alcool sulla superficie

Vi saranno residui alcool sulla superficie dell’elemento stampato una volta lavato.
Continuare a tenere l’elemento stampato dopo che è stato lavato e non eseguire la post-polimerizzazione finché non si verifica che l’alcool si è completamente volatilizzato. Dopo l’alcool si asciuga all’aperto, verificare attentamente che non vi sia alcun residuo di resina nelle caratteristiche. Assicurarsi di rimuovere la resina non polimerizzata per evitare che si ostruiscano i dettagli di design del modello originale.

Nota 
» Se la polimerizzazione viene eseguita quando sono ancora presenti residui di alcool sulla superficie dell'elemento stampato, la superficie appare bianca e nebulosa, influendo sul risultato della fusione. 

Rimozione del supporto

Utilizzare strumenti per tagliare il supporto piuttosto che tirando direttamente (tirando si può facilmente danneggiare la superficie dell’elemento).

Post-polimerizzazione

L’elemento stampato prodotto dalla resina calcinabile deve essere sottoposto a post-polimerizzazione tramite luce UV per garantire la durezza per la fusione a cera persa.
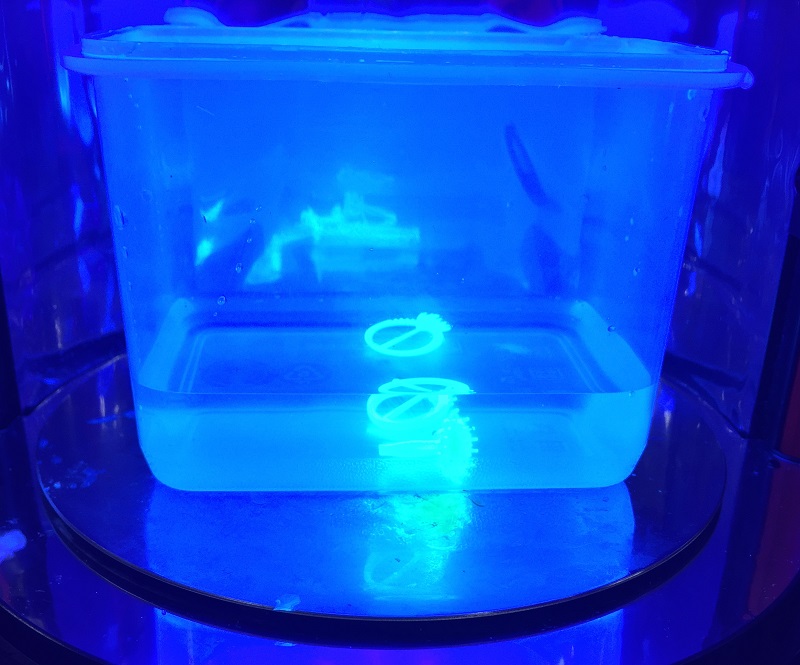
Per proprietà del materiale ottimali, eseguire la post-polimerizzazione UV delle parti stampate in acqua per 5 minuti.

Consiglio
» Quando si usa la camera di polimerizzazione UV XYZprinting, eseguire la post-polimerizzazione delle parti stampate in acqua per 5 minuti.
» In condizioni di lunghezza d'onda UV a 375~405 nm e intensità di radiazione di 14mW/cm²,quando lo spessore della struttura dell'oggetto supera 7 mm, si consiglia di eseguire la post-polimerizzazione dell'oggetto per 10 minuti.

Conservazione della resina non polimerizzata

La resina non polimerizzata all’interno del serbatoio di resina non deve essere esposta alla luce. La resina non polimerizzata può essere conservata in un contenitore opaco una volta filtrata. Versare di nuovo la resina nel serbatoio prima della successiva stampa.
Nobel 1.0 - Modalità Aperta

Impostazione Modalità Aperta

Per accedere alla Modalità Aperta:

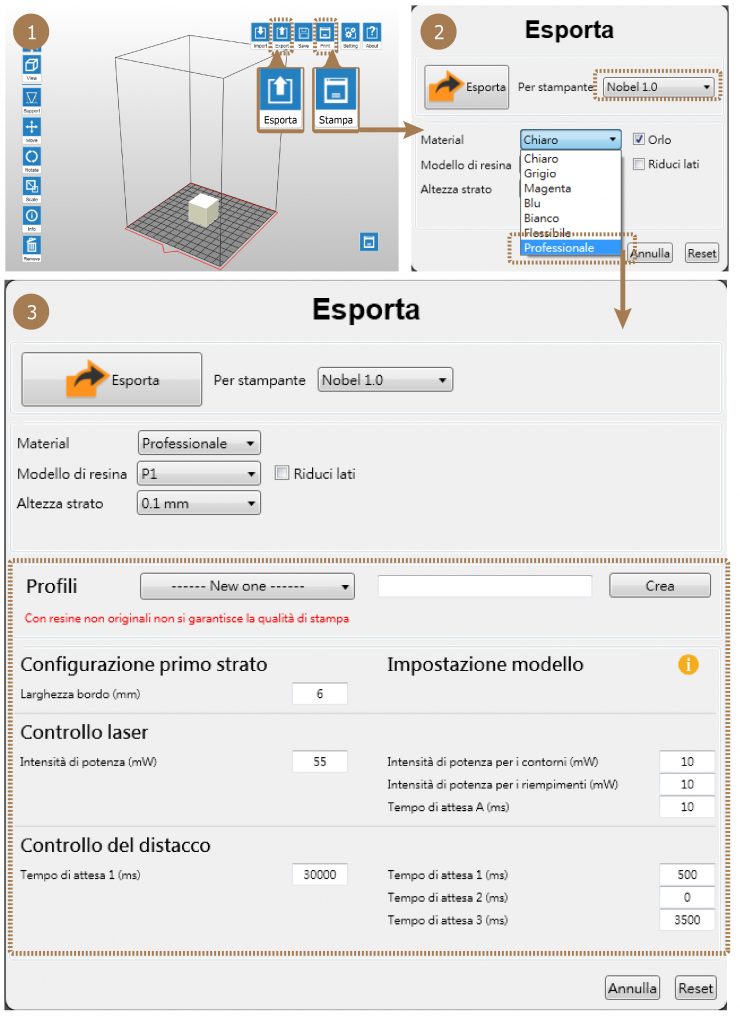
Selezionare “Esporta” o “Stampa”, quindi selezionare “Professionale” in “Materiale”.

Nota
Con resine non originali non si garantisce la qualità di stampa.
La funzione di riempimento automatico verrà disabilitata quando si utilizza una resina non originale. Se si utilizza una resina XYZprinting, selezionare le opzioni opportune per i materiali XYZprinting.

Processo di stampa

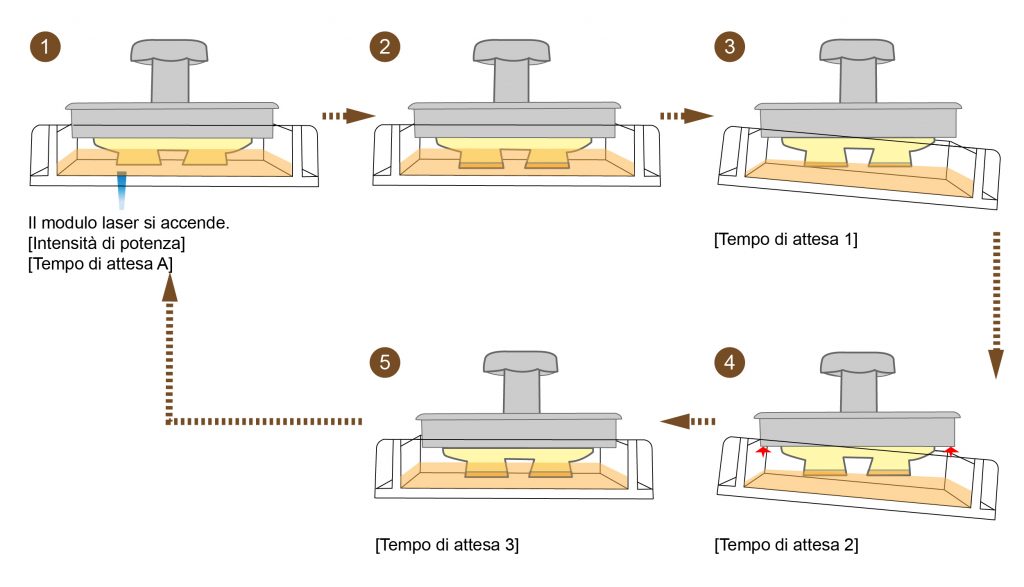
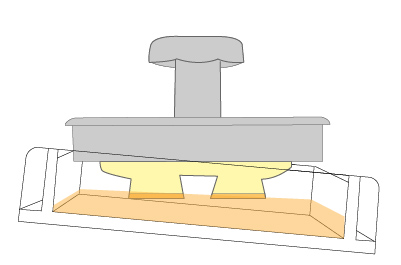
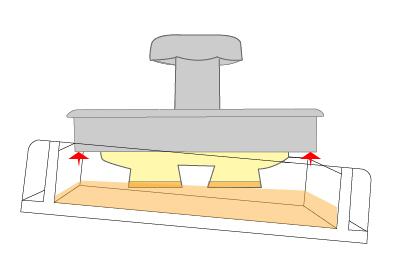
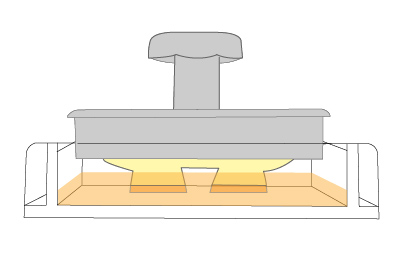
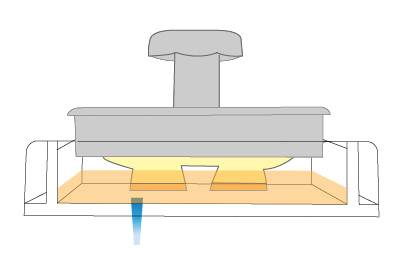
Il processo di stampa di Nobel 1.0 si svolge nel modo illustrato. A seguire è fornito l’elenco dei parametri regolabili in ogni stadio per la stampa con resina di terzi.

Parametri regolabili in ogni stadio

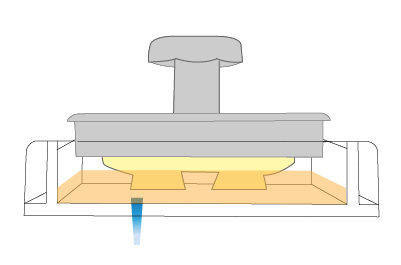
1. Il modulo laser si accende in base alle impostazioni del controllo laser:

Intensità di potenza

L’articolo controlla l’intensità di potenza del raggio laser.
Intervallo: 0 – 72 mW

Nota
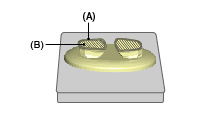
È possibile impostare una diversa intensità di potenza per l'essiccazione dei contorni e dei riempimenti del modello.

(A) i contorni
(B) i riempimenti
Tempo di attesa A

Il raggio laser si spegne per il periodo di tempo specificato quando si passa da una sezione all’altra dello stesso strato.
Intervallo: 10 – 15 ms

2. Il raggio laser si spegne dopo il tracciamento dell’intero strato.

3. Il serbatoio si inclina per staccare lo strato essiccato dalla superficie del rivestimento e attende.

Tempo di attesa 1

Il serbatoio si inclina e la stampante attende il tempo specificato finché la resina non è completamente polimerizzata.
Intervallo: 0 – 65535 ms

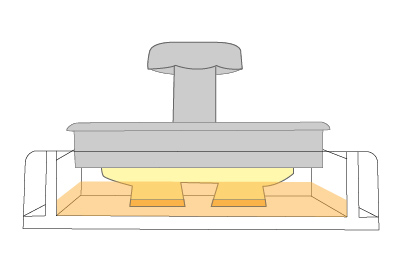
4. La piattaforma si sposta verso l’alto per l’altezza dello strato impostata e attende.

Tempo di attesa 2

La piattaforma si sposta verso l’alto e la stampante attende il tempo specificato finché la resina non si è raffreddata.
Intervallo: 0 – 65535 ms

5.  Il serbatoio si resetta e attende.

Tempo di attesa 3

Il serbatoio si resetta e la stampante attende il tempo specificato finché la resina non ha smesso di fluire.
Intervallo: 0 – 65535 ms

6. Il modulo laser si accende per essiccare lo strato successivo.

Best Practice

To ensure the printing quality, check the following items before printing.

Filter the resin in tank

Sift any residue or cured debris from the platform and tank with the scraper, high-density filter or other tools. Resin can be reused after filtering.

Note
Filter the resin after every prints may ensure the stability of printing. 
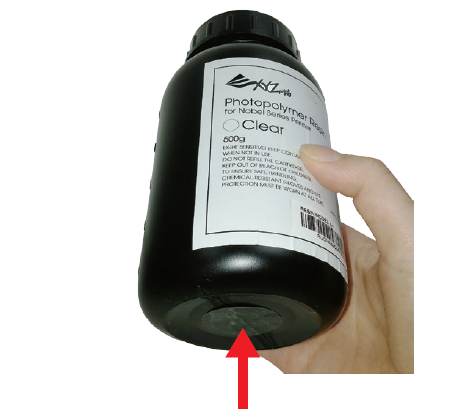
Resin resided in the black filling tube may drip on the printer case. Please cover the opening of the tube with paper towel before removing the tank.

Clean the tank bottom

Mop the fingerprint or resin under the tank or on the glass with with lint-free cloth dampened with alcohol.

Clean the level sensor

Brush the level sensor with alcohol if it gets stuck.
Level sensor should return to the original position after a soft push. When the tank is full or the resin gets sticky, the sensor’s movement may be hindered greatly. Normally, it may take 1 minute for sensor to return. If stuck, remove the remaining resin from tank before cleaning. If resin in tank is cured, please replace the tank.

Platform calibration

Re-calibrate the platform after changing the platform or the tank. Make sure that the platform is paralleled with the tank.
Please note that platform calibration should be done with an empty tank.

Avoid cloudy area

Check if the tank is cloudy at where you place the model. Move the model away from the cloudy area in the software with the “Move” function. Replace the tank if the overall surface is cloudy.

Note
The placement on the virtual platform in the software is opposite to the actual placement in the tank. For models placed at the right side of the virtual
platform, they will be built on the left side of the tank.
Printing at the left side of the tank (right side on the virtual platform) will be less affected by the peeling force during build process.

Check for optimized setup

Optimize the placement and the support structure of the model with the ”Rotate”, “Support” and “Brim”functions in the software.

Rotate

For models of top-heavy structure, with less contact with the platform, or with any larger solid layer, please rotate the model to reduce the effect of peeling force during build process.

Support

For models of top-heavy structure, with overhanging parts or with less contact with the platform after rotated, please add support structures.

Tips
For larger overhanging parts, please choose the support structure with higher density and larger contact point.

Brim

One of the keys to successful printing on the bottom up type SL printer is to ensure the adhesion of the model to the platform. If rotating the model doesn’t increase the contact between the models and the platform greatly, please check “Brim” while exporting or printing the file. Also add “support” if necessary.

Avoid non-manifold geometry

For models with non-manifold geometry (black-highlighted in the software), please repair the models before printing.

Post-Processing

Post processing to printouts may be required

Remove Support Structure

Use pliers or other tools to remove the support structure from the cleaned prints to ensure perfect finish.

Empty Uncured Resin Inside the Prints

Hollow prints with uncured resin inside may break as time passes. To ensure the durability of hollow prints, leave a weep hole at the bottom of your 3D design, so you can empty the uncured resin easily.

Post-cure Prints for Optimal Results

The post-curing process maximizes the mechanical properties of resin-printed objects. It ensures the stable performance of functional resins and successful burnout of castable material. It’s essential for professionals such as dentists or jewelers. Post-cure with XYZprinting UV Curing Chamber is easy. Refer to the curing profile here.

Risoluzione dei problemi

When an error occurs, please refer to the service code on the printer and/or in the software, and check the suggestion below for troubleshooting.

If any error persists, please contact customer service center for support.


Error Code 1000

Cause: Vibration generator movement abnormalities or tank sensor malfunctioned.

Suggestion:

Contact customer service center directly

[collapse]
Error Code 1001

Cause: Z axis motor upward movement abnormalities or Z axis top sensor malfunctioned.

Suggestion:

Select “INFO”>”SENSOR STATUS” on the printer, touch Z axis top sensor, and see if the status of “Z-T” switches from 0 to 1.

If the value doesn’t switch accordingly, then the sensor is malfunctioning. Then select “UTILITIES”>”MOVE PLATFORM”>”TO TOP” to raise the . If the platform doesn’t rise accordingly, then the motor is malfunctioning.
Contact the service center after you have checked the status of the printer.

[collapse]
Error Code 1002

Cause: Z axis motor downward movement abnormalities or Z axis bottom sensor malfunctioned.

Suggestion:

Select “INFO”>”SENSOR STATUS” on the printer, touch Z axis bottom sensor, and see if the status of “Z-B” switches from 0 to 1.

If the value doesn’t switch accordingly, then the sensor is malfunctioning. Then select “UTILITIES”>”MOVE PLATFORM”>”TO BOTTOM” to descend the platform. If the platform doesn’t descend accordingly, then the motor is malfunctioning.

Contact the service center after you have checked the status of the printer.

[collapse]
Error Code 1003

Cause: NFC tag reader malfunctioned.

Suggestion:

Contact customer service center directly.

[collapse]
Error Code 1004, 1006, 1007, 1008

Cause: Engine board malfunctioned.

Suggestion:

Contact customer service center directly.

[collapse]
Error Code 1005

Cause: Y axis movement problem.

Suggestion:

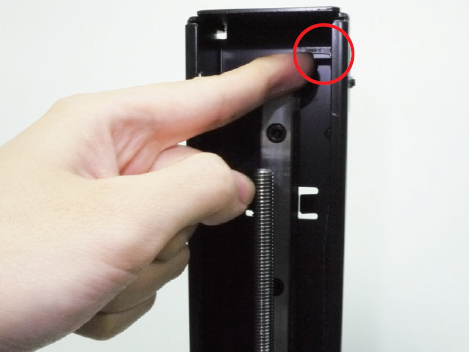
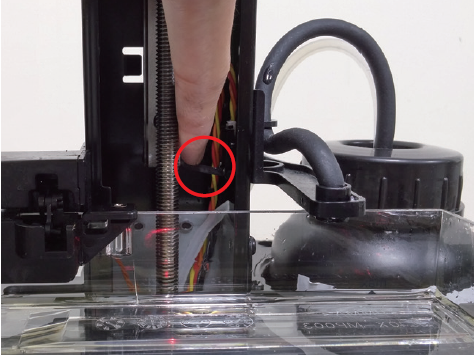
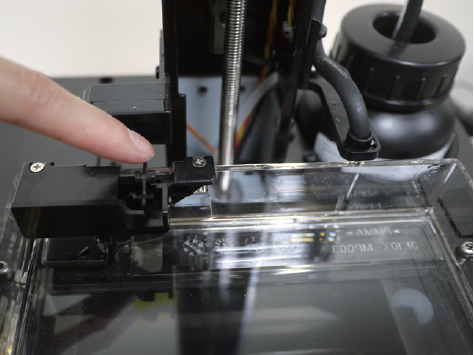
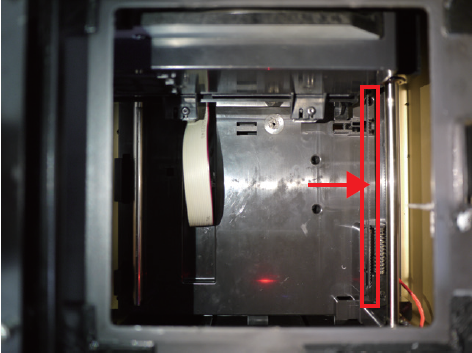
Remove the resin tank, release 3 latches by the glass and remove the glass. If you find any object falls inside the printing chamber and blocks the movement of the printing module, please remove it. If you find the belt is broken, please contact the service center.

Y-axis belt

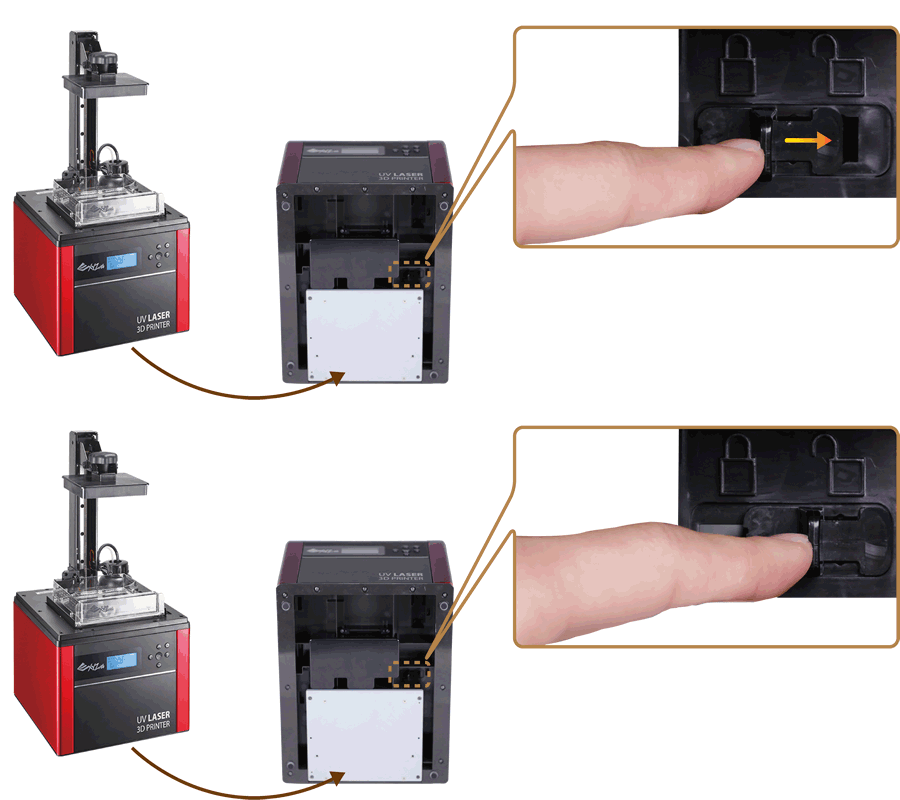
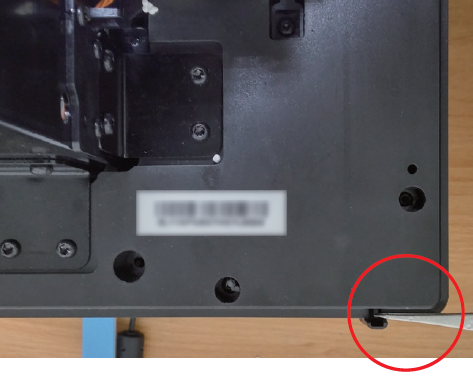
Please also check if the printing module lock at the bottom of the printer has been released.

[collapse]
Error Code 1009

Cause: WIFI module malfunctioned.

Suggestion:

Contact customer service center directly.

[collapse]
Error Code 100A

Cause: Z axis motor malfunctioned.

Suggestion:

Turn off the printer and confirm if the printing platform and the resin tank are installed correctly. If the error still occurs, contact customer service center.

[collapse]
Error Code 100C, 100D, 100C

Cause: Internal error.

Suggestion:

Contact customer service center directly.

[collapse]
Error Code 1020

Cause: Printer not found.

Suggestion:

Make sure printer is powered on, and connected to PC correctly. If the error persists, please try to restart your PC or refer to FAQ on XYZprinting website.

[collapse]
Error Code 1021

Cause: XYZware_Nobel slicer not found.

Suggestion:

Reinstall XYZware_Nobel.

[collapse]
Error Code 1022

Cause: Transmission failed.

Suggestion:

Make sure the USB wire is securely connected to the printer. Do not remove the wire before data transmission is completed.

[collapse]
Error Code 1023

Cause: Insufficient memory to load file(s).

Suggestion:

Increase system memory to 4G RAM and 1G graphics RAM or above. Leave some prints for next task if you are printing several models.
For better performance, it is recommended to run the program on 64-bit operating system.

[collapse]
Error Code 1024

Cause: XYZware_Nobel runtime error.

Suggestion:

Restart XYZware_Nobel.

[collapse]
Error Code 1025

Cause: Unable to save the file.

Suggestion:

Please check if there is enough space on the selected disk/device. Delete some files and try again. If you are saving the file to external device, make sure that the device is securely connected.

[collapse]
Error Code 1026

Cause: Non-manifold issue is found in the file.

Suggestion:

Repair the file with 3D model repairing software (such as netfabb or MakePrintable) and slice the model with XYZware_Nobel again.

[collapse]
Error Code 2000

Cause: Resin filling timeout.

Suggestion:

If the resin bottle is not empty, and the NFC tag matches the cartridge, first check if the nozzle cap is securely closed. Then check if the tank level sensor is functioning. Select “INFO”>”SENSOR STATUS”, and touch the tank level sensor. If the value doesn’t switch from 1 to 0 after “L”, the sensor is not working.


Then tap the floater to see if it moves smoothly.
If the sensor gets stuck, clean the sensor by following the cleanup procedure.
Also check the status of the filling pump. Disconnect the transparent filling tube, and select “UTILITIES”>”INSTALL RESIN”. If you don’t feel air releasing from the tube, then the pump is malfunctioning.
Contact the service center after you have checked the status of the printer.

[collapse]
Error Code 2001

Cause: Resin bottle not found.

Suggestion:

Make sure resin bottle is placed correctly and NFC tag is in place under the bottle.

If the NFC label is missing, please contact customer service center.

[collapse]
Error Code 2002

Cause: UV laser module not calibrated.

Suggestion:

Contact customer service center directly.

[collapse]
Error Code 2003

Cause: Resin bottle empty.

Suggestion:

Resin bottle is empty is based on the the reading from the NFC tag. Select “INFO”>”RESIN STATUS” to check resin level. When “REMAINING” is shown as “0%”, then the resin bottle should be empty. Please install another XYZprinting resin bottle before printing.

[collapse]
Error Code 2004

Cause: Lid not covered during printing.

Suggestion:

Place the lid on the printer before printing. If the lid is placed correctly, please remove the lid, select “INFO”>”SENSOR STATUS”, tap the lid sensor and see if the status of “C” switches from 0 to 1.

If the value doesn’t switch accordingly, then the sensor is malfunctioning.

Contact the service center after you have checked the status of the printer.

[collapse]
Error Code 2005

Cause: Unrecognized resin tag.

Suggestion:

Check the record of the resin bottle by selecting “INFO”>”RESIN STATUS”. If the display shows “UNIDENTIFIED TAG”, please change to XYZprinting resin bottle.

[collapse]
Error Code 2006

Cause: Unable to resolve the file.

Suggestion:

Slice the file again with XYZware_Nobel. Be sure to select the “Printer Type” according to the printer model used while slicing the file.

[collapse]
Error Code 2007

Cause: File too large.

Suggestion:

Please select a .3wn file, size no more than 200MB.

[collapse]
Error Code 2008

Cause: Non-manifold issue is found in the file.

Suggestion:

Repair the file with 3D model repairing software (such as netfabb, MakePrintable, or 3D Builder) and slice the model with XYZware_Nobel again.

[collapse]
Error Code 2009

Cause: Resin tank is not installed correctly.

Suggestion:

Confirm if the resin tank is installed correctly. If the resin tank is placed correctly, remove the tank, select “INFO”>”SENSOR STATUS” on the printer, touch the resin tank sensor, and see if the status of “T” switches from 0 to 1. If the value doesn’t switch accordingly, then the sensor is malfunctioning. Contact the service center after you have checked the status of the printer.

[collapse]
Error Code 2020

Cause: Printer is busy.

Suggestion:

Wait until the printer finishes current task. If the error persists when the printer is idle, please try to restart the printer.

[collapse]

User Interface

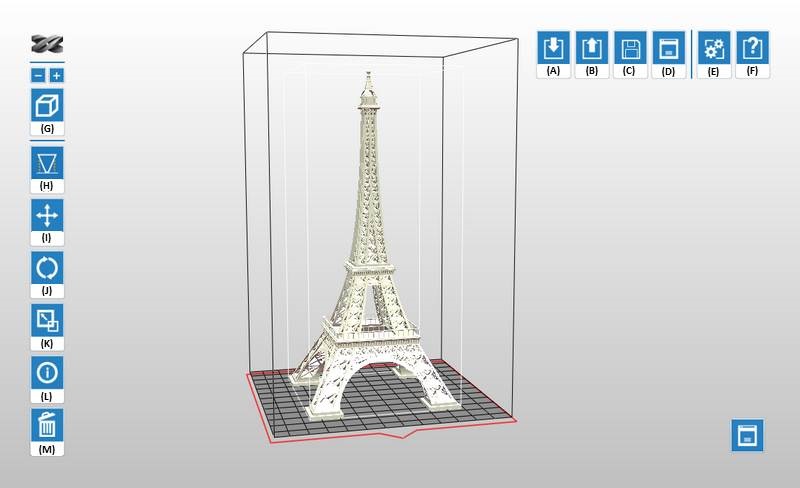
XYZware_Nobel is not only for printing, it also enables basic edits and printer setups. Below is the descriptions of all functions.

(A) Import

Import objects in .stl/.3ws/.3wn format.

Open the file browser and select the files to print.

Note
Only one 3ws or 3wn file is allowed on the workspace.
Tip 
You may also drag the files from a folder into XYZware_Nobel. To load more than one file, press Shift key while selecting the files and drag them into XYZware_Nobel.

(B) Export

Export the objects on the workspace to sliced file in 3wn format. Click here to read the description on each options.

(C) Save

Save as .stl or .3ws file.

Save all objects on the platform to a single stl/3ws file. Any adjustment to the size or placement of the objects will apply to the file.

(D) Print

Setup printing preference and send the objects for printing.

The options are the same as for the Export function. Click here to read the description on each options.

(E) Setting

Setup interface language, display units, printer type, printout scaling, light strength tuning and sign in as XYZprinting member. Click here to read the description on each options.

(F) About

Software and firmware version are displayed here.

To update software or printer firmware, please click in the update/upgrade button in this window. In this section, you can also find the contact information of XYZprinting in different regions.

Tip 
Apply printer firmware and XYZware_Nobel updates when prompt by the software for stable printing performance.

(G) Zoom

Zoom in/out the view.

Zoom in or out the platform to view the details of objects.

Tip
You can also zoom with the scroll wheel on the mouse.

(H) View

Switch views.

Switch views with a click to view objects from different angle.

Tip
You can also drag the mouse to rotate the view.

(I) Support

Add supports to overhangs on the models.

Support structure is required under overhangs. It prevents the falling for gravity and the deforming due to the peeling force during printing, and increases adhesion of the model to the platform. Click here to read more.

(J) Move

Move the object along the x, y, or z axis.

You can move the object by dragging the slider or inputting a value in the field by the slider.

Keyboard shortcut
Press and hold ALT key and drag the mouse to move the object horizontally.

(K) Rotate

Adjust the angle of the object around the x, y, or z axis.

Orientation is one of the keys to a successful print. For models of top-heavy structure, with less contact with the platform, or with any larger solid layer, please rotate the model to reduce the effect of peeling force during build process.

To rotate the model, drag the mouse over the circular slider or input the desired angle in center of the circular slider.

(L) Scale

Scale the object as you desire. The adjustment to the object on the platform will not affect the size of your original file.

To scale up or down the model, input the desired size on X, Y or Z axis, drag on the slider bar, or input the scale ratio directly.

Tip
To resize the whole model, be sure to check "Uniform". Unselect "Uniform" if you wish to make non-uniform scaling.

(M) Info

View info of the object.

You can check the dimension and location of the object in this function. For sliced objects, the info window also shows printing related data, including selected printer type, estimated print time and resin volume.

(N) Remove

Remove the object from the platform.

Select an object and click the option to delete it from the platform.

Keyboard shortcut
You can also press Delete key to remove the selected object from the platform.

(O) Printer Monitor

View printer status, including printing progress and the resin level in the resin cartridge.

“My Printer” window shows the information on the connected printer(s). However, only one connection is allowed. To switch to another printer, click “Connect” button below the target printer.

Note
"Wireless Setting" is only compatible with printer model Nobel Superfine.