Error Codes

Error code: 0007 - unable to locate spool

  • The Mini is unable to read the sensor chip inside of the spool. Using a philips screwdriver, open the white plastic spool and check that the sensor is seated in the the correct position. The sensor chip tracks the amount of filament you have used, and helps to calculate if you have enough to complete the print. When you purchase new filament supplied by XYZprinting, a sensor chip will also be included in the packaging. Without this sensor chip loaded the Mini will not be able to use the filament.

error-0007-02

Error code: 0008 - unable to locate spool

  • The Mini is unable to read the sensor chip inside of the spool. Using a philips screwdriver, open the white plastic spool and check that the sensor is seated in the the correct position. The sensor chip tracks the amount of filament you have used, and helps to calculate if you have enough to complete the print. When you purchase new filament supplied by XYZprinting, a sensor chip will also be included in the packaging. Without this sensor chip loaded the Mini will not be able to use the filament.

error-0007-02

Error code: 0011 - problem with heating

  • There was a problem with the extruder heating. Turn off the Mini and check to see if the extruder connector is securely connected. Restart you printer and retry. If you continue to get the same error, contact the XYZprinting service center for support.

Error code: 0014 - problem with heating

  • There was a problem with the extruder heating. Turn off the Mini and check to see if the extruder connector is securly connected. Restart you printer and retry. If you continue to get the same error, contact the XYZprinting service center for support.

Error code: 0016 - spool not properly installed

  • The Mini is unable to read the sensor chip inside of the spool. Using a philips screwdriver, open the white plastic spool and check that the sensor is seated in the the correct position. The sensor chip tracks the amount of filament you have used, and helps to calculate if you have enough to complete the print. When you purchase new filament supplied by XYZprinting, a sensor chip will also be included in the packaging. Without this sensor chip loaded the Mini will not be able to use the filament.

error-0007-02

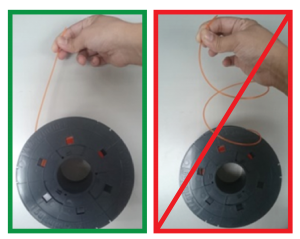
Error code: 0028 - Spool not found

    • Spool may not be installed properly. To reinstall the spool, press Unload Filament then Load Filament in the printer dashboard. If you still get the same error, the Mini might be unable to read the sensor chip inside of the spool. Using a philips screwdriver, open the white plastic spool and check that the sensor is seated in the the correct position. The sensor chip tracks the amount of filament you have used, and helps to calculate if you have enough to complete the print. When you purchase new filament supplied by XYZprinting, a sensor chip will also be included in the packaging. Without this sensor chip loaded the Mini will not be able to use the filament.

error-0007-02

Error code: 0029 - no filament left in spool

    • No filament left in spool. Replace spool and sensor chip before printing. The sensor chip tracks the amount of filament you have used, and helps to calculate if you have enough to complete the print. When you purchase new filament supplied by XYZprinting, a sensor chip will also be included in the packaging. Without this sensor chip loaded the Mini will not be able to use the filament. When you replace the filament be sure to open the white plastic spool with a philliips screw driver and check that the sensor is seated in the the correct position.

error-0007-02

Error code: 0030 - problem with X-axis motor

  • Check that the X-axis motor is connected, then check that the X-axis sensor is in the right position and the connector is plugged in.

Error code: 0031 - problem with Y-axis motor

  • Check that the Y-axis motor is connected, then check that the Y-axis sensor is in the right position and the connector is plugged in.

Error code: 0032 - problem with Z-axis motor

  • Check that the Z-axis motor is connected, then check that the Z-axis sensor is in the right position and the connector is plugged in.

Error code: 0050 - memory error

  • Restart the printer, if the error persists, contact the service center for support.

Error code: 0054 - incompatible extruder module

  • Turn off printer, reinstall compatible extruder module, then restart your printer.If error persists, contact service center.

Unsupported file type

  • XYZware can only print .STL, .3W, and 3WF files. Try re-exporting the file as one of the these types and re-importing it again.

Error code: 020B - cannot detect SD card

  • Open up the back of your machine and check that the SD card is connected.

Error code: 020C - cannot detect SD card

  • Open up the back of your machine and check that the SD card is connected.

Post-printing issues

What should I do if I can’t remove the printed object?

  • Use the supplied scraper to carefully remove the objects from the print bed – insert the scraper between the object and print bed and gradually lift the scrapper.

Printing issues

How to start or stop a print?

  • To start a print, click the print icon on the XYZware main screen, or view this first-time printing video.
  • The da Vinci can be stopped via PC or directly on the machine using the LED button. To stop the machine via PC, open XYZware, click on the Printer monitor icon in the bottom right-hand side of the screen and in the Printer Info window click on the stop icon.

Filament jammed / not coming out smoothly.

  • Cancel your current print, press the LED button on the da Vinci Mini and wait for the print bed to move to the front. The LED button should change from red to pulsing orange.
  • Remove your failed print and press the LED button one more time to return it to green status
  • Close and restart XYZware
  • Open the Printer monitor and click Extruder > Clean nozzle
  • Follow the onscreen instructions to clean your extruder nozzle
  • Nozzle cleaning video

If the filament spool can’t spin freely

  • Check that it is not coiled around the feed module. Filament must be loaded in a certain direction without any tangles, please see the picture below.

Untitled-3-01

Part doesn’t stick to print bed.

  • The distance between the extruder nozzle and the printing bed may not be close enough, attach bed tape and calibrate the da Vinci Mini

If you are still having problems try manually adjusting the Z offset

  • Open XYZware then go printing monitor
  • In the printing monitor go to SetUp → jog mode → home axis → Finished. The extruder will go back to its original position.
  • Move the extruder module to the middle of the print bed using the onscreen buttons.
  • Check if the tape has been scratched or not; if you can fit two A4 pieces of paper between the extruder nozzle and print bed comfortably, press Home axes again to move the extruder back to the initial axis, then proceed to the step below.
  • Go Setting → Z offset to set the Z offset; manually move the nozzle to the middle, the ideal distance between extruder nozzle and print bed should be a snug fit of two standard A4 sheets of paper. Use the Z-offset figures to decrease the gap by 0.1mm increments and click Accept. 

Filament not coming out of the extruder, bed tape is being scratched and shifting position.

  • The distance between the extruder nozzle and the printing bed may be too close, attach bed tape and calibrate the da Vinci Mini.

If you are still having problems try manually adjusting the Z offset

  • Open XYZware then go printing monitor
  • In the printing monitor go to SetUp → jog mode → home axis → Finished. The extruder will go back to its original position.
  • Move the extruder module to the middle of the print bed using the onscreen buttons.
  • Check if the tape has been scratched or not; if the distance between extruder nozzle and the print bed is too close, press Home axes again to move the extruder back to the initial position, then proceed to the step below.
  • Go Setting → Z offset to set the Z offset; manually move the nozzle to the middle, the ideal distance between extruder nozzle and print bed should be two standard A4 sheets of paper. If you cannot fit two pieces of paper between the extruder nozzle and print bed, use the Z-offset figures to increase the gap by 0.1mm increments and click accept.

The printer is making thudding noise when printing

  • Check to see if the noise is originating from the feed module
  • When the feed module makes a noise it is generally because the filament is stuck, and the motor is slipping when trying to extrude the filament
  • Make sure the filament spool can spin freely
  • The extruder module may be jammed, follow this tutorial on how to clean the extruder nozzle 
  • The distance between the print bed and extruder module may be too close – follow the instructions from the previous problem
  • Feed module teeth may need cleaning. Drive gear cleaning video. 

Printer stops mid print

  • Check that your printer power supply is plugged in and that there hasn’t been a power shortage recently
  • Make sure the print file has transferred from your computer to the da Vinci Mini and that the print was started before removing the USB cable. The larger the 3D file the longer the transfer will take.
  • Turn the printer back on immediately and unload the filament to ensure the extruder nozzle hasn’t jammed

The guide tube has come loose inside the feeding tube grip and pops out during printing

  • Overtime the guide tube wears where the feed tube grip connects to it. When this happens we recommend following this trim guide tube tutorial.
  • If the problem persists it may be that the teeth on the feeding tube grip are worn and do not hold the guide grip in place. If this is the case, try replacing the tube grip with the replacement supplied in the packaging.

Setup issues

XYZware displays "Printer Error" after I have clicked print

After a print or if a print fails, you need to return the LED button to its green state

  • If the LED button is red or orange, push it once to make it return to a green state. The printer is now ready to print.

XYZware will not connect to the da Vinci Mini

Ensure the da Vinci Mini’s USB cable is connected to the printer and your computer:

  • Turn on the da Vinci Mini
  • Restart XYZware
  • Click on the Printer monitor and wait for XYZware to automatically detect the da Vinci Mini

If you are still having issues connecting to the da Vinci Mini, try manually connecting:

  • In XYZware click Settings > Printer > Printer type > da Vinci Mini W or da Vinci miniMaker

The print monitor is displaying error code: 0028
  • Check that the filament spool has a white filament spool ring attached to it
  • Put the filament spool on the spool holder to the left-hand side of the da Vinci Mini
  • If the above suggestions do not work, open up the filament spool ring using a phillip screwdriver and check that there is a sensor chip inside.

Image 9

When you purchase new XYZprinting filament, it comes with a NFC sensor chip that you need to load into the filament spool ring before use. This sensor chip tracks the type of filament, how much you have used, and is able to let you know if you have enough to complete the print. Without the sensor chip, the printer will be unable to work.
The da Vinci Mini’s extruder module has been designed to extrude only XYZprinting PLA filament; because 3rd party filaments often jam inside the extruder,  only XYZprinting filament will work with the da Vinci Mini.

Purchase new filament 

Not enough filament alert shown, how do I go back to the monitor page?

The alert is displayed when you have 30% filament remaining, click the button to go back to the main screen.


da Vinci Mini

Dimensions: 400 x 336 x 362 mm
Weight: 8 KG
Print Technology: Fuse Filament Fabrication (FFF)
Print Material: PLA
Filament Diameter: 1.75 mm
Nozzle Diameter: 0.4 mm
Print Dimension: 150 x 150 x 150 mm
Print Resolution: 0.1/0.2/0.3/0.4mm
Connectivity: USB 2.0 (da Vinci miniMaker), USB 2.0/ WiFi (da Vinci Mini w)
Print Software: XYZware
File Format: STL / 3W


FAQ

Filament questions

Does Mini accept ABS filament?
  • Mini is designed for the PLA filament – the use of other filaments may cause the extruder nozzle to jam and result in printer failure.

What is PLA?
  • Polylactic acid or polylactide (PLA, Poly) is a biodegradable thermoplastic aliphatic polyester derived from renewable resources, such as corn starch, tapioca roots, chips or starch, or sugarcane.

Can the filament of all da Vinci series be used with Mini?
  • No, the Mini uses NFC filament designed for only the da Vinci Mini and Junior. This filament can be purchased here.
  • When you purchase new XYZprinting filament, it comes with a NFC sensor chip that you need to load into the filament spool ring before use.This sensor chip tracks the type of filament, how much you have used, and will let you know if you have enough to complete the print. Without the sensor chip the printer will not be able to work.


Hardware questions

What is the size of the Mini's printable area?
  • The Mini can print up 15 x 15 x 15 cm.

How many 3D printers can be connected to one PC?
  • Multiple printers can be connected to one PC, however, XYZware can only send one job at a time.


Other questions

How long is the warranty period?
  • The warranty for the printer is 1 year, the extruder module is under warranty for 90 days.


X-axis adjustment

If you have tried calibrating the Mini and adjusting the Z-axis offset, but you are still having issues. For example, prints won’t stick to the print bed, or the tape on the printing bed has been scratched, we recommend following this guide to adjust your X-axis support.


Connect to a PC, open XYZware, and click on Printer monitor > Setup > Jog mode. Then click Home axes.

Check and make sure the Extruder module has returned to its home position.

Image 001


Move Z-axis up by 10mm.

Image 002


Manually move the extruder module to the right.

Image 003


Open the black cover on the left-hand side of the machine.

Image 004


Take the leveling tool supplied with the da Vinci Mini, and place it on the print bed under the X-axis support.
Image 007


Unloosen the 4 screws manually, but do not take them off completely.

Image 005


In Jog mode, move Z-axis downward by 1mm.

Repeat the above steps until the X-axis support and the leveling tool are flush.Image 006


Check that the leveling tool and X-axis support are in full-contact with each other, then tighten the 4 loosened screws.

Image 008


Remove the leveling tool – X-axis adjustment complete.

Image 010

Trim Guide Tube


Before trimming the guide tube of the da Vinci Mini, you need to unload the filament. Instructions for this can be found in the link below:

Unload filament 


In the printer monitor panel, click Setup > Jog Mode.

Make sure the extruder module has returned to the home position.

Image 001


Remove the guide tube from the feed module.

Push down on the black ring on the feed tube grip and pull out the feed tube.

Image 003Image 004


Remove the guide tube from the extruder module.

Push down on the black ring on the feed tube grip and pull out the feed tube.

Image 005


Prepare the following:

  • Feeding path cleaning wire
  • Diagonal pliers
  • Scissors

Image 006


Insert the feeding path cleaning wire into the guide tube.

Image 007


Use the pliers to cut the guide tube cleanly.

Image 008


Remove the feeding path cleaning wire from the guide and reinstall the guide tube.

Note: If the guide tube is under 50cm, we recommend that you replace it.

Image 009

Clean Feed Module


During filament unloading, if the filament breaks off or gets stuck in the drive gears, you will need to clean the drive gears. Below is a detailed explanation on how to do this.

Push down on the black ring in guide tube connector and remove the guide tube from the feed module.

Image 24


Open the feed module cover.

Image 25


Unloosen the screws on both sides of the cover.

Note: do not remove them entirely from their sockets – you will be tightening them back up shortly.
Image 26


Remove the cover protecting the motor.
Image 27


Clean the left side idle roller and right side motor gear with the brush.
Image 28


If the filament breaks off inside the feed module, or is stuck, push the release arm and remove the broken filament.
Image 29


Reattach the cover protecting the motor, then reattach the screws.
Image 30


Reattached the feed module cover.
Image 31


Reinstall the guide tube.
Image 32